All posts in “Reviews”

This Affordable All-in-One System Is the Perfect Hi-Fi Package

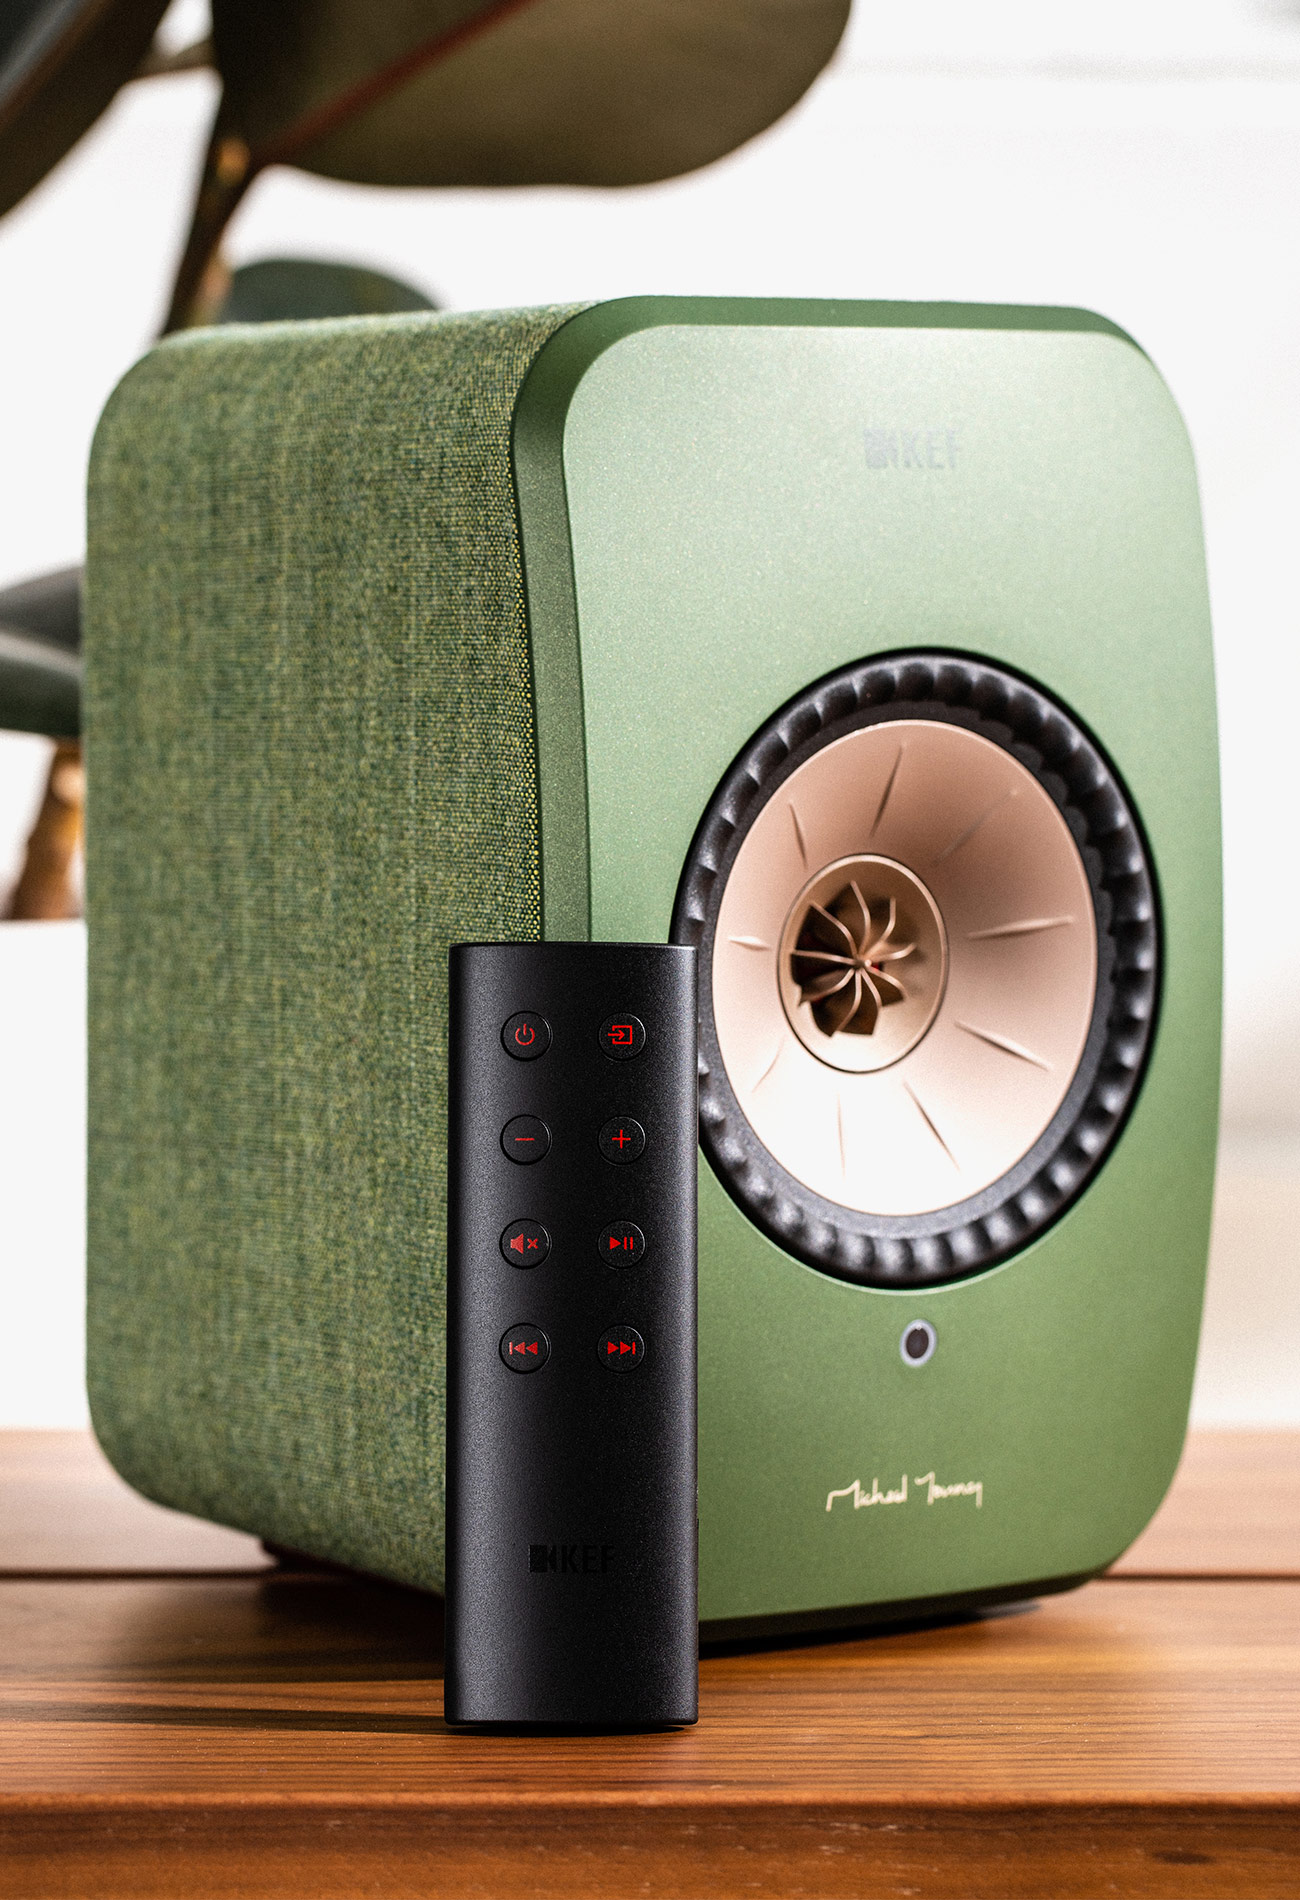
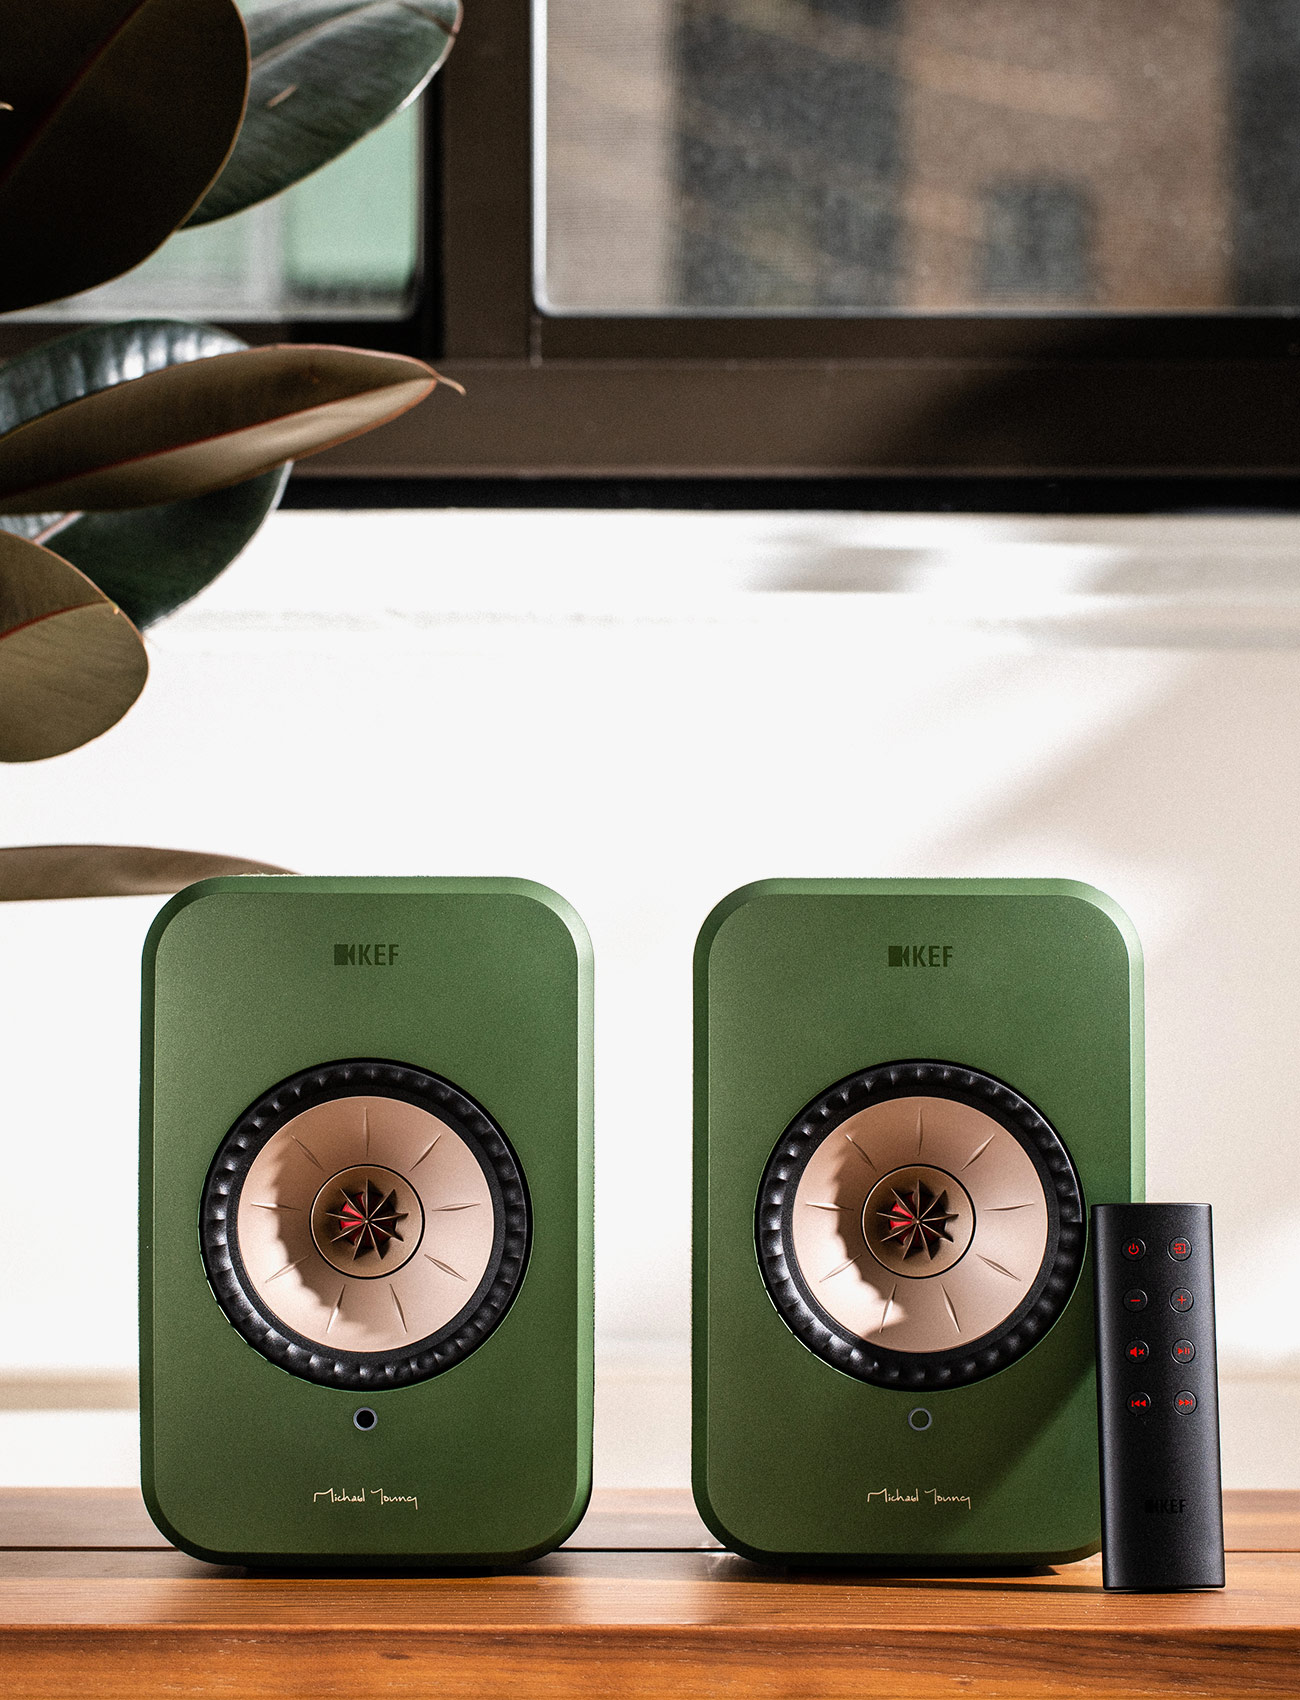
The LSX ($1,100) is KEF’s newest and smallest wireless speaker system. It looks similar to the company’s acclaimed LS50 Wireless ($2,000), which we called the “perfect hi-fi all-in-one speaker system” earlier this year. It’s designed in the LS50’s image too: each speaker is built with the same signature Uni-Q driver, and the system boasts the multitude of connectivity options. You can connect the speakers to your TV (via optical), your turntable (via RCA), your smartphone (via aux) or your computer (via USB). Or you can stream directly to them over wi-fi, through Tidal and Spotify apps, or over Bluetooth.

Essentially, the LSX is the same exact wireless stereo speaker system as the LS50 Wireless, only its speakers are roughly 1/3 the size. The system is less powerful, too. It runs 100-watts per channel rather than 230-watts per channel like the LS50 Wireless, meaning it won’t sound quite as amazing. That said, the LSX is also half the price making it a lot more accessible (and appealing) to most people. Also, unlike the larger LS50 Wireless, the LSX speakers come in playful colors: blue, maroon, olive, white and black.

|

The Good: The LSX delivers exceptional stereo sound, especially considering each speaker’s size. It’s also a convenient all-in-one system, no separate receiver needed. You don’t need any external amplification. These are active and powered speakers that work all on their own. Also, because of their diverse connectivity options, you can use them however you want: as TV speakers, as hi-fi bookshelf speakers or as wireless speakers that you stream from your smartphone, just like you would Sonos speakers. Lastly, AirPlay 2 support is coming in early 2019, so you’ll be able to pair with compatible speakers in a multiroom system.

Who It’s For: An audiophile speaker nerd or somebody just searching for a great stereo sound. Unfortunately, if you have other speakers or an advanced hi-fi system, there’s probably no need to get the LSX system as it’s designed to work all on its own. And, obviously, even though the LSX sounds terrific and is basically half the price of the LS50 Wireless, $1,000+ still isn’t pocket change.

Watch Out For: One main difference between the LSX and the LS50 Wireless, besides size and power, is that the LSX master and slave speakers don’t need to be wired together (via ethernet) to work, meaning you’re not confined to placing them a few feet apart. On the flipside, however, if you choose this wireless option, the audio resolution goes down to 48kHz/24-bit rather than 24-bit/192kHz, which is a sacrifice most audiophiles won’t be willing to make. Then again, you can always have them tethered together, like you can the LS50 Wireless, to sound their best. Lastly, besides being fairly expensive, each LSX speaker still needs its own power source; when wall outlets are at a premium, this can be a bit frustrating.

Alternatives: There’s a scarcity of active and powered bookshelf speakers that are as versatile as the LSX. Obviously, if you’re looking for the ultimate bookshelf speakers – and money isn’t an issue – I’d go for the LS50 Wireless. The Naim Mu-so ($999) system is an excellent alternative. It’s a wireless hi-fi speaker system that supports AirPlay, though it won’t produce the same stereo experience. Another alternative that’s in the same price range is Devialet’s new mono hi-fi speaker, the Phantom Reactor ($999+).

Review: There are two main pillars of the LSX experience: its sound quality and its versatility. I’ll begin with the latter. In the three weeks that I’ve been listening to these speakers, I’ve used them in a variety of ways. I started out using them as wireless streaming speakers – playing through Spotify Connect, specifically – and they were incredibly convenient. Plug them in. Download an app. Connect to wi-fi. And from there, it was basically like using Sonos. I didn’t have to go back into the KEF app – which admittedly isn’t great – I could just play music through the Spotify app. Wonderfully easy.

Then, I hooked them up to my Vizio 4K TV (it’s an M-Series from 2017) via an optical cable and, let me tell you, to say there was a vast improvement in audio quality would be a disservice. Heck, I normally have two Q Acoustics 3020 speakers, which are good entry-level passive speakers, hooked up to an AV receiver and then to my TV. The LSX are so so much better. Watching Interstellar on Blu-ray and hearing Hans Zimmer’s score thumping felt amazing. (Maybe not to my neighbors.)

There’s also an aux port on the back of the master LSX speaker. Recently, I’ve been testing Amazon’s new Echo Input ($35) as well – essentially an Echo Dot, just without a speaker. I’d been using the Echo Input with a Bose Bluetooth speaker, but thought it’d be funny/amazing to hook it up to this LSX. And it worked, basically turning it to the coolest smart speaker system I’d ever heard. There were some caveats, of course: the LSX had to be turned on to play; it wasn’t always on like an Amazon Echo; I wouldn’t actually recommend people using the LSX this way. But, again, it worked.

If I had a turntable or an external subwoofer in my apartment, I could’ve easily connected these speakers to work with either or both. If I had a Sonos Amp, I could’ve used the LSX with my Sonos speakers. The options are kind of endless, especially when you consider that AirPlay 2 support is coming to the LSX in January of 2019. That said, I imagine most people would just listen to these speakers as they are, in all their stereo glory. That’s how I preferred to listen to them.

As good as these speakers sound, and even though they share most of the same tech as the LS50 Wireless, the LSX obviously can’t match the sound of their larger and more powerful sibling. That said, they deliver a fantastic audio experience. The bass is powerful – surprisingly so from speakers this compact. The midrange and treble separation is clear and makes everything feel more warm, balanced and immersive; this is very noticeable when listening to powerful film soundtracks or when streaming audio from Spotify.

Lastly, our editor-in-chief had a bit of a conniption when he saw that I requested the LSX in green — sorry, olive — but, frankly, I test too many white or black speakers. This was fun. This was different. Although, if I had to do it all over again, I think I would’ve gone for the LSX in blue, which looks amazing. (By the way, just before publication, after seeing the photos, he said, “You know, the green is growing on me.”)

Verdict: Frankly, there’s no glaring weakness with the KEF LSX. This system is still fairly expensive, true, but it’s the most versatile, compact speaker system that I’ve come across. You can connect it to your TV or turntable, or stream straight from the Spotify (and soon-to-be Apple Music) app. It’s also so, so easy to use. You don’t have to be an audiophile or tech nerd to really enjoy the LSX. You just have to be somebody who appreciates fantastic stereo audio.

What Others Are Saying:

• “The LSX doesn’t defy the scientific logic of smaller drivers and boxes equalling smaller sound, but that doesn’t feel like a shortcoming, especially considering its soundstage is more expansive than that of its closest rival, the Naim Mu-so.” — Anonymous, What Hi-Fi?

• “There’s no denying that these speakers provide a high level of audio quality, with a warm and balanced sound. Although they are by no means cheap, we think they are a fantastic investment for any audiophile who doesn’t want to clutter their home with huge towers.” — Olivia Tambini, TechRadar

• “Integration from the bottom of the frequency range to the top is excellent – no area sticks out, even though the mid-range – which is effortlessly communicative with the nuance of singers – is worthy particular mention. Low frequencies are low enough – there’s a subwoofer pre-out on the “master” speaker for those who don’t care what the neighbors think – and treble sounds are reasonably crisp. KEF has struck a sensible balance with the tonality of LSX: it has reasonable levels of attack, but never threatens to run away with itself or lose control..” — Simon Lucas, Trusted Reviews

Key Specs

Drivers: 4-inch Uni-Q driver
Frequency Range: 49Hz – 47kHz
Power: 100-watts per channel
Max Volume: 102dB
Resolution: up to 24-bit/192kHz (wired); up to 48kHz/24-bit (wireless)
Connectivity: wi-fi, Bluetooth
Inputs: 3.5mm jack, Toslink Optical, ethernet
Colors: white, black, olive, blue, maroon
Weight: 7.7 pounds (slave) and 7.9 pounds (master)

|

KEF provided this product for review.

Read More Gear Patrol Reviews

Hot takes and in-depth reviews on noteworthy, relevant and interesting products. Read the Story
Note: Purchasing products through our links may earn us a portion of the sale, which supports our editorial team’s mission. Learn more here.

2019 Ford Ranger Review: Ford Takes Aim at the Tacoma

The 2019 Ford Ranger pickup truck marks the Blue Oval’s return to the midsized pickup segment for the first time in over a decade. Going up against the crowd-favorite Toyota Tacoma, the Ford Ranger is positioned as less of a utility truck and more of an everyday recreational vehicle.

The Good: For a midsized pickup truck, the 2019 Ford Ranger is relatively refined. Ford did the Ranger a huge favor and channeled into the midsized newcomer what customers love most about the ever-popular Ford F-150 Raptor. That’s not to say the Ranger is a hardcore, off-road monster like the Raptor, but the Ranger is expected to be put to work as a recreational truck. It has plenty of weapons in its arsenal too: a 10-speed transmission, four different drive modes for varying terrain and a 7,500 lbs towing capacity are present regardless of the trim level purchased. Boasting that kind of equipment as standard is a big advantage in the affordable truck arena.

Who It’s For: Ford recognizes the outdoors lifestyle crowd loves midsized trucks for their size and everyday livability; the Ranger doubles down on that knowledge. As evidenced by an accessory list packed with Yakima products like bed racks, a canoe carrier and rooftop tents, Ford is clearly aiming squarely at the adventure and recreational off-roading customer: the heart of Tacoma territory.

Watch Out For: Ford is fairly confident in its 2.3-liter Ecoboost inline-four engine and 10-speed automatic transmission combination – so much so that it’s the only engine optional available. Regardless of the trim level and cab style you choose, you get the same power. That’s a deal if you opt for the absolute base model, but if you spring for the top-rung Lariat SuperCrew 4×4 — a $12,000 premium — nothing changes under the hood.

Alternatives:
Toyota Tacoma ($25,550 base)
Chevy Colorado ($20,500 base)
Nissan Frontier ($18,990 base)

Review: Take one look at any full-sized truck currently rolling down the road and it’s easy to understand why midsized pickups are making a comeback. Ford’s own F-150, the Chevrolet Silverado and (Dodge) RAM are so gargantuan you’d think their owners might need a Commercial Driver’s License to go grocery shopping. The sheer size of these mass-market Mack trucks is becoming too much for the average person, and buyers who want a big truck just for the sake of having a big truck are becoming scarce. Not only do midsized trucks navigate crowded parking lots and dense traffic more easily, but drivers can also take them down trails and go off-roading on the weekends without stressing about losing a wing mirror or creasing a fender when a turn is tight. Moreover, the “adventure lifestyle” movement is on the rise; vehicle shoppers want to know their next car or truck can take them as far as they want to go. Ford knows this, which is why the Ranger is aimed squarely at the outdoor community — it’s gunning for Tacoma territory with gusto.

Before I even arrived to test the new truck it was wildly obvious what sort of customer Ford has in its sights: an ‘off-road experience’ was on the second day’s itinerary. Outside our hotel Ford had spelled out ‘Ranger’ using camping gear, cut up mountain bike tires, kayak paddles and all manner of other adventure gear. It seemed Ford’s marketing team had gotten carried away with the #lifestyle vibe, but after putting the Ranger to task on long stretches of highway, tight canyon roads and repeated laps through an off-road course, Ford’s new midsized pickup takes what the Tacoma does well and does it better.

The Tacoma is not a bad truck at all. My colleagues and I have driven the Tacoma many times, and we’re definitely all huge fans — it does everything you ask of it on-road and off. In fact, when it comes to midsized pickups with off-roading capabilities, there has been zero competition up until recently: one-horse races are the easiest to win, no matter the horse. However, in 2019 Chevy brought the formidable Colorado ZR2 AEV edition to market, and now that the Ford Ranger FX4 joins the fight it’s already looking like the Tacoma pales in comparison.

One reason the Ford Raptor has such a massive fan club is it’s insanely competent off-road. Between its transmission, suspension and power delivery, it’s in a class of its own. While there’s no Ranger Raptor (yet), the 2019 Ranger gets the same 10-speed automatic transmission, four-wheel-drive system with locking rear differential and off-road driving modes you’ll find on the F-150 Raptor. Whether it was going through loose dirt up a steep incline littered with obstacles, rounding bankings with 20 degrees or more of lateral incline or plowing through door-handle-high mud pits, the Ranger seemed planted and unphased.

Helping the Ranger over hills and through axle-twisting moguls are Ford’s Terrain Management and Trail Control systems. Terrain management offers four different drive modes: normal; grass, gravel and snow; mud and ruts; and sand. Like any other drive mode system, it modifies suspension settings, transmission shift points and how aggressively the torque goes to each wheel at any given time. Trail Control acts as cruise control on steep inclines and declines. Again, this is nothing new for the off-road world, but the way it’s put to work in the Ranger feels more refined and smoother than the Tacoma.

Refined. That word kept coming to mind throughout my drive. The Ranger handled itself off-road and down the highway in a more sophisticated manner than the Toyota does. I’m not saying the Ranger pickup would give a Mercedes a run for its money, but for a pickup truck in the $30,000 range, you’re getting your money’s worth in terms of all-around capability. There are (mostly industry standard) driver’s aids like a lane departure alert system that faintly buzzes through the steering wheel. The materials used throughout the Ranger’s interior make the Tacoma feel more like a rental. In the world of off-roading, an easy-to-clean interior is a big help – the Ford never feels fancy, and I wasn’t exactly overcome with guilt when I tracked some mud inside, but it didn’t feel plastic-y or cheap.

If the superior off-road handling, max towing capacity of 7,500 lbs or a maximum payload of 1,860 lbs isn’t enough to convince you Ford wants customers to actually use this truck, the accessory list might be. It’s full of over 20 Yakima add-ons like a bed rack and roof-top tents to accompany them, tow hitch-mounted bike racks and roof racks that fit paddle boards and kayaks. It’s the extra mile Ford went to set up the Ranger as an adventure-ready truck that puts it ahead of the Toyota in my book.

Verdict:
When Ford puts real energy and passion into a project, they can knock it out of the park – some other notable hits include the F-150 Raptor, Focus RS, Ford GT, not to mention that whole “winning Le Mans in 1966, ’67, ’68 and ’69” thing. On that same token, when Ford pumps out a car out for the sake of hitting sales numbers, it can be excruciatingly disappointing. Look no further than the Focus Active, or almost anything from with a Blue Oval Badge from the ’80s, to see my point. Thankfully, Ford recognized the rising enthusiasm for exploring the outdoors and channeled that energy into the Ranger.

The off-road community is a difficult crowd to pull one over on — if your truck shouts about its rock-crawl cred but turns out to be garbage when the pavement stops, they’ll let you know. The Tacoma has earned its reputation for being a fantastic truck off-road partially due to its skilled marketing team, but mostly because the community embraces its simplicity and capability. It’s is a genuine benchmark. So when I say the Tacoma is in danger of losing its crown to the new Ford Ranger, it’s not a knock against the Toyota. It’s high praise for Ford.

Key Specs

Engine: 2.3-liter Ecoboost Inline-four
Transmission: 10-speed automatic with manual shifting mode
Horsepower: 270 horsepower
Torque: 310 ft-lbs
Max Tow: 7,500 lbs
MPG: 21 City/26 Highway

Ford hosted us and provided this product for review.

Read More Gear Patrol Reviews

Hot takes and in-depth reviews on noteworthy, relevant and interesting products. Read the Story
Note: Purchasing products through our links may earn us a portion of the sale, which supports our editorial team’s mission. Learn more here.

2019 Porsche Cayenne Review: A Proper Porsche, and One You’ll Pay For

The Cayenne is Porsche’s larger mid-size luxury SUV. For its third generation, the self-described “sports car for five” has gotten lighter, faster, and more performance-inclined to distinguish itself from external competitors and similar internal competitors like the Audi Q8 and the Porsche Macan S.

The Good: Porsche designed it. Quick for an SUV. Excellent balance and low center of gravity. Responsive steering. Intuitive transmission. Notably comfortable front seats.

Who It’s For: Affluent SUV buyers who want Porsche cachet and performance. Perhaps a one-car Porsche enthusiast whose kids have outgrown the 911’s rear seat.

Watch Out For: Engine noise underwhelms. Standard suspension feels tight. The option tree gets pricey and borderline exploitative.

Alternatives: Other high-end European performance geared SUVs in this general price range include:
Range Rover Sport ($67,050, base)

Audi Q8 ($67,400, base)

BMW X5 ($60,700, base)

Review: The thing about driving a Porsche around Napa for a day is you can’t describe it as work. Social mores mandate at least a knowing smirk when you say that. We all know why. Porsche means premium, precisely engineered, and damn near perfect. When Porsche needed to redefine the Cayenne for its third generation (and differentiate it from its Audi Q8 cousin using the same MLB platform and engine) the answer was to play up just how much of a Porsche this midsize SUV is.

Porsche made the Cayenne more athletic. The SUV has gotten lighter (down 120lbs) from the last generation. The new 3.0L Turbo V6 in the base model generates more power (+35hp) and torque (37lb-ft) than the last model. Getting lighter, more powerful, and having the driving dynamics improved makes it faster. Every iteration of the Cayenne will do 0-60mph in under six seconds.

Porsche wants the Cayenne to look more like a Porsche. Truth be told, it looks similar to Gen 2. But, Porsche wants the wide shoulders to remind you of the 911’s characteristic, much fawned over back end. The new Cayenne also incorporates a number of performance features from other Porsches. It has staggered front and rear wheels, replacing the predecessor’s square alignment. It can be fitted with rear axle steering and launch control. The Cayenne will be the first Porsche fitted with proprietary Porsche Surface Coated Brakes (PSCB). These deliver most of the benefits of ceramics, cost much less, and leave a boss mirror finish.

Upping the Porsche quotient (surprise, surprise) produces an engaging SUV to drive. The Cayenne is quick. It is well-balanced. The steering is responsive. It has a low center of gravity and an impressive amount of grip. The transmission intuits what the driver wants seamlessly. It’s a keen corner taker. It behaves when bottled up behind a Subaru on a two-line highway. About the only criticism is the engine note which was either too mild or too mild to puncture the noise canceling glass.

Rest assured. Porsche did not go full-on “SAV” here. The Cayenne is still an SUV. The grab bag of Porsche sports car features available did not include the PDK transmission, because Porsche believes its 8-Speed Tiptronic is better for off-roading and towing. The Cayenne has multiple off-road terrain settings. The closest we got to testing them was ducking into a scenic roadside lookout for pictures.

The Adaptive Air Suspension is worth the expense. The standard one felt very tight and unforgiving on our morning tester with 21-inch wheels. The air suspension gives a smoother and more composed ride. Even when the car is being pushed, the copilot can settle into a notably comfy front seat for a post-lunch snooze.

I would lean toward taking the PSCB brakes as well. I found them too touchy starting out at slow speed. I missed how easily they stopped the car when I didn’t have them. The standard brakes are adequate. The PCSBs, as they should be for the cost, are better and look cool.

I didn’t futz with the infotainment system too much. The Cayenne has dual customizable 7-inch displays behind the wheel and a 12.3-inch tablet screen in the center. The design was clean. Menu progression was natural. I wish the big screen had been angled toward the driver slightly more.

Where the Cayenne offers the truest Porsche experience is when you reach for the checkbook. Porsche makes nearly everything, including many features most luxury cars would make standard, options. Those options get expensive in a hurry. Embark with me on a quick configurator journey.

Let’s add the air suspension ($4160) and the PSCB brakes ($3490). The latter require you to upgrade to at least 20 inch wheels ($1720 minimum). That alone is approaching $10,000. You probably want adaptive cruise control ($2000) and lane change assist ($950) on your kid transporter. Sunroof? That’s an additional ($1850). Want your car to remember your seat settings ($1900) and heat up during the winter? ($530 for just the front).

Does the performance stuff intrigue you? The Sport Chrono package for launch control and sport plus driving mode ($1130) is a must have. There’s the rear-axle steering ($1650) Do you plan to use your Cayenne for SUV stuff? That will be an additional off-road package ($2000) and tow rig ($660). Yeah, I dig that Biscay Blue Metallic paint ($800) too. This stuff only scratches the surface of the customization options.

Our lightly outfitted, base model tester vehicles were pricing out north of $80,000 for what, reminder, is the third best engine you can have in a Cayenne. That price tag factors into the perception. The Cayenne provides a great drive for an SUV. It’s an all-around, capable, and fun car. It’s recognizable as a Porsche. It’s more than a profitable placeholder in the Porsche lineup. But, an $80,000-plus or more car should have some outstanding quality that makes that expenditure feel justified. However improved or formidable, the Cayenne in the base trim doesn’t.

The Cayenne will be more than enough SUV for most buyers. Porsche will sell a number of them. The cachet from that Porsche emblem alone will keep many Cayenne customers happy. It better, because they are paying a steep premium for it.

Verdict: The Cayenne is a proper Porsche. It’s top notch engineering. It performs just about every task well. It will be more than enough for most buyers. But, a near $90,000 car, SUV or no, should give you the giggles. It should have one exceptional quality that excites you about spending that much money. The Cayenne didn’t.

What Others Are Saying:

• “It took Porsche 53 years to sell a million 911s. Porsche has sold 770,000 Cayennes in the 15 years since it was launched in 2002, and the millionth will probably be built in about three years. As much as we love and cherish the sports cars from Stuttgart, Porsche in the 21st century is the house that the Cayenne SUV built.” – Tony Quiroga, Car and Driver

• “If you’re willing to pay the premium, though, the new Cayenne delivers precisely what cargo-hauling Porsche fanboys consistently insist they want: an SUV that satisfies the sport part of the equation while offering a level of functionality and people-moving they can’t get in a 911 or 718. – Basem Wasef, Autoblog

2019 Porsche Cayenne Key Specs

Engine: 3.0L Turbo V6
Transmission: 8-Speed Tiptronic
Horsepower: 335hp
Torque: 332lb-ft
Weight: 4,377 lbs
0-60: 5.6sec (with Sport Chrono package)
Top Speed: 152mph

Porsche hosted us and provided this product for review.

Read More Gear Patrol Reviews

Hot takes and in-depth reviews on noteworthy, relevant and interesting products. Read the Story
Note: Purchasing products through our links may earn us a portion of the sale, which supports our editorial team’s mission. Learn more here.

This Is the MacBook to Buy Right Now

The second generation of the MacBook Air was a game-changer when it launched in 2010. Portable, relatively affordable and powerful (enough) – it was the perfect MacOS laptop for most consumers. However, Apple did little to evolve its much-beloved laptop for the better part of a decade, and two years ago, when Apple released a completely redesigned MacBook Pro that was thinner and way more powerful, many thought that the end was near for MacBook Air line. But thanks to consumer demand (and dwindling sales of its personal computers), Apple revived the MacBook Air ($1,199+) and overhauled it with a Retina display, a thinner and lighter design, 8th-generation Intel processors and a host of other features like USB-C ports and even Touch ID.

The Good: The 2018 MacBook Air is a huge hardware refresh on the old MacBook Air. It’s 10-percent thinner and a quarter pound lighter. It has a higher-resolution Retina display with significantly smaller bezels, an upgraded keyboard, a larger Force Touch trackpad, and it has Touch ID, so you can unlock the laptop with your finger. Additionally, it’s powered by Intel’s newest 8th-generation dual-core processor.

Who It’s For: It’s perfect for basically everybody other than creative professionals with intense computing demands, such as graphic designers, photographers, audio professionals or app developers. Think of this as the right MacOS laptop for most people, especially students.

The new MacBook Air retains its famed wedge-shape, yet it’s 10 percent thinner and a quarter pound lighter than the old MacBook Air. It also comes in gold.

Watch Out For: It only has two ports, both USB-C Thunderbolt, so you’ll likely need to purchase several dongles. The loss of the SD card slot, in particular, will be tough to accept for anyone who has appreciated the convenience of offloading photos on the older model. For a lot of people, especially those who don’t rely on cloud-based storage, the base MacBook Air with 128GB of storage also probably won’t be enough. This means you’ll want to consider the model 256GB, which will also drive the price up to $1,399 and that isn’t cheap.

The MacBook Air’s customized 8th generation Intel dual-core Y series processor is likewise still less powerful compared to the quad-core U series processors found in many competing laptops, and in general, it’s important to remember that you can get more for your money if you go with a Windows laptop (see below for alternatives). As with any Apple computer, you’re paying a little extra for the premium build quality and the MacOS operating system.

Is the lesser processor a deal-breaker? Probably not for most people, but would be easier to swallow slightly slower speeds if the new Air’s starting price of $1,199 was closer to the previous generation’s $999 sweet spot. Just don’t be shocked to hear the MacBook’s fan spin up in a quiet room if you’ve got tons of browser tabs open or are performing other labor-intensive CPU tasks.

Alternatives: The Dell XPS 13 ($930+) and Microsoft’s new Microsoft Surface Laptop 2 ($999+) are similarly spec’d alternatives that cost less and have a touchscreen. On the MacOS side, you can go for the similar-yet-more-powerful 13-inch MacBook Pro ($1,299+) or the smaller, less powerful and more expensive MacBook ($1,299+).

The new MacBook Air has the same exact port situation as the 13-inch MacBook Pro: two Thunderbolt 3 (USB-C) ports.

Review: Anybody in the market for a laptop running MacOS with modern features such as a high-resolution screen only had two options for several years. The MacBook ($1,299+), is still Apple’s thinnest and lightest laptop, but it’s also very underpowered, especially relative to its cost, making the MacBook an impractical choice for anyone looking for a primary computer to handle more than just email and casual web browsing. Alternatively, the 13-inch MacBook Pro ($1,299+), is a bigger and heavier option with a significantly better Retina display and more computing power for the same price

Now the 2018 MacBook Air finally fills an obvious gap in Apple’s lineup, striking the same balance of portability and performance that made the previous generation a runaway hit. Its essentially now the perfect computer for anyone looking for a MacOS laptop for “normal” things, like browsing the web, drafting documents, answering emails, watching movies or even occasional work in Adobe’s creative suite.

A Retina display on the new MacBook Air. Some dreams do come true.

It’s a little bit funny; actually, I’d consider myself as the perfect candidate for Apple’s new MacBook Air. As a writer and journalist, my job is a constant balance between drafting stories and answering emails. I’ll occasionally have to take photos and then upload them, sure, but most of the extensive photo editing work on Photoshop and Lightroom I leave to our designers. This is why two years ago when I was looking to replace my five-year-old MacBook Pro, I was particularly interested in reviewing the 2016 MacBook Pro sans Touch Bar. It was thin, beautiful and powerful (maybe too much for my needs), and it wasn’t too expensive – in my review I ended up calling it “Apple’s secret weapon.” Looking back, I still agree with that statement, but it was really because the 2016 MacBook Pro was the closest thing to what the MacBook Air should’ve been.

I ended up buying a 2016 MacBook Pro and have used it for the better part of two years. I love it. After using the new MacBook Air for the last four days (that’s all the time we were given before review embargos were allowed to lift), however, the similarities are stark. I wouldn’t say I’ve got regrets, but if this MacBook Air was around two years ago, this would’ve been the laptop I would have chosen. Hands down.

Touch ID is a welcome addition to the MacBook Air. No password required. Just press your finger.

Yes, it has a less powerful processor, but the reality is that the 2018 MacBook Air and my current MacBook Pro aren’t too dissimilar. And for what I use a computer for – working in Google Docs, WordPress and browsing Chrome – I didn’t notice any difference. They have virtually the same 13-inch Retina display (although the MacBook Pro’s display has a little better max brightness). They look very similar, although the new MacBook Air is thinner and looks more svelte thanks to its wedge form factor. And they have the same two USB-C Thunderbolt charging ports and a headphone jack. Actually, in a few cases, the MacBook Air is better than my MacBook Pro. It has Touch ID, for example, so it’s even easier unlocking the laptop (no password required), and if you use Apple Pay, it’s easier for that too.

On paper, the battery life of the new MacBook Air is another a distinct advantage worth mulling over by anyone torn between other Mac laptop options. Apple says the revamped machine can provide up to 2 extra hours of web browsing compared to either the MacBook Pro or MacBook, which is a massive boon for those on go. In our early real-world testing, we found the Air’s battery lasted between seven and eight hours, which still compares favorably to the roughly 5 hours we tend to get from the recent MacBook Pro, though it’s still noticeably less time than the 12 hours claimed by Apple. Lowering the screen brightness to the same 75% mark used in Apple’s battery usage test would probably extend run time further, but we also found that the Air’s slightly dimmer screen needed to sit at a higher setting than the MacBook Pro to be used comfortably in average lighting conditions. We’ll make sure to update this review with more thoughts on battery life after extended use.

Quibbles aside, this laptop will undoubtedly feel like a night-and-day upgrade for those still clinging to an older MacBook Air. It’s 10 percent thinner and a quarter pound lighter. It has a bigger and Force Touch trackpad. It has louder stereo speakers. It has the same second-gen Butterfly keyboard as the latest MacBook Pros. It’s decked out with two USB-C/Thunderbolt 3 ports, one of which can be used to power a 5K external monitor.

The Retina display on the new MacBook Air is way higher resolution than the mid-2013 model: 2560 x 1600 versus 1440 x 900.

Verdict: With the 2018 MacBook Air, Apple’s has finally answered the demands of its customers. Though it’s nowhere near as game-changing as the previous generations were and unfortunately slightly more expensive, the new iteration is still perfectly positioned as a capable and beautifully built mass-market laptop for anyone who loves using MacOS. It takes many of the same great features of its 13-inch MacBook Pro sans Touch Bar and puts them into a thinner laptop that’s also cheaper (albeit slightly less powerful). If you’re looking for a fully fledged Mac laptop for typical personal or work needs and hoping to spend less than $1,500, you can’t go wrong with the new MacBook Air.

Key Specs

Display: 13.3-inch Retina display
Processor: 1.6GHz dual-core Intel Core i5
Graphics: Intel UHD Graphics 617
Battery: up to 12 hours, up to 30 hours
Storage: 128GB, 256GB, 512GB or 1.5TB SSD
Memory: 8GB, configurable up to 16GB
Ports: two Thunderbolt 3 USB-C
Weight: 2.75 pounds
Key features: Touch ID
Finish: gold, silver, space gray

Apple provided this product for review.

Read More Gear Patrol Reviews

Hot takes and in-depth reviews on noteworthy, relevant and interesting products. Read the Story
Note: Purchasing products through our links may earn us a portion of the sale, which supports our editorial team’s mission. Learn more here.

2019 Porsche Cayenne Review

The Cayenne is Porsche’s larger mid-size luxury SUV. For its third generation, the self-described “sports car for five” has gotten lighter, faster, and more performance-inclined to distinguish itself from external competitors and similar internal competitors like the Audi Q8 and the Porsche Macan S.

The Good: Porsche designed it. Quick for an SUV. Excellent balance and low center of gravity. Responsive steering. Intuitive transmission. Notably comfortable front seats.

Who It’s For: Affluent SUV buyers who want Porsche cachet and performance. Perhaps a one-car Porsche enthusiast whose kids have outgrown the 911’s rear seat.

Watch Out For: Engine noise underwhelms. Standard suspension feels tight. The option tree gets pricey and borderline exploitative.

Alternatives: Other high-end European performance geared SUVs in this general price range include:
Range Rover Sport ($67,050, base)
https://www.landroverusa.com/vehicles/range-rover-sport/index.html
Audi Q8 ($67,400, base)
https://www.audiusa.com/models/audi-q8
BMW X5 ($60,700, base)
https://www.bmwusa.com/vehicles/x-models/bmw-x5/overview.html

Review: The thing about driving a Porsche around Napa for a day is you can’t describe it as work. Social mores mandate at least a knowing smirk when you say that. We all know why. Porsche means premium, precisely engineered, and damn near perfect. When Porsche needed to redefine the Cayenne for its third generation (and differentiate it from its Audi Q8 cousin using the same MLB platform and engine) the answer was to play up just how much of a Porsche this midsize SUV is.

Porsche made the Cayenne more athletic. The SUV has gotten lighter (down 120lbs) from the last generation. The new 3.0L Turbo V6 in the base model generates more power (+35hp) and torque (37lb-ft) than the last model. Getting lighter, more powerful, and having the driving dynamics improved makes it faster. Every iteration of the Cayenne will do 0-60mph in under six seconds.

Porsche wants the Cayenne to look more like a Porsche. Truth be told, it looks similar to Gen 2. But, Porsche wants the wide shoulders to remind you of the 911’s characteristic, much fawned over back end. The new Cayenne also incorporates a number of performance features from other Porsches. It has staggered front and rear wheels, replacing the predecessor’s square alignment. It can be fitted with rear axle steering and launch control. The Cayenne will be the first Porsche fitted with proprietary Porsche Surface Coated Brakes (PSCB). These deliver most of the benefits of ceramics, cost much less, and leave a boss mirror finish.

Upping the Porsche quotient (surprise, surprise) produces an engaging SUV to drive. The Cayenne is quick. It is well-balanced. The steering is responsive. It has a low center of gravity and an impressive amount of grip. The transmission intuits what the driver wants seamlessly. It’s a keen corner taker. It behaves when bottled up behind a Subaru on a two-line highway. About the only criticism is the engine note which was either too mild or too mild to puncture the noise canceling glass.

Rest assured. Porsche did not go full-on “SAV” here. The Cayenne is still an SUV. The grab bag of Porsche sports car features available did not include the PDK transmission, because Porsche believes its 8-Speed Tiptronic is better for off-roading and towing. The Cayenne has multiple off-road terrain settings. The closest we got to testing them was ducking into a scenic roadside lookout for pictures.

The Adaptive Air Suspension is worth the expense. The standard one felt very tight and unforgiving on our morning tester with 21-inch wheels. The air suspension gives a smoother and more composed ride. Even when the car is being pushed, the copilot can settle into a notably comfy front seat for a post-lunch snooze.

I would lean toward taking the PSCB brakes as well. I found them too touchy starting out at slow speed. I missed how easily they stopped the car when I didn’t have them. The standard brakes are adequate. The PCSBs, as they should be for the cost, are better and look cool.

I didn’t futz with the infotainment system too much. The Cayenne has dual customizable 7-inch displays behind the wheel and a 12.3-inch tablet screen in the center. The design was clean. Menu progression was natural. I wish the big screen had been angled toward the driver slightly more.

Where the Cayenne offers the truest Porsche experience is when you reach for the checkbook. Porsche makes nearly everything, including many features most luxury cars would make standard, options. Those options get expensive in a hurry. Embark with me on a quick configurator journey.

Let’s add the air suspension ($4160) and the PSCB brakes ($3490). The latter require you to upgrade to at least 20 inch wheels ($1720 minimum). That alone is approaching $10,000. You probably want adaptive cruise control ($2000) and lane change assist ($950) on your kid transporter. Sunroof? That’s an additional ($1850). Want your car to remember your seat settings ($1900) and heat up during the winter? ($530 for just the front).

Does the performance stuff intrigue you? The Sport Chrono package for launch control and sport plus driving mode ($1130) is a must have. There’s the rear-axle steering ($1650) Do you plan to use your Cayenne for SUV stuff? That will be an additional off-road package ($2000) and tow rig ($660). Yeah, I dig that Biscay Blue Metallic paint ($800) too. This stuff only scratches the surface of the customization options.

Our lightly outfitted, base model tester vehicles were pricing out north of $80,000 for what, reminder, is the third best engine you can have in a Cayenne. That price tag factors into the perception. The Cayenne provides a great drive for an SUV. It’s an all-around, capable, and fun car. It’s recognizable as a Porsche. It’s more than a profitable placeholder in the Porsche lineup. But, an $80,000-plus or more car should have some outstanding quality that makes that expenditure feel justified. However improved or formidable, the Cayenne in the base trim doesn’t.

The Cayenne will be more than enough SUV for most buyers. Porsche will sell a number of them. The cachet from that Porsche emblem alone will keep many Cayenne customers happy. It better, because they are paying a steep premium for it.

Verdict: The Cayenne is a proper Porsche. It’s top notch engineering. It performs just about every task well. It will be more than enough for most buyers. But, a near $90,000 car, SUV or no, should give you the giggles. It should have one exceptional quality that excites you about spending that much money. The Cayenne didn’t.

What Others Are Saying:

• “It took Porsche 53 years to sell a million 911s. Porsche has sold 770,000 Cayennes in the 15 years since it was launched in 2002, and the millionth will probably be built in about three years. As much as we love and cherish the sports cars from Stuttgart, Porsche in the 21st century is the house that the Cayenne SUV built.” – Tony Quiroga, Car and Driver

• “If you’re willing to pay the premium, though, the new Cayenne delivers precisely what cargo-hauling Porsche fanboys consistently insist they want: an SUV that satisfies the sport part of the equation while offering a level of functionality and people-moving they can’t get in a 911 or 718. – Basem Wasef, Autoblog

2019 Porsche Cayenne Key Specs

Engine: 3.0L Turbo V6
Transmission: 8-Speed Tiptronic
Horsepower: 335hp
Torque: 332lb-ft
Weight: 4,377 lbs
0-60: 5.6sec (with Sport Chrono package)
Top Speed: 152mph

Porsche hosted us and provided this product for review.

Read More Gear Patrol Reviews

Hot takes and in-depth reviews on noteworthy, relevant and interesting products. Read the Story
Note: Purchasing products through our links may earn us a portion of the sale, which supports our editorial team’s mission. Learn more here.

These Cheap Speakers Are The Perfect Upgrade For Most TVs

Roku TV Wireless Speakers ($200) are the company’s first-ever audio product and they’re designed to work with Roku smart TVs, and only Roku smart TVs. This means they’re compatible with hundreds of TVs made by the likes of TCL, Insignia, Sharp, Hisense, Philips and others; as long as the TV runs Roku’s smart operating system, these speakers will work with it. (Although they are not compatible with Roku streaming sticks.)

Their selling point is simple: most modern televisions are too thin to have good built-in speakers — in fact, most modern TVs, especially “budget TVs” (which most Roku smart TVs tend to be), have such poor speakers that dialogue is hard to make out and bass is near non-existent – these speakers, which are easy to install, are an inexpensive upgrade. There’s no need to deal with a receiver or wires, as these speakers will connect to your TV over wi-fi; just plug them in and your TV will detect them. Click through a few menu screens and you’re done — setup takes less than a five minutes. These speakers are the easiest and cheapest way to upgrade your Roku TV’s audio.

The Roku TV Wireless Speakers were just released this past November and for a limited time you can get them for $180. The deal runs through 12/31.

The Good: The difference these speakers will make to your Roku smart TV is significant. They feature two drivers (one 0.75-inch tweeter and one 3.5-inch woofer) and deliver solid stereo sound as well pretty decent bass, and it’s a big upgrade from the natural audio that’s baked right into most Roku smart TVs. They’re incredibly easy and quick to set up, and you don’t have to deal with any wires. Finally, price: they’re cheaper than other similar-quality soundbars or a combo of bookshelf speakers and a receiver.

Who It’s For: Anybody who owns a Roku TV and wants a seamless, relatively inexpensive way to improve its audio quality.

Watch Out For: These speakers don’t play well with other TVs or speakers. These speakers were flat-out not work with smart TVs that don’t have a Roku operating system – Android TV, WebOS, Tizen OS or Fire TV, for instance. They will not work with Roku streaming sticks. You can’t integrate them into a larger system with other speakers – even if they’re also Roku speakers – or a subwoofer. This is a 2.0 system and that’s it – no way to convert it into a surround sound system. And they don’t support the latest immersive technologies, such as Dolby Atmos.

Alternatives: There aren’t any other bookshelf speakers or soundbars that work as seamlessly with Roku smart TVs. And there really aren’t many speakers that are cheaper. A few weeks ago I reviewed the Soundcore Infini soundbar ($100), a surprisingly good soundbar considering its really cheap price. But Roku’s speakers deliver way better stereo sound.

Review: The fact that Roku’s first speakers only work with Roku smart TVs should neither come as a surprise nor hamper your opinion of them, especially since a lot of people have Roku smart TVs. A rep at Roku told me that as of Q3 2018, “more than one in every four smart TVs sold in the U.S. was a Roku TV.” That’s a ton of TVs. Even more impressive, it doesn’t matter if the TV in question is one of TCL’s new 6-Series models, which are beautiful 4K HDR TVs, or a TV that’s several years old — as long as it’s a Roku smart TV, these speakers will work with them.

I own a Roku smart TV that’s made by Sharp. It’s neither a 4K TV nor huge, but I tested these Roku speakers with it and the upgrade in audio quality was clear. I watched a few movies, like Mowgli and Sicario, but I mainly watch soccer and football games on my TV, and the sound was clearer, more dynamic, more immersive and just better overall.

Even though they’re designed to work exclusively with Roku smart TVs, these speakers aren’t entirely walled off from your other gadgets. They do have built-in Bluetooth, so you can stream audio from your smartphone, tablet or computer. The catch is, to set it up, you have to do some navigating in the TV’s settings and it’s not as straightforward as connecting to, a Bluetooth speaker. The speakers also work with Spotify Connect, so you can “discover” them just by opening the Spotify app. For me, this was the easiest way to play music — I’m a Spotify Premium subscriber — but the only caveat was that Spotify Connect requires the TV to be, as it displays things like the track name and the album cover art. The TV can be off when listening to Bluetooth, but again, that wasn’t as easy for me as Spotify Connect.

In general, Roku’s first speakers are pretty straightforward. Their only real “wild card” quality is voice control. The speakers come with two remotes: a Roku voice remote, which is the same one that comes with most new Roku smart TVs, and a new Roku Touch remote. While pressing the mic button on each you can ask the TV to switch inputs, open apps or search for certain shows, which is nice, but voice search won’t work with your cable box. (You can’t order the TV to “open ESPN” if you’re watching Fios, for example.) And when playing music on Spotify, you can’t use voice control to play songs or change playlists. You still have to go through the app on your smartphone or tablet. Basically, Roku’s smart search features are limited, and not as capable as voice assistants like Google Assistant or Alexa.

It’s important to remember that these won’t be the best sounding speakers you’ve ever heard — they only cost roughly $200, after all. If I were to be overall critical, I’d say their bass is relatively weak and you don’t get quite the separations you’d get from higher quality bookshelf speakers, such as Q Acoustics Concept 20s or Audioengine A5+. But then again, these don’t promise to be the best speakers you’ve ever heard. They just have to be better the speakers built into your Roku smart TV. And that they definitely are.

Verdict: Roku’s first speakers are limited, but that’s not a bad thing. They know what they are – stereo speakers for your Roku smart TV – and they’re really good at it. Audio quality is a big upgrade over your TV’s speakers. Whereas in the past you’d probably have to spend $300+ on a soundbar, you can get a comparable sound quality upgrade, with even better stereo separation, for around $200.

Bottom line: if you own a Roku smart TV, old or new, and you want to upgrade its sound system without spending a lot and without making things overly complicated, Roku’s first speakers are a no-brainer buy.

What Others Are Saying:

• “For an inexpensive and relatively small pair of satellites, the Roku TV Wireless Speakers offer very solid performance, with some slight volume-scaling quirks.” — Will Greenwald, PC Mag

• “While a Vizio soundbar may be harder to set up and slightly lower cost, this Roku system also includes two voice remotes enhancing the use of your Roku TV and overall presents a better value to those looking for a wireless audio upgrade.” — Linda Moskowitz, TechRadar

• Roku’s speakers won’t be the right choice for everyone (or anyone without a Roku TV), and some features — voice controls, especially — need to get better. But they’re a massive improvement over the awful built-in speakers on Roku TVs, which sound lifeless and frequently make dialogue hard to understand. If you’re tired of that and want to give shows and movies the audio they deserve with minimal fuss, Roku’s option starts to make a lot more sense.” — Chris Welch, The Verge

Key Specs
Drivers: one 0.75″tweeter, one 3.5″ woofer
Connectivity: Roku, Bluetooth
Weight: four pounds each
Remotes: two, one Roku TV Voice Remote and one Roku Touch tabletop remote

Roku provided this product for review.

Read More Gear Patrol Reviews

Hot takes and in-depth reviews on noteworthy, relevant and interesting products. Read the Story
Note: Purchasing products through our links may earn us a portion of the sale, which supports our editorial team’s mission. Learn more here.

These Are the Best-Sounding True Wireless Earbuds, Bar None

When it comes to true wireless earbuds, I’ve been less than impressed with a lot of them. From the B&O E8 to the Erato Verse, the Zolo Liberty to Apple AirPods, I haven’t actually been sold on any of them. (I’m a Pixel 3 guy, so AirPods don’t have the same effect.) That’s because if the sound quality was great, then the connectivity was flaky or the app was clunky. And if the connectivity was great, the sound quality was lacking. No truly wireless earbud I tested hit that Goldilocks zone. That was until I tested Sennheiser’s first true wireless earbuds, the Momentum True Wireless, which blew me away. Though, for $300, they probably should.

The Good: The biggest selling point for the Momentum True Wireless is their incredible sound quality. For a truly wireless earbud, they are unmatched. But for me, the good hardly stops there. They are also the only earbud we’ve tested that rivals the quick-pairing capabilities of Apple’s AirPods. The case is slim (though not as slim as others), and is wrapped in a textured gray fabric that feels surprisingly luxe. The earbuds themselves fit snug and don’t feel as weighty and bulky when in-ear as they look.

Who They’re For: If you’re in search of truly wireless earbuds with the best possible sound quality, stop your search here. They work well in office settings, and while commuting or traveling, thanks to a transparent hearing mode that lets in ambient noise and can be toggled on and off.

Watch Out For: The biggest hurdle, and really the only thing to watch out for, is the price. At $300, they are certainly at the tippy top of the market for true wireless earbuds. For context, AirPods cost roughly half of what these are going for, and many people think AirPods are to expensive. That said, the price tag is certainly in the realm of many over-ear headphones with comparable sound quality. Some reviewers have noted that the touch controls on either earbud can be unintuitive, but I found that once I knew what to do, it was easy to control volume, pause/play and skip to the next track.

Alternatives: In terms of price and sound quality, the most comparable alternative is Bang & Olufsen’s E8 Wireless earbuds ($299). They are similarly sized, have a competitive sound quality and offer a lot of the same features. Another, cheaper option would be Optoma’s NuForce BE Free8 ($149). They are the only other earbud to offer aptX low latency support.

Review: As far as I’m concerned, these are the best-sounding true wireless earbuds you can buy. Bar none. AirPods don’t really come close. Neither do the Jabra Elite 65t. If sound quality, noise isolation and comfort are important to you, the Momentum True Wireless earbuds should be your earbuds of choice.

In testing, they were easy to set up and pair with my Google Pixel 3 and my MacBook Pro. In fact, once they were initially paired with each device, connecting to my phone and computer was the fastest I’ve experienced from any Bluetooth device. And once connected, the signal was strong and hardly encountered any interference or characteristic popping and cutting out that I’ve experienced with other true wireless earbuds when my phone is in my back pocket.

The sound quality was clear and slightly warm (a characteristic that Sennheiser is known for). The bass was there, without making your teeth chatter, and treble and mid tones were clear and consistent. I listened to a wide range of music as well as podcasts and was impressed by the Momentum’s performance throughout. And if you happen to come across a particular song that doesn’t sound quite right, or if the out-of-the-box sound profile doesn’t quite work for you, the Sennheiser Smart Control app also you to access an equalizer to tweak things. It also gives you to battery levels on each earbud as well as the transparent hearing mode that amplifies ambient noise.

The Verdict: When I first listened to the Momentum earbuds, their sound shocked me. In the best possible way. And then when I saw their price, that shocked me as well. That said, after spending two weeks with them, I the Momentum earbuds could replace each headphone in my current rotation — including my Bowers & Wilkins P5 on-ear headphones. They hit everything I’m looking for in a wireless headphone, minus perhaps gesture support for control on the earbuds, but I’m willing to overlook that thanks to the stellar sound quality.

Key Specs
Battery life: 4 hours
Charging port: USB-C
Compatibility: Android 7.0 and up; iOS 11.0 and up
Water-resistance: IPX4

Sennheiser provided this product for review.

Read More Gear Patrol Reviews

Hot takes and in-depth reviews on noteworthy, relevant and interesting products. Read the Story
Note: Purchasing products through our links may earn us a portion of the sale, which supports our editorial team’s mission. Learn more here.

10 of the Best Motorcycles We Rode in 2018

The Magazine

Let us take you on a journey of the world. Each issue of the Gear Patrol Magazine comes packed with adventures, guides and stories exclusive to the magazine. Stunningly designed, printed on high quality stock and ready for your coffee table. Biannual. $39.

The Newsletter

Get GEAR PATROL in your inbox with the DISPATCH, including Today in Gear and all our new stories. Daily, 5pm. Free.

Salomon Shift Review: The Most Innovative Ski Binding Ever

Skiers who want to explore terrain beyond resort boundaries have forever faced a quandary: do they want it badly enough to buy a second pair of skis, boots and bindings specifically for touring? The cost alone is a tough pill to swallow, and for a novice who might only go into the backcountry a handful of times per season, it can be downright obstructive.

But touring bindings are designed to be light, so they don’t offer the safety and security of those intended for downhill. The compromise has been frame bindings like Marker’s Duke or Salomon’s Guardian that essentially position a full downhill rig onto a platform with a release that frees the system to pivot off the toe for uphill travel. The rather hefty downside is that with every step a skier must lift the entire weight of boot and binding, and that can take a toll over 3,000 feet of vertical.

Salomon’s answer is the S/Lab Shift MNC binding. It’s designed with a dual-purpose toe piece that transforms from a fully-certified alpine mode to a pin-equipped uphill form with the action of a lever, and it means that skiers can have their powder and eat it too, inbounds and beyond.

The Good: It’d be easy to get tangled in the binding’s highly-technical details, but the key innovation is the toe piece. It uses pins for uphill travel and transforms with a lever into an alpine binding for downhill skiing. The toe piece isn’t only more versatile; it’s also fully-certified with a DIN range that goes up to 13, so it’s remarkably safer than backcountry bindings too. Additionally, the Shift is Multi-Norm Compatible, which means it can accommodate all certified types of ski boot soles (many alpine bindings won’t accept a touring sole).

Who It’s For: The Shift’s transforming toe makes it equally suitable for those who spend half their time out-of-bounds as it is for skiers who may only go touring once or twice per year. The binding’s downhill performance is so good that it’d be a fine option for skiers who might never use its touring function (although better options exist). Perhaps, more than anyone else, it’ll be travelers who benefit most from the binding’s capabilities — instead of hauling two setups for the resort and the backcountry, they can now build one kit that’ll work everywhere.

Watch Out For: Transitioning the binding between modes is intimidating at first — the binding requires a few more steps than familiar backcountry models– but anyone who’s previously used a touring binding will get the hang of it after one or two tries. Weight-conscious skiers will compare it to products from Dynafit and others and decry its 865-gram heft, but remember that those don’t offer the same level of safety or downhill performance as the Shift. Comparatively, the Guardian MNC 16, Salomon’s previous frontside/backside frame binding, weighs in at 1,495 grams. If you want anything lighter than the Shift you’re back to looking at traditional pin-toe touring bindings.

Alternatives: There are no true alternatives to the Shift, but there are a few other bindings that come close. Marker’s Kingpin ($649) is lighter and has a full alpine heel but not an alpine toe. Fritschi’s Tecton ($650) has an alpine-style heel as well, but it’s even lighter. The tradeoff in weight savings is that neither of these alternatives offers the same boot compatibility or downhill security as the Shift.

Review: The allure of backcountry skiing is clear: no crowds, untouched snow, unexplored terrain. But for those who have only experienced skiing with an aided ascent — be it from a chairlift, helicopter or snowcat — trudging uphill with the aid of special touring bindings and climbing skins can seem like a self-inflicting sort of activity. Why spend hours huffing out a sweat in the cold for one or two short-lived runs when a lift can bear six times the amount of fruit for no labor at all? One might also ask, “Why travel at all when you can Google pictures of any place on Earth?”

Ski touring is enjoyable in the same way as hiking. It’s social (but doesn’t have to be), meditative and, in addition to views, provides the reward of a well-earned descent. Besides, outdoor companies produce a full range of apparel and equipment designed specifically for the task — it doesn’t have to be uncomfortable. But it does call for some extra purchases to be made.

The pivoting motion needed to walk up a mountain calls for a specific set of bindings. As mentioned earlier two main options here (although a handful of unique alternatives do exist): ski bindings that fasten at the toe with two lateral pins that hold touring-specific ski boots pincer-style, and frame bindings, which essentially put a downhill setup onto a platform that can be unlocked to free the heel. The former is ideal for climbing but not the best option for skiing inbounds at a resort while the latter handles both well but neither perfectly.

Years ago, when I was just beginning to get into backcountry skiing, my attempt to reconcile these differences left me paralyzed; neither seemed optimal and despite working three jobs, I couldn’t afford two full setups. What I wanted was the best of both worlds without sacrificing performance in either venue. I was half a decade ahead of the available equipment but unbeknownst to me, Salomon was already two years into the development of the Shift.

The binding was only released this year, but last December Salomon invited me and a faction of ski journalists out to Alta, Utah for an early look at it. The evening of our arrival, we gathered in one of the historic Rustler Lodge’s conference rooms to learn about all that went into the creation of the Shift. A lot went into that — it has 300 parts, uses a new carbon-infused plastic, went through many iterations over seven years of development — but I’m going to focus on how it works.

It works great. The following morning we set out for Alta’s Collins lift — stepping into the Shift when it’s in alpine mode is just like entering any downhill binding — rode it to the top zoomed across fresh corduroy and ducked a rope (with the blessing of our guides). A few short pitches later and it was time to transition into uphill mode. This process, which to me appeared quite complicated during the conference room demo the night before, is actually quite easy. Flip down the middle part of the toe piece and two touring pins shoot up; pull back the lever that rests in front of the heel piece; press down on the toe piece lever in order to spread the pins to slide the boot in; pull that same lever up to lock the toe piece; stomp down with the heel to lock the brakes up and out of the way. Okay, re-reading that, it does sound complicated, but it isn’t. Actually, in many ways, I found the shift easier to operate than other touring bindings, despite an extra step or two.

We trekked our way through a mix of trees and closed groomed trails with a combination of switchbacks and head-on assaults up steep terrain. On the uphill, the Shift performs as any other touring binding does. In its “default” state, it provides two degrees of climbing aid, and it also has a 10-degree riser for use on steeper slopes. That’s it though, and while other bindings might offer seven- and 13-degree climbing aids, Cody Townsend and Chris Rubens, two professional skiers who played critical roles in the development of the Shift, justified this decision aptly: “If you’re on your third riser you’re climbing too steep.” (Also, it’s notably easier to flick up the 10-degree riser on the Shift with a ski pole than any other touring binding I’ve used.)

Transitioning back to downhill mode is a simple reverse operation of the process described earlier. And skiing the binding, well that’s like skiing any other alpine binding. I usually make a slightly more calculated descent when using touring bindings and remain semi-conscious of them throughout the ride, but after I got used to the idea that these were alpine bindings, I was able to ski freely. We skied fast groomed runs for the rest of the day and executed as many G-forces-inducing turns and hit as many side trail kickers as were available.

Years ago, the cost associated with buying two separate sets of gear for inbounds and out-of-bounds skiing was enough that I resigned myself to life skiing and easy-access backcountry zones. When I needed a touring setup, I either borrowed or rented one. After the trip to Alta last year Salomon let me keep the bindings for continued testing. I’ve put a full season on them at this point and haven’t run into any issues on the uphill, downhill or transitions that might make them a deal breaker for any particular type of skiing. In fact, because it’s so versatile, the binding has become my go-to for any trip; regardless of the terrain, conditions or whether I’ll spend more time going up, or down.

Verdict: In the S/Lab Shift, Salomon has created the most versatile ski binding available. It isn’t the lightest touring binding or the burliest alpine binding, but with the capacity to go uphill with pins and downhill without, and the capability to work with nearly every type of ski boot, neither of those superlatives matter — the Shift is more adaptable than anything else and doesn’t sacrifice any functionality, or safety, to get there.

What Others Are Saying:

• “To be able to go uphill in a binding that I like as much as a Kingpin, then go downhill on a binding that has the same DIN certification and same/similar power transfer as a good alpine binding… this binding is ticking all of the boxes — for me.” — Jonathan Ellsworth, Blister Review

• “My criticisms were minimal. My gratitude for what this binding is to my skiing moving forward was plenty, as the Shift sets a new standard for alpine bindings and touring compatibility.” — Julie Brown, Powder

• “The toepiece provided power transmission similar if not equal to that of a true alpine binding, allowing me to ski fast, confidently and without concession. From steep, fall line turns to quick-reaction maneuvers in the trees of Lower Rustler, the binding performed as advertised. Both Townsend and Benoit Sublet, the Alpine Binding Product Manager on the SHIFT project, were tossing backflips left and right using these bindings. If the engineer behind the product has enough confidence to stomp inverted tricks on them, the proof is decidedly in the pudding.” — Donny O’Neill, Freeskier

Key Specs

Weight: 865 grams (with brakes and screws)
DIN Range: 6-13
Climbing Risers: 2 and 10 degrees
Boot Sole Compatability:
Available Brake Widths: 100, 110, 120mm

Salomon provided this product for review.

Read More Gear Patrol Reviews

Hot takes and in-depth reviews on noteworthy, relevant and interesting products. Read the Story
Note: Purchasing products through our links may earn us a portion of the sale, which supports our editorial team’s mission. Learn more here.

Google’s Pixel 3 Is Revolutionizing Low-Light Photography

When Google launched the Pixel 3 earlier this fall it came with heaps of expectation, most of which was centered around its camera. Its predecessor, the Pixel 2, featured what had been considered the best smartphone camera you could buy, even beating out the newer iPhone XS and Galaxy S9. The Pixel 3 promised a significantly better camera system. Well, months later, it’s clear that Google wasn’t lying. The Pixel 3 is by far the best smartphone camera of 2018 – check out our latest camera comparison, here – and most of its new features (Top Shot, Super Res Zoom, Photobooth, Motion Auto Focus), which sound like gimmicks, turned out to be anything but.

That said, the Pixel 3’s potentially coolest feature, Night Sight (another gimmicky name), wasn’t available at launch. Designed to revolutionize low-light and nighttime photography, at the smartphone’s launch event Google showed off photos of the Pixel 3 using Night Sight – the results were almost too good to be believed. Even without Night Sight, we found the Pixel 3 to take the best low-light photos of any smartphone already. Now that Night Sight has rolled out via a software update to all Pixel 3s – as of mid-November – they’re able to take photos that the Pixel 3, like all other smartphones, simply could not.

|

What Is Night Sight? Night Sight is a setting built into the Pixel 3’s camera app that captures really detailed photos even when you’re in poorly lit locations. Normally in such situations, the camera would call for a long exposure, which in turn would require a flash or for you to keep your hand really still (or have a tripod). The magic of Night Sight is that it eliminates the need for most of that. You still need to stand still for up to six seconds when taking a Night Sight photo, but the camera will automatically detect small movements like your shaking hand and, thanks to Google’s superior artificial intelligence, eliminates flaws to produce a clear, well-lit photo.

How Does It Work? All the latest smartphones use some form of high dynamic range (HDR), which is a special image processing technique. It enables the camera to capture a burst of frames, all at different exposures, and then align and merge them together into one high-contrast photo. Google’s own version of this, called HDR+, is unique because it’s also able to cancel out unwanted noise, such as handshake or motion, thanks to what Google calls “zero shutter lag (ZSL).” Here’s how it works: right when you open the camera app, it starts capturing frames and then when you hit the shutter button, it takes the most recent frames, combines them and then processes them through the Pixel 3’s normal HDR+ algorithm.

With Night Sight, the camera doesn’t utilize ZSL, which limits the exposure time of each frame, and thus it doesn’t immediately start capturing frames when you open the camera app. Instead, Night Sight relies on “positive shutter lag (PSL)”, which starts capturing frames when you hit the shutter button. But it captures frames that can each feature longer exposures than the individual photos that you capture with HDR+. “When in Night Sight, the Pixel 3 can take up to 15 photos,” said Alexander Schiffhauer, a product manager of computational photography at Google. “The total exposure time can be up to six seconds in Night Sight versus HDR+ where the total exposure time is much slower.” This is also why the Night Sight function prompts you to hold the camera still for up to six seconds – it needs to capture frames with longer exposures and know exactly when to start capturing them.

It should be noted that all previous generations of Pixel smartphones are now able to use Night Sight, however, the results aren’t equal. The Pixel 3 has a superior processing engine that allows it to use a feature called Super Res Zoom, which helps it capture stabilized zoomed-in photos. While the Pixel 2 and first-gen Pixel run multiple frames in Night Sight through the HDR+ algorithm, the Pixel 3 runs its frames through Super-Res Zoom algorithm. The algorithm was developed for super-resolution and works to reduce noise, according to Google’s blog post, and produces better results for nighttime scenes.

The Good: Night Sight works with both the rear-facing and front-facing camera, and it generally feels like a game changer for low-light and nighttime photography: a simple software upgrade that allows the Pixel 3 to capture photos that only very few, very expensive dedicated cameras could possibly achieve. No other smartphone comes close to achieving the same levels of sharpness and exposure. Not the iPhone. And not any other Androids. And it’s the feather in the Pixel 3’s cap, only further cementing it as the clear best smartphone camera you can buy right now.

Who It’s For: Anybody who wants to take better photos in near dark and standard low-light situations. Plain and simple.

Watch Out For: Night Sight is currently limited to its own mode; it doesn’t work with ‘portrait” mode, panoramas or videos, for example. One of the biggest hurdles is that to work really effectively Night Sight needs the environment to be pretty darn dark. A second hurdle is ensuring your subject is in focus. Night Sight uses the Pixel’s Motion Focus feature, but Motion Focus doesn’t work super consistently if it’s really dark; it’s not uncommon for Night Sight to experience “focus failure” or focus on the wrong thing.

Review: It’s important to stress is how easy Night Sight is to use. It’s built directly into the camera app, so you can quickly access it and, other than holding the shutter button down a little longer, you don’t really have to do that much different than you would when taking a normal photo. Moreover, the app will suggest using Night Sight if it’s dark enough. It essentially does all the work for you.

Is Night Sight perfect? No. As I mentioned above there are two common issues. One, it needs to really dark — but not pitch black — for Night Sight to look really great (and make you, the photographer, feel like some kind of nocturnal animal or covert marine). If it’s not dark enough, the photos still look decent but overexposed, and I just generally preferred the natural contrasty nature of the normal HDR+ photo. And two, especially when capturing objects or people, Night Sight sometimes had problems with focus or focusing on the right person. That said, Night can and will work in a bunch of different settings and scenarios. I used it in a bunch – you can check out the results below – to varying degrees of success.

Night Sight: Example #1

Google-Pixel-Night-Sight-Gear-Patrol-Glass-Slide-1
Google-Pixel-Night-Sight-Gear-Patrol-Glass-Slide-2

This glass of water was taken in a dark room with some soft light coming in from the window. The original HDR+ photo does a good job capturing shadows and contrast, but the details of the glass and water — which I tapped to focus on – weren’t as detailed. With Night Sight, some of the shadows on the table are lost, but in general, it does an excellent job of exposing the photo, especially on the glass and water as well as the wall and plant behind it. This is one of the scenarios where Night Sight works best.

Night Sight: Example #2

Google-Pixel-Night-Sight-Gear-Patrol-Tucker-Slide-1
Google-Pixel-Night-Sight-Gear-Patrol-Tucker-Slide-2

These two photos were taken in a near-dark studio. Considering the conditions, I thought the normal HDR+ photo did an alright job of actually making me feel visible. I took the same photo with my iPhone XS and it was basically black. That said, it’s still not really a useable photo. It’s blurry and dark and pretty much all the details of the subject are lost. With Night Sight, however, it’s (figuratively) a night-and-day difference. It looks basically like the photo was taken in a well-lit room. You can make out details on my face, hair, body and the room itself. It’s truly impressive.

Night Sight: Example #3

Google-Pixel-Night-Sight-Gear-Patrol-Flatiron-Slide-1
Google-Pixel-Night-Sight-Gear-Patrol-Flatiron-Slide-2

In these photos of the Flatiron Building, you can definitely tell the difference between the HDR+ and Night Sight photos. The sky and buildings are way more exposed in the Night Sight photo, but it also looks a little blown out. Night Sight wasn’t working as well as I would’ve hoped simply because it wasn’t dark enough. Even though it was after 9:00 pm and very dark, the Pixel 3’s camera picked up too many of the street lights and light from the surrounding buildings.

Night Sight: Example #4

The three photos here are all selfies, taken with and without flash, and then with Night Sight. It was almost completely dark in the room, which you can see in the non-flash HDR+ photo. Though it’s really more interesting to look at the Night Sight photo and compare it against the photo with flash, a combination that other phones with Night Sight would likely use in such a scenario. Yes, the face is more illuminated with flash, but a lot of its natural colors are lost, and so are the objects in the background. Night Sight does an alright job here, butmy face doesn’t appear as in-focus as I’d like.

Night Sight: Example #5

Google-Pixel-Night-Sight-Gear-Patrol-Stuytown-Slide-1
Google-Pixel-Night-Sight-Gear-Patrol-Stuytown-Slide-3

These two photos are further evidence that it’s difficult finding a truly dark outdoor place to photograph the city. It’s almost 10:00 pm and very dark, but the street lamps are brightening up the scene. Both photos do a good job at capturing lens flare, but you can see how the Night Sight captures everything else way more. You can see the individual branches in the trees and more detail in the fence and buildings.

Further Reading: Night Sight is an advanced feature that requires a Pixel smartphone and a crazy amount of software and image processing. Google has published a very detailed blog post that breaks down the intricacies of how Night Sight works and how more professional photographers can use it to its fullest potential in a manual mode. You can read the blog post, here.

What Others Are Saying:

• “Whatever wizardry Google has used to make Night Sight, it has our full recommendation. This is a serious addition to the Google Pixel camera – a feature that can seemingly turn the darkest of shots into light-filled masterpieces. Yes, it’s using AI and algorithms, but when the quality of the shots are this good, we aren’t going to argue.” – Marc Chacksfield, Digital Camera World

• “Every aspect of Google’s Night Sight is dynamic and automatic. If the phone detects that a scene is dark enough, it’ll surface a suggestion to try night mode, you tap on that, and then it mostly takes over from there. The only controls offered to the user are tap-to-focus and the usual exposure slider. You can’t tell the camera how many frames you want it to capture or set your own shutter speed.” – Dieter Bohn, The Verge

|

Read More Gear Patrol Reviews

Hot takes and in-depth reviews on noteworthy, relevant and interesting products. Read the Story
Note: Purchasing products through our links may earn us a portion of the sale, which supports our editorial team’s mission. Learn more here.

The 2018 KTM 690 Enduro Will Leave a BMW GS In Its Wake

The 2018 KTM 690 Enduro is a middleweight dual sport bike aimed at riders looking to move on from dirtbikes or smaller enduros or dual sports. Comparatively, it’s a step up in performance from all three. Because of its on-road/off-road abilities, the KTM could even be considered a high-performance adventure bike. This particular 690 Enduro is tuned by Solid Performance.

The Good: Whether this bike is taking on highway blasts, cutting up single tracks and fire trails or wading through deep sand pits, it’s incredibly balanced. Power and torque seem endless, and there’s always enough twist no matter where you are in the rev range.

Who It’s For: Riders who’ve outgrown their smaller enduros or dirtbikes and want to upgrade. On the other hand, the 690 Enduro also positions itself as a bike for adventure riders who are looking to downsize from a bigger ADV bike in order to attack tighter trails since there’s less weight to wrestle.

Watch Out For: This isn’t an all-out adventure bike, equally suited to on- and off-road work. It’s much happier on the trails than on the road. If the weather turns for the worst, faster highways stints become tougher to handle given there’s no windscreen and no creature comforts you’d find on the bigger bikes.

Review:
Dual sport and enduro motorcycles are designed partially to tackle tight and twisty single track trails, dubious mud bogs, challenging sand pits and demanding highspeed fire trails. They’re also meant to cruise long bursts on paved roads and highways in between off-road stints. The Pine Barrens 500 then, is the perfect stage for the KTM: a three-day, 500-mile mix of all the terrain mentioned above. Throw in a nor’easter on the second day and you’ve begun to imagine the setting for my ‘stress-test.’

I’ve never trained for a ride like this before, but the way the PB500 necessitated it. I attended the Pine Barrens Adventure Camp with a borrowed Solid Performance-tuned KTM 690 Enduro in part to polish up my off-road skills and get used to the terrain, but also to familiarize myself with the bike. After all, I would be spending nearly 500 miles riding through some of the most gnarly off-road riding South Jersey has to offer.

‘Eye-opening’ is the best way to describe the first day of the Pine Barrens 500. The first few miles are pure pavement that gives way to slightly sandy dirt roads, all of which can be taken sitting down and relaxed. Reach the forest, however, and the Jeep trails are dotted with mud pits – you’re forced to skirt their edges, not knowing how deep the they might be in the middle. The trail narrows and the endless chain of four-foot-high whoops start; these are moguls for dirt bikes. My thighs are on fire, and it’s not even close to lunchtime.

Thanks to Solid Performance, the KTM came better prepared than me. The 690 was set up with a tuned WP suspension (Solid Performance’s specialty), PHDS Handlebar Mounts to mitigate vibrations and ease wrist and shoulder stress, Enduro Engineering Hand Guards to fend off any branches, protecting the controls from damage. Underneath SP fitted a thicker-than-stock PowerParts Skid Plate for defense against downed trees and rocks hiding in ruts. However, the real head turner is the combination of the Akropovic slip-on muffler, KTM Evo Kit Air Box Cover and fuel-remapping. The bike benefits from a boost in power and torque, plus weight reduction and better throttle response. Give the Enduro a hearty twist of throttle you’d think there’sn a .50-cal tailgunner along for the ride.

Whether I was dancing on the pegs, tipping the 690 from side to side, dodging trees or riding straight over the downed ones, the bike consistently felt nimble and predictable. Through the sand, even when deep divots and ruts caught me out, sending the bike to one side or the other, the light 690 could rein it back in. On the same trails, we were passing BMW R 1200 GS after R 1200 GS – some laid over, others struggling to shift their weight across the sand pits. My full face helmet hid my smug smile well. If there was ever an argument that bigger adventure bikes can be overkill, this was it.

On trails crowded with trees and branches imposing on personal space and littered with tight turns is where a bike like the 690’s strengths should live. A light, single cylinder bike on knobby tires should be awful on the open stretches of pavement connecting the trails. At a certain speed, vibrations, wobbling and a sense of instability tell every one of your senses you should back off, but the 690 Enduro tracked straight as an arrow. Some might say the bike was rock steady even at triple digit speeds.

Of course, the highway is where traditional big adventure bikes still hold an advantage. After riding through pouring rain on the second day of the event, the challenging trails were enough to keep my body temperature up; once we hit the open road, with no windshield, heated grips or massive fairings to break up and deflect the wind, the chill started to win the battle. We couldn’t get to the next trail fast enough.

Verdict:

If you’re outgrowing or out-riding your current dirt bike or dual sport, the KTM 690 Enduro is worth a serious look. Likewise, if you’re looking for a smaller bike to complement your big ADV-tourer, the 690 will feel featherweight by comparison. An entire day or more on the trails is a blast with the 690. It’s lightweight enough that you don’t get exhausted wrestling it through dense forest or deep sand and, if you do end up on your side, it’s less of strain to stand back up by yourself. Quite different than a 600lbs-plus BMW GS. If you’re looking to tackle more miles on pavement than dirt, though the 690 will happily take a tank and saddlebags, it’s best to leave the long hauls for the bigger ADVs.

2018 KTM 690 Enduro Tuned by Solid Performance

Engine: 690cc Single-Cylinder
Transmission: 6-speed
Horsepower: 67 horsepower @ 7,500rpm (stock)
Torque: 50 ft-lbs @ 6,000rpm (stock)
Weight: 309 lbs
Top Speed: 100 mph (stock)
Price: $8,749 (base)

Solid Performance and KTM provided this product for review.

Read More Gear Patrol Reviews

Hot takes and in-depth reviews on noteworthy, relevant and interesting products. Read the Story
Note: Purchasing products through our links may earn us a portion of the sale, which supports our editorial team’s mission. Learn more here.

Roomba i7+ Review: This Is the Best Robot Vacuum You Can Buy. Period.

Though less revered than Dyson, iRobot, makers of the genre-defining Roomba robot vacuums, is no less dominant.

By way of quiet and fairly confusing tech advances (and videos of pets mounting them), the Roomba has come to define the robot vacuum. They’re priced from $300 to $950, all Roomba modelsdesigned for the time-deficient (or somewhat lethargic) homemaker, but none are quite so advanced or expensive as iRobot’s latest: the Roomba i7+.

Its fact sheet of features and functions is long and impressive, but is it any better than what’s already out there? I ran it through my Brooklyn apartment close to a hundred times to find out.

The Good: The i7+ is the only robot vacuum cleaner that’s ever been able to empty itself. It does so on a reasonably sized black command center called Clean Base that you plug into the wall. It can even detect when it’s full or jammed and go home to empty before finishing up its duties. The i7+ is one of very few vacuums that allows you to not only schedule cleans on your phone, but go as far as mapping your home and allowing you to select specific rooms for cleaning. Finally, it’s also able to identify the dirtiest area of your home and will run over those spots more often to ensure comprehensive cleaning.

Who It’s For: It handles pet hair just fine, so no worries if you have a little friend (or two), but the i7+ is probably best-suited to small- to medium-sized homes, as it can clear the whole floor in one charge; however, those with larger homes shouldn’t be dissuaded by this — you’re going to be hard-pressed to find vacuum that can clean for longer.

Watch Out For: Many of the the classic complaints people have with robot vacuums are still present with the i7+. It’s a bit loud (roughly 60 decibels, according to an app on my phone), it spazzes out if a door isn’t fully ajar and it requires fairly long charging times. The dust emptying box is very useful but also takes up a chunk of space in your home and isn’t exactly the nicest looking thing, either.

Alternatives: To be clear: there are no other robot vacuums that empty themselves — if that’s what you’re in for, there isn’t a true alternative. If you want a robot vacuum that you can name and send to clean the apartment when you leave for work, Roomba’s older (and cheaper) models are much more affordable. Plus they’re frequently on sale (the Roomba 675, in particular, is discounted often and can still be controlled by iRobot’s app). If its the ability to schedule and choose specific rooms to clean, the Eufy 30 ($270) is a decent option that’s much more affordable.

Review: Setting up your cleaner is rather easy — plug in the home base, allow your Roomba to charge for about three hours and sync iRobot’s smartphone app to the machine. After naming my machine (I went with a weird and not very funny Twister reference in Paxton), I set it off on its initial foray through my apartment.

Lost among the self-emptying and specific-scheduling hype is the machine’s built-in memory. During its maiden voyage, it will locate walls, stairs, bookcases and the like, but it is not going to be very efficient. However, the i7+ remembers its first go-round, and after every run, it will display a percentage of optimization to let you know how close it is to creating the ideal (read: fastest) path to cleaning.

In my 675-square-foot Brooklyn apartment, this meant that its first run took a little over an hour, its second a little under an hour and its third right at 43 minutes. After the third, the app alerted me it had successfully optimized the cleaning path (further missions have remained in the 42- to 44-minute range consistently).

Because I live in that rather small apartment in Brooklyn, the saving of a few minutes isn’t all that impactful, but if you live in a home that’s large enough to command runtimes around the 90-minute max, it could mean the difference between clearing every room in one run and having to wait a few hours for another.

Once mapped (even after just the first run), you can begin labeling the rooms and zones of your home (you can also use Alexa or Google Assistant to tell it to clean certain areas: “Paxton, clean the kitchen”). Supremely helpful for the more open concept livers among us, the smart mapping system allows you to add dividers and “walls” that the vacuum will recognize when scheduling — meaning that even if the kitchen leads right into the living room, you can segment the two for individual room cleaning (I also used this to stop the vacuum from going under my media console and getting caught up in all the wires).

Oddly enough, the star of the show — the self-emptying home base — was not all that interesting, which is exactly what I’d hoped. At roughly 19 by 12 inches, it’s much larger than other robo-vac bases, but the ability to completely ignore my vacuum (apart from scheduling on my phone) is legitimately satisfying. The base holds up to thirty full loads from the vacuum which, even with a very hairy dog, has yet to fill after almost two months of use (iRobot says three months is the average).

Its cleaning performance has been heaped with praise hundreds of times over, and I had a similar experience. Thanks to iRobot’s staple Dirt Detect tech, areas my dog litters with fur and pieces of her bone are run over three or four times more than areas that don’t receive the same abuse. Frankly, other than dark corners behind pots of plants there wasn’t much touching up to do in Paxton’s wake.

Its only real mess-ups were not even its own. Prior to testing the i7+, I hadn’t use a robot vacuum in a few years, which means I forgot that leaving cords and bags on the floor amount to traps. So while this robo-vac is the most hands-off and effective at actual vacuuming, it still requires a fairly consistent space to clean (e.g. keep bedroom doors open and get charging cables off the carpet).

Verdict: The iRobot i7+ is the most effective robot vacuum at accomplishing what robot vacuums originally set out to do — that is, shrink your chore list and do so with a noticeable difference in cleanliness. Its self-emptying capabilities are a natural, needed and downright welcome addition to the world of robot vacuums, and the app that controls it is simple and effective. The price is high, but if the prospect of not vacuuming for the foreseeable future makes you feel warm and cozy inside, it just might be worth it.

What Others Are Saying:

• “The i7+ is an impressive robot vacuum with unique features that you won’t find on lesser models. I don’t necessarily think it’s worth five times the cost of a standard vacuum, but once this technology trickles down to lower-end models, it will be very nice to have.” — Dan Seifert, The Verge

• “The whole point of buying a robot vacuum is to make your life easier. It’s easy to be seduced by the promise of automated cleaning, and not realize that it’s actually much more work to maintain a robot vacuum than to just push a regular one around. The Roomba i7+ all but eliminates the few remaining robovac pain points, including some that I wasn’t aware were aggravating to begin with. It empties its own bin! My God!” — Adrienne So, Wired

• “Personally though, if I had a pile of money to play around with, I would totally buy the Roomba i7+ before any other vacuum—robot, cordless, plug-in, whatever. The self-emptying feature and targeted cleaning options mark a new high point for low-effort cleaning.” — Liam McCabe, Wirecutter

Key Specs

Max Runtime: 90 minutes
Charge time (no battery to full): 3 hours
Robot Size: 13.34 x 3.63 inches
Robot Weight: 7.44 pounds
Home Base Size: 19 x 12 inches:

iRobot provided this product for review.

Read More Gear Patrol Reviews

Hot takes and in-depth reviews on noteworthy, relevant and interesting products. Read the Story
Note: Purchasing products through our links may earn us a portion of the sale, which supports our editorial team’s mission. Learn more here.

2019 Raptor Review: How Does This Insane Truck Keep Getting Better?

The 2019 Ford Raptor looks more or less the same as it has the past two years, but it’s the changes you can’t see that make this latest model the best Raptor yet. With the addition of active dampers and off-road cruise control Ford has moved the Raptor up into another echelon of vehicles, one that few would have ever thought a pickup truck could reach.

The Good: The major talking point with the 2019 Raptor is the addition of “Live Valve Technology” to the bespoke Fox 3.0 Internal Bypass shocks. These electronically controlled shock absorbers are controlled by a solenoid placed on the shock body that’s connected to a valve. The valve can be adjusted in as little as 40 milliseconds to alter the rate at which oil passes through it, thus stiffening or softening the shock. Wide open you get a soft suspension perfect for tearing over rough terrain at impressive speeds; closed you get a stiff suspension that makes a 5,697-lb truck returning to Earth after a brief flight a rather anticlimactic event. Ford also finally saw fit to make Recaro bucket seats an option – and damn are they excellent. Deep upper bolsters and suede inserts do their best to keep one’s body from sliding all over, and Ford wisely chose not to make the seat cushion bolsters so tall that they would impede one from sliding right into the seat when hoisting oneself up into the truck. The addition of “Performance Blue” as a paint option is also most welcome as are optional redesigned beadlock capable wheels.

Who It’s For: Hardcore off-road enthusiasts will continue to enjoy the Raptor (and moan about the death of the 6.2L V8 as they have for 4 years), but that crowd is only one part of the equation. With on-road ride quality vastly improved by the new suspension, the 2019 Raptor is for anyone who is confident in their skills to drive an 86.3” wide vehicle and enjoys getting some dirt under their fingernails with some regularity.

Watch Out For: Base prices for the Raptor are $52,855 for the SuperCab and $55,840 for the SuperCrew respectively. Good luck finding a dealership that will come anywhere close to those numbers. Dealer markups on the Raptor are absurd so be prepared to pay to play. That being said, the price of a visit to Ford’s Performance Driving School at Utah Motorsports Campus is included in the purchase price, so that adds some value.

Alternatives: The Raptor stands alone at the top of the mountain, but there are a few other pickups and one SUV that make a decent attempt at climbing it. The 2019 RAM Rebel starts at $44,990 and is a reasonably fun off-roader, but doesn’t come close to matching the outright capability or refinement of the Raptor. We’ll have to wait and see if RAM delivers a real contender with the RAM Rebel TRX which is supposed to go into production by 2022. A Toyota Tacoma TRD Pro will run you $42,660 and while it is most definitely easier to live with on a daily basis, it’s based on an old chassis, has an old(and underpowered) V6 under the hood and can’t pull off the same kind of shenanigans the Raptor can. To get anywhere close to you’ll need to forego having a pickup and fork out $230,000 for a Mercedes-Benz G 500 4×4 Squared, so with that in mind the Raptor sounds like a hell of a bargain, doesn’t it?

Review: To show off the new and improved Raptor, Ford brought us out to the 511-acre playground that is Utah Motorsports Campus. Following a quick classroom rundown of how the aforementioned Fox 3.0 Internal Bypass shocks work, I tried (and failed) to bottom one out in its stiffest setting by putting my entire body weight on the lever it was connected to. With the stiffness dialed back to the middle, similar to the previous generation’s ability, I was able to push it down, albeit with a good deal of effort.

Throughout the day I took full advantage of the suspension travel, which is 13” up front and 13.9” at the rear. However, with the mechanical valving doing the bulk of the heavy lifting during high-speed trail running as it has done in years past, I noticed the new Live Valve tech most during moderate speeds on the trail and even more so on pavement. Where the 2017/18 Raptor was prone to doing what I call “the floaty dance” at highway speeds, the 2019 is buttoned down. The sheer size of the truck is still noticeable when braking, but with “Sport” mode selected and those shocks stiffened up the stability is really apparent. Steering inputs are noticeably reduced and instead of worrying about keeping the damn thing between the lines you can think about the task ahead, which is exactly what I was doing before we pulled off the blacktop outside Tooele, UT.

Out along old mining roads, I got to put the other new key feature of the 2019 Raptor to the test. Off-road cruise control isn’t anything new – Jeep, Toyota and Land Rover all have versions too – but Ford’s “Trail Control” is now my favorite of the bunch because you hardly notice it working. While the other systems I’ve used lurch and groan, Trail Control is smooth and quiet. With “Rock/Crawl” mode selected and the transfer case in 4-Lo, Trail Control can be set from 1-20 mph so that all the driver needs to do is focus on steering. For novices it takes the guesswork out brake and throttle inputs, allowing them to focus on wheel placement and avoiding obstacles. For veterans, it makes mundane and tedious sections of trail much less of a buzzkill. There’s also the simple fact that even the most proficient off-road driver cannot distribute power and braking to each wheel individually as Trail Control can. Some of my peers voiced complaints about the system being “over eager”, especially when beginning a steep descent, but I didn’t experience any unwanted power surges throughout the day.

Is the 2019 Raptor that much better than the ‘17/’18 Raptor? After a full day bashing around the desert, climbing a mountain and repeatedly jumping it there is no doubt in my mind that it is.

Verdict: The first-generation Raptor was built for the few, but Ford sold more of them than they could have ever anticipated. Understanding the broad appeal of the truck led them to refine it, make it more accessible and that’s brought us here to a Raptor that has an adaptive suspension and off-road cruise control. The Raptor does things no other vehicle can do and does most of the things all vehicles can do reasonably well. Sure it guzzles fuel and needs its own zip code, but the tradeoffs are worth what it delivers many times over – provided you have the funds, space and environment in which to properly enjoy it.

What Others Are Saying:

• “All that intoxicating power comes paired to a 10-speed automatic. It’s the only downside to an otherwise superb setup. It sloshes around aimlessly at times, and doesn’t do what you want it to do on hard braking – that is, downshift quickly and with some decisiveness. That’s the same issue we had with the pre-refresh model, and Ford hasn’t done anything to mitigate it here.
” — Jeff Perez, Motor 1

• “We’re sure Trail Control will be controversial among hard-core off-roaders; plenty are bound to be of the “I-know-how-to-drive-off-road-and-don’t-need-no-fancy-electronics-to-do-it-for-me” mindset. We’ll remind them that systems like Trail Control can distribute power and braking individually to each wheel, which a human with two legs and two pedals simply cannot do. It can also prevent you from digging ruts by applying too much power.” — Aaron Gold, Automobile

Key Specs

Engine: 3.5-liter, twin turbocharged DOHC 24V V6
Transmission: 10-speed automatic with manual shifting mode
Horsepower: 450 horsepower
Torque: 510 ft-lbs
0-60: 5.2 sec
Top Speed: 110 mph (est)
MPG: 15 City/18 Highway

Ford hosted us and provided this product for review.

Note: Purchasing products through our links may earn us a portion of the sale, which supports our editorial team’s mission. Learn more here.

RMU BRFCS Review: A Ski Company Adds Adventure to the Business Bag

Rocky Mountain Underground — RMU for short — is a ski company. Well, that was true, until it decided to open a tavern in its home base of Breckenridge, Colorado, and to start building things like a versatile backcountry backpack, a tailgate cover for mountain bikes and a dog collar that converts into a water bowl. Now, the one-time garage-based ski maker bills itself more generally as an outdoor brand. One of its most recent products called the BRFCS — fill in the vowels for pronunciation — is an all-purpose adventure travel bag that sets a tone for where the company might be headed.

The BRFCS is a carry-on compatible bag with a 35-liter base capacity that expands to 50 liters. RMU outfitted its interior with compartmentalized storage for clothing, (there’s enough room for ski boots), and smaller mesh pouch pockets for necessities and essentials; there’s also a false bottom. The BRFCS also features a padded laptop sleeve and a removable compression strap. It can be carried like its namesake, with backpack straps and a stow-away hipbelt or as a shoulder bag.

The Good: RMU’s dog collar/water bowl provides the yardstick example of how it approaches its outdoor products: put function everywhere. The BRFCS does that — in one compartment is a false bottom; the hipbelt and backpack straps stow away (the latter can be removed entirely, too); the front exterior pocket is ideal for essentials like a passport and wallet but also stashes a helmet sling; even the aluminum buckle on the interior compression strap has a curved edge for opening bottles.

As a bag, it’s more spacious than it looks. It has two sides with zippered compartments, like many classic travel suitcases, for storing clothing — and separating the dirty from the clean on the way home. These are more vast than they look, and easily sufficient for multi-day trips. Multiple carrying methods make schlepping the thing a breeze, and both the briefcase-style handles and backpack straps are comfortable in use. Exterior compression straps help make everything secure once inside, whether slightly empty or fully-stuffed.

Who It’s For: The BRFCS is an adventure travel bag, and adventurous travelers are precisely who it’s for. Sure, the casual weekender and the business traveler will also find it an adequate companion, but features like the helmet sling and backpack straps may go under-appreciated. If you’re the type of person who prefers a carry-on only approach, or someone who will tack on a hike or a day on the slopes to any quick trip, this is your bag.

Watch Out For: All the features that the BRFCS offers make for a bag that at times feels crowded. If you don’t use the false bottom, it’ll be a thick space-waster — luckily, it’s removable. Some of the other features aren’t though, including the hipbelt and the helmet sling, so even if you don’t need them you’re stuck with them. Another small gripe is that access to the twin inner compartments is limited by zipper entries that feel too short. And one final, inconsequential grip: the folding shirt graphic inside feels corny and unnecessary — it’s obvious where the clothes are supposed to go.

Alternatives: Clamshell-style adventure travel bags are having a moment right now. One of the first iterations to make waves is Cotopaxi’s Allpa ($210), which is smaller than the BRFCS at 35 liters and doesn’t expand but is a worthy alternative that’s equally rich in features. Evergoods’ forthcoming 40-liter Civic Transit Bag ($235) offers a more refined, less “adventure-y” look and is currently available for preorder, and Quiksilver and Pacsafe’s collaboration bag ($190) provides an anti-theft spin on this style of carry.

Review: I first heard of Rocky Mountain Underground three years ago when a coworker at the Wyoming ski shop I was working at attempted to convince our manager that we should add the brand’s skis to the offering in the shop. “They’re unreal, just trust me,” he pleaded, (or something like that). Our manager caved, and the following year we had the Apostle and the North Shore on the ski wall and in the demo fleet, a perk I took advantage of during many of my ski breaks. I don’t know what my manager thought of them, but I agreed with my coworker; they were unreal.

I was both intrigued and surprised to hear the news that RMU had created its first backpack, but when I saw it for the first time, it all made sense. The Core Pack felt like a bag that RMU would make, with features both adventure-practical and fun; like the feeling I had skiing champaign powder on the Apostles somehow materialized.

The BRFCS does this too. It looks like a bag that a ski company would make, with slick black 630-denier PU-coated nylon fabric, an orange polyester interior and orange aluminum exterior hardware. The briefcase format threatens to dampen its adventurous vibe — even the word implies a sense of formality — but once its backpack straps and hipbelt are un-stowed, it again becomes apparent where this bag comes from and what it’s for.

I’ve carried the BRFCS on numerous trips so far, but the first is most apt for mention here. I brought it to Outdoor Retailer this past July, which, coincidentally, is the same event that the BRFCS was first revealed to me. Typically when I pack for the biannual outdoor trade show, I stash a collapsible duffel in my carry on in anticipation of returning with two or three times the amount of stuff than I originally brought. This time I left it at home.

The packing list on the way there was relatively small: three days worth of clothing, a pair of Red Wing boots, running shoes and clothing, toiletries, my laptop and all my tech accessories. It all fit into the BRFCS without the need to expand it, but I was moderately surprised at how quickly this filled up the bag’s interior space. The multiple layers of material that created the BRFCS’ many compartments also seemed to be preventing its volume from being wholly useful. That said, the return trip saw the addition of hats, a backpack, an enamel mug, a pillow, a jacket, so many pairs of socks, a bottle of whiskey and probably more things that I’m forgetting. I had a gentleman’s bet with my coworkers on whether it would all fit, and with the extra liters provided by the expansion zipper and firm cranks on its exterior compression straps, I won. It was even comfortable to carry with the light backpack straps.

That trip was more business than fun, and the BRFCS excelled in the circumstances, even without its vowels. I never rigged my helmet to its exterior or cracked open a beer with its secretive bottle opener, and I was able to carry it fine without peeling out its latent hipbelt. But I can visualize scenarios in which I will use these things. I don’t think it’ll become my go-to adventure bag for camping and ski vacations; I have too much gear for that. But during those busy trips where I may only get a single day or part of one to explore — sort of like taking a break during a day of work at a ski shop — the BRFCS will do the trick.

Verdict: The BRFCS isn’t without its flaws, but they’re minor in comparison with all the areas in which the bag excels. It’s an awesome bag for the short jaunt or an extra-day trip, and a very solid piece of luggage given that its only RMU’s second attempt at a bag. I’m looking forward to an updated pass at this bag by the company or an entirely new follow-up.

What Others Are Saying:

• “Adaptability is important for getting the most out of your travels. And adaptable is exactly what Rocky Mountain Underground’s BRFCS lets you be. Wherever you’re going, this bag helps get your gear there with three carry options. Haul it as a backpack, shoulder bag or by hand for flexibility on the move.” — Carryology

Key Specs

Capacity: 35/50 liters
Weight: 4 pounds
Outer Material: 630D Nylon face fabric with carbonate PU coating
Inner Material: 150D Polyester liner

Read More Gear Patrol Reviews

Hot takes and in-depth reviews on noteworthy, relevant and interesting products. Read the Story

Note: Purchasing products through our links may earn us a portion of the sale, which supports our editorial team’s mission. Learn more here.

These Smart Glasses Look Good Enough To Wear All the Time

Editor’s Note: When this article was originally published in October 2018, you couldn’t buy Level smart glasses on an e-commerce site – customers had to go through a VSP network doctor. And while you can still do that, as over November 2018, Level smart glasses are now available nationwide the company’s online eyewear store, Eyeconic. The below article has been updated to reflect this change.

VSP Global is the largest vision healthcare company on the planet, with over 88 million members. Its innovation wing, The Shop, is where its creative team of designers and biomedical engineers have free rein to create products that push future eyewear technologies to the limit. In the past, they’ve collaborated with Google on Google Glass and with Nike and Zeiss Optics on The Wing, a pair of really aerodynamic (and expensive) glasses for Olympic-level sprinters. I’ve been testing one of their latest innovations, Level, which is a wearable fitness tracker that doesn’t look like a typical wearable fitness tracker – Level looks like a nice, normal pair of eyeglasses.

Marchon, owned by VSP Global, is one of the world’s biggest eyewear manufacturers, and Level glasses are designed in the same factories with the same detail and fine materials as the company’s Italian-made glasses. What sets Level apart is that in one of its arms are housed a suite of sensors and tech: gyroscope, accelerometer, magnetometer, Bluetooth and battery. (The other arm is weighted to evenly balance the frames.) The frames aren’t designed to be an advanced fitness tracker, like an Apple Watch. There’s no built-in GPS or heart-rate sensors; instead, Level is more of a wellness tracker. It can track your steps, distance traveled, overall active minutes and even how many calories you burn throughout the day. The companion app can send you push notifications to encourage you to walk more to reach your step goals and earn more points. Yes, points. They are what make Level more unique than its competition.

Each day wearers can earn a maximum of two points if they achieve both their daily steps goal and daily stretch goal. When they reach 50 total points, VSP Global, which operates the charitable programs known as Eyes of Hope, will give a free comprehensive eye exam and a pair of eyeglasses (if needed) to a person-in-need: either a veteran, a person affected by homelessness, a child or an elderly person. In the Level app, you select which group of people you want to help by achieving your fitness goals. The thinking behind this, beyond pure altruism, is that some people can’t motivate themselves to be active; however, if they know that they could also help somebody else by being active, that might provide extra incentive.

Level is both a simple gadget and a nice pair of eyeglasses. It’s water-resistant, charges via micro-USB (in the joint) and has roughly a five-day battery life. On the eyewear side, Level comes in three different options for frames – check them out, here – and each costs $270 without prescription lenses.

Editor’s Note: To get a better understanding of The Shop, you can check out the original article that I wrote about them in May 2017, here.)

|

The Good: Level is a wearable that you don’t have to think about – you just wake up, put on your glasses and then go about your day. It looks and feels like traditional eyeglasses and no, it doesn’t scream, “Hey, I’m wearing a fitness tracker on my face!” The battery life is excellent. Just like a lot of eyewear, they are very customizable. You can get them with prescription and/or polarized lens, or even photochromic lenses that are clear when you’re inside, but automatically darken when exposed to sunlight. The app is simple to use and accurately tracks your metrics. There are several frames to choose between. Also, by simply wearing Level every day you can also help those who are less fortunate.

Who They’re For: You should wear prescription eyewear, but anybody purchase Level smart glasses. If you’re a VSP member, however, you’re able to apply your vision care benefits toward the purchase of Level to greatly reducing the overall cost. They’re only available in select cities for now – Sacramento, DC, Denver, Seattle, Portland, LA and Minneapolis – but they are preparing to expand availability in the near future (think weeks).

Watch Out For: Don’t expect this to be an elite-level fitness tracker. There’s no heart-rate sensor or built-in GPS. The app requires you to open it a few times a day, or else you won’t receive activity updates about your activity throughout the day. If you’re interested in buying Level, you’ll can search for a VSP network doctor in your area who carries the product; or you can shop on company’s online eyewear store, Eyeconic.

Alternatives: The term “smart glasses” can go one of a few ways. There are augmented reality glasses, like Microsoft Hololens, Vuzix Blade AR and Intel’s Vaunt, but none of those look like glasses you’d wear as part of your normal wardrobe. And there are Bluetooth-enabled glasses like the Oakley Radar Pace or even Snap Spectacles, which can coach you to fitness or take photos, respectively. But again, both look and feel rather tech-y. Level, on the other hand, look and feel like a great pair of designer glasses that you wear every day.

Review: Full disclosure: I don’t normally wear eyewear. I’m in my late 20s and still have pretty-near perfect vision, but the team behind the Level smart glasses reached out to me, partially because I had done a story on The Shop last year, but more importantly because you don’t need to normally wear eyeglasses to appreciate Level. It’s a wearable – that’s how I treated them. My loaner pair were sunglasses and didn’t have prescription lenses, which allowed for easy testing despite my not being the ideal use-case. While Level smart glasses are meant to be worn all day long, I only wore them while I was outside. Still, I was able to track my data, though because I didn’t wear them constantly, in a two-week period I was only able to reach my daily steps goal – 10,000 steps – on a few different occasions.

I think it’s important to judge these Level smart glasses on two different merits: one, how they are as a piece of fashion and two, how they are as a gadget. The first is easy: as eyewear, Level blend right in and look like a normal pair of glasses (in my case, sunglasses). In my few weeks of wearing them – I wore the Nikola frames (pictured) – no one mentioned they looked weird. That’s because they don’t. I wore them to my cousin’s wedding and while hiking in Arizona and the fact that they were smart glasses was never brought up. Heck, I almost forgot.

There are things that remind you that Level aren’t standard eyeglasses, of course. They feel slightly heavier than the sunglasses that I typically wear, but you only really notice this weight difference when you pick them up. (Although each pair weights about 40 grams, which Level says isn’t heavy compared to most other eyewear.) And when you’re wearing them, they are evenly weighted and don’t feel heavy on your face – I had no issue wearing them for hours at a time. The app, which can send your smartphone occasional updates throughout the day, is the only further reminder that you’re wearing smart glasses.

Level is a good gadget too. As I mentioned before, Level is simple. It tracks steps, calories and somewhat vaguely named “active minutes” – and that’s it. In general, I found that it does a good job of tracking these things. In fact, if you talk to the people behind Level they’ll tell you it does as good a job (or better) at tracking these basic metrics than wrist-bound wearables like the Apple Watch, because glasses are worn centrally on your axis and there’s less noise or movement from extremities.

However, the main issue I found was in using the app to track my progress and overall goals. The wearer is required to open the companion app every 12 hours; if they don’t, the app will automatically log them out and stop pushing notifications to their smartphone. The glasses will still track activity as long as they have battery life, however – which is actually really good, lasting around five days. I rarely opened the app, so I was frustrated, but when I mentioned this to the team behind Level, their answer actually made sense. It boils down to privacy.

VSP Global is a healthcare company that has to comply with HIPAA standards and, because of that, they are legally obligated to treat Level’s data as personal health information: private. This is why you have to create an account through your email, rather than through Facebook or Instagram or any other social platform. The data is the wearer’s and Level isn’t sharing it with anybody. This is also why, if you’re inactive for over 12 hours, the app will automatically make you sign in again from scratch. The app won’t autofill anything for you.

Verdict: Level are really nice, high-quality eyeglasses. They’re also a simply-yet-reliable wearable. Remember, there’s no built-in GPS or heart-rate sensors, and the glasses shouldn’t be expected to track any activities other than running or walking. But if you want to track everyday wellness, and to make sure that you’re at least moving around – Level works well and looks really good, too. Just make sure to open that app more often than every 12 hours.

Key Specs

Frames: Minsky, Hedy, Nikola
Sensors: gyroscope, accelerometer, magnetometer, Bluetooth
Battery: five days
Port: micro-USB

|

Read More Gear Patrol Reviews

Hot takes and in-depth reviews on noteworthy, relevant and interesting products. Read the Story

Note: Purchasing products through our links may earn us a portion of the sale, which supports our editorial team’s mission. Learn more here.

For Easy Access on the Trail, This Is Your New Backpack

You may not be familiar with Evergoods, a young backpack company founded in 2017, but you probably know the two companies that its founders came from. Jack Barely and Kevin Dee are expats from GORUCK and Patagonia, respectively, and they’re using the expertise acquired there to create a collection of sleek, hard-wearing backpacks. Evergoods’ initial launch (via Kickstarter) included a commuter backpack and a daypack for hiking. This year it added two more packs: a 40-liter travel bag and one with an all-new opening mechanism called the Mountain Quick Draw.

The Mountain Quick Draw (MQD24 for short) is the company’s take on an alpine-specific backpack. Traditionally these types of bags focus on simplicity over features — they lack lots of exterior straps and pockets and usually only contain one large interior compartment that can hold lots of gear like ropes and climbing hardware. The MQD24 includes enough extras to make it versatile, but doesn’t lose that simplicity.

The Good: The best thing about the Mountain Quick Draw is access. The most apparent feature contributing to this is the innovative quick draw lid, which uses a cord lock placed on the front of the bag for fast access to the main compartment. It’s similar to the cinch closures that most trekking backpacks use underneath their lids, but it’s made more effective here because the hardware is static — you don’t have to slide it up and down with the cord, just grab the lock and rip it open.

Access doesn’t end there though. There’s an additional zipper on the side that lets you get into the bag’s interior, so you can get to whatever is at the bottom without opening the top and pulling everything out. The Mountain Quick Draw is also very comfortable thanks to Evergoods’ thoughtful curved shoulder straps and back panel.

Who It’s For: The Mountain Quick Draw is designed with hikers and climbers in mind, and that’s who it will provide the most use for. It isn’t overly-techy though, and can certainly be used as an everyday bag, but those in need of lots of organizational features and multiple pockets may want to look elsewhere.

Photo: Chase Pellerin

Watch Out For: The Quick Draw system isn’t like any other backpack closure and does take some getting used to. It requires two hands: one to hold the lock and another to pull the sleeve open. Reaching for the lock first can feel unnatural, but after a couple of tries, you get the hang of it. The only additional feature that I yearned for was an exterior water bottle pocket.

Alternatives: Black Diamond’s Creek 20 ($100) is another simple, climbing-focused backpack with a cinch top and no lid. Access is also a key point here — Black Diamond gave the Creek a top-to-bottom zip that splits the bag’s entire main compartment open. Mountain Hardwear’s Scrambler Outdry 30L ($130) doesn’t have that feature, but it does have a fully-waterproof (but not submersible) exterior and a lid in addition to its cinch top. For more daypack recommendations, check out our buying guide to the Best Daypacks for Hiking.

Review: I still remember my first hiking backpack. It was, essentially, an aluminum rectangle with some light foam padding and a nylon box attached to its front. Straps hung off in various places for lashing a sleeping pad and other items to it, and there was one external zip pocket for small things. I wore it on my first week-long overnight, back when I was 12 years old. At the time it was great, but now it’s a relic worthy of a spot in a museum.

Hiking backpacks have come a long way since then. Multi-day backpacks like my old one now contain pockets for every piece of gear, multiple points of entry and suspension systems that move separately from the loads they support. It all adds up to a level of comfort and efficiency that was previously unimaginable.

Smaller backpacks have kept pace too — even some of the “basic” hiking daypacks available today would probably beat out my old rucksack in support and function, despite a lower volume. But unlike those bigger bags, daypacks have an opportunity toward versatility — they’re small enough to find use in the processes of everyday life, which, for many, lies far from the trailhead. To be genuinely versatile though, a daypack has to make careful consideration of the features included (some will always be too techy for life in the city).

Evergoods has made a mission of adding adaptability into every backpack it makes. Every backpack is a “crossover backpack;” for instance, its commuter bag uses weather-resistant fabrics and includes a hydration port, a suspension system and rear entry that are inspired by outdoor packs. In turn, its mountain packs feature side-carry handles for use around town, hydration sleeves that also accommodate laptops and enough small pockets for everyday essentials.

Photo: Chase Pellerin

The concept applies to the new Mountain Quick Draw too, but it’s the most outdoor-oriented of Evergoods’ backpacks. The bag uses alpine backpacks as its platform. These bags are often incredibly rugged and technical in build but simple and straightforward in design. Many feature one compartment for hauling climbing gear that opens wide and usually doesn’t include a lid. The Quick Draw follows the concept: it has one main compartment and a cinch top closure.

But Evergoods still managed to pack more utility into a backpack that’s simple by design, a fact made apparent to me during a week of ticking off peaks in New York’s Adirondack Mountains. For those who aren’t familiar with the region, it’s big (over six million acres) and wild (cell service is unreliable at best). It’s also home to the 46ers — 46 mountains with an elevation over 4,000 feet. That elevation won’t impress when compared to western peaks, but the Adirondacks aren’t to be taken lightly. A summit bid can be a 20-mile endeavor and weather is susceptible to change without notice.

Our trip’s highlight was Mt. Marcy, the tallest peak in the state of New York at 5,344 feet and more than 14 miles of walking. I packed everything I’d need for the day into the Mountain Quick Draw (a mid layer, a puffy jacket, a rain jacket, a hat, a GPS, two liters of water, a large sack of GORP, two cameras and the case they were in). It was a lot for a 24-liter bag, but it all fit comfortably with the extra room provided by the cinch top.

Photo: Chase Pellerin

Unlike many hiking backpacks, the Mountain Quick Draw’s back panel doesn’t use mesh to promote airflow and breathability. I was skeptical of how comfortable the bag would be during a full day (and how sweaty my back would get) but was pleasantly surprised at the performance of its Zote foam back panel. I’ll give a special mention to the fit too — the back panel is curved, and the shoulder straps are contoured, together producing a comfy fit that lasted the entire day (again, even with my full load). For Evergoods, “ergonomic” isn’t just a buzzword.

We took breaks to shed or add layers, drink water, munch on snacks and snap photos every hour or so during our ascent of Mt. Marcy. It’s during these moments that a backpack’s features are most noticeable. At first, I fumbled releasing the Quick Draw Cord Lock, which requires you to use one hand to grab the backpack’s front handle and the other pull the top loose. I kept wanting to rip open the cinched top as I’ve been accustomed to doing with backpacks that use a similar construction. Once I got the move down though, it was a quick and efficient way to get inside the main compartment, although it did continue to feel a bit unnatural.

That turned out to be okay though because once we hit our stride, and our layers were shed, I ended up using the Quick Draw’s side-access zipper to get to all the things that were at the bottom of the bag. From here I was able to get to snacks stored inside a mesh zipped pocket as well as my water. I also found that this additional point of entry, when paired with a camera case (I used Peak Design’s small Camera Cube) made the Quick Draw an awesome photography backpack. I could swing it across the front of my body, access the side zipper and pull out a camera for a photo without having to take the bag off or dig around at all.

Photo: Chase Pellerin

Our journey lasted a little over eight hours. When we got back to town, I unpacked to let things dry off and headed to a local coffee shop to get some work done, carrying my laptop in another bag. I don’t know that I’d use the Quick Draw for work — although I recognize that I could — but I’d gladly reach for it in preparation for any day on the mountain.

Verdict: The Mountain Quick Draw knows where it succeeds: access and simplicity. It isn’t fully-featured with all the bells and whistles that some heavier bags have, but it takes the architecture of a traditional top-loading alpine pack and gives it the additional practicality — mainly through the inclusion of a sizeable side-access zipper — needed to appeal to more casual hikers and everyday users too.

Key Specs

Volume: 24 liters
Weight: 2 pounds
Shell fabric: 420-denier nylon with PU coating
Features: Quick Draw lid, side-access zipper, top external access pocket with key leash, internal sleeve for hydration or laptop, removable, adjustable sternum strap and waist belt
Lifetime warranty: yes

Evergoods provided this product for review.

Read More Gear Patrol Reviews

Hot takes and in-depth reviews on noteworthy, relevant and interesting products. Read the Story
Note: Purchasing products through our links may earn us a portion of the sale, which supports our editorial team’s mission. Learn more here.

Wahoo’s Latest Trainers Are as Close as You’ll Get to Riding Outside, Indoors

While you’ll never truly be able to replicate the feeling of riding your bike outdoors while sitting in your living room, Wahoo is trying its damnedest to get you as close as possible. With the additions of the Wahoo CLIMB and HEADWIND, two of the biggest holes in the indoor training experience have been filled — pitching your bike up and down when climbing and descending, and airflow that responds to your speed.

|

The Good: With the KICKR CLIMB and KICKR HEADWIND, the indoor riding experience is finally significantly more tolerable. The CLIMB actually pitches your bike up or down based on the grade that you’re riding in a program like Zwift. Likewise, the HEADWIND is a Bluetooth-enabled fan that adjusts its speed based on your riding speed or heart rate.

Who They’re For: Admittedly, CLIMB and HEADWIND aren’t for everyone. For most, a KICKR trainer paired with your standard Honeywell fan will do just fine. But for those who want the absolute best indoor riding experience available, the system is worth a look.

Watch Out For: It’s worth noting that both CLIMB and HEADWIND are version 1.0. And as such, there are certainly some places that they can improve. In the case of the CLIMB, it doesn’t feel as solid when riding as I wish it did. The up and down movements, at times, aren’t quite as smooth as I’d like to see either. It’s also important to note that the Kickr CLIMB is only compatible with Wahoo smart trainers made from 2017 onward.

For HEADWIND, the big pain point for me is the price. Unless you’re really dedicated to making your indoor cycling setup as close to riding outside as possible (which is an admirable goal), and therefore using the setting that allows HEADWIND to blow harder the faster you’re pedaling, then you’re probably better off getting a standard, constant-blowing fan. You could even mimic Mark Cavendish’s setup and use Dyson’s Cool AM06 10 inch desk fan, for around $30 less than the HEADWIND.

Alternatives: Because these products are the first of their kind, there aren’t really any alternatives. As an alternative to the HEADWIND, with none of the features, you could opt for a standard Honeywell room fan ($50). If you want to pitch your bike up and down according to the grade on your virtual route, the CLIMB is your only option.

Review: Despite the shortcomings of both CLIMB and HEADWIND, the two new additions to the KICKR lineup make for the most advanced and most enjoyable indoor cycling experience I’ve had to date. Setting the system up, which is as simple as plugging in the pieces and allowing them to use a proximity sensor to pair with the trainer, is virtually idiot-proof. Once you’ve removed all of the packaging, simply allow them to pair with your trainer, turn on Zwift and you’re riding in less than three minutes (if you’ve set up Zwift before).

Riding with my bike attached to the CLIMB was a unique feeling that I wasn’t quite prepared for. The first time I hit a steep incline, the somewhat robotic movement of the front of my bike upward on the first grade above around 7% caught me off guard. But I quickly got used to it. And if I ever felt like the CLIMB was moving too much (this didn’t happen except for on hilly courses with lots of gradient changes), I simply hit the lockout switch on my handlebar that disables the up and down motion (it can raise up to 20 degrees or decline down to -10 degrees). You will notice both the sound and the vibrations from the movement at first, but they quickly fade into the background and are overshadowed by the noise of the trainer and your bike shifting.

As for the HEADWIND, it’s far quieter than I expected it to be. When I read on the box that it can blow up to 30mph, I fully anticipated that the sound of it would quickly overwhelm my small living room. While it was certainly noticeable, it wasn’t the wind tunnel effect that I braced for. The HEADWIND mitigated my usual torrents of dripping sweat excellently. While it was still the typical pain cave experience in terms of heat, using the HEADWIND made the whole experience far more enjoyable.

Many have noted that using the HEADWIND on its speed setting seems silly, but I found it pretty serviceable. Even on slow climbs, I found there to be ample airflow to keep me cool and my sweat at bay.

Verdict: When paired together with a KICKR Core trainer and Zwift, it’s hard to imagine a better indoor training setup. And it’s important to remember that this is version 1.0. Wahoo is clearly leaps and bounds ahead when it comes to technological advancements in indoor cycling, and even as they stand, CLIMB and HEADWIND are impressive pieces of hardware. If you’re looking to build out the ultimate pain cave, and take your training as seriously as possible this winter, adding CLIMB and HEADWIND to your setup is a no-brainer.

|

Wahoo provided this product for review.

Read More Gear Patrol Reviews

Hot takes and in-depth reviews on noteworthy, relevant and interesting products. Read the Story
Note: Purchasing products through our links may earn us a portion of the sale, which supports our editorial team’s mission. Learn more here.

2018 MacBook Air Review: The Is the MacBook, Perfected

The second generation of the MacBook Air was a game-changer when it launched in 2010. Portable, relatively affordable and powerful (enough) – it was the perfect MacOS laptop for most consumers. However, Apple did little to evolve its much-beloved laptop for the better part of a decade, and two years ago, when Apple released a completely redesigned MacBook Pro that was thinner and way more powerful, many thought that the end was near for MacBook Air line. But thanks to consumer demand (and dwindling sales of its personal computers), Apple revived the MacBook Air ($1,199+) and overalled it with a Retina display, a thinner and lighter design, 8th-generation Intel processors and a host of other features like USB-C ports and even Touch ID.

The Good: The 2018 MacBook Air is a huge hardware refresh on the old MacBook Air. It’s 10-percent thinner and a quarter pound lighter. It has a higher-resolution Retina display with significantly smaller bezels, an upgraded keyboard, a larger Force Touch trackpad, and it has Touch ID, so you can unlock the laptop with your finger. Additionally, it’s powered by Intel’s newest 8th-generation dual-core processor.

Who It’s For: It’s perfect for basically everybody other than creative professionals with intense computing demands, such as graphic designers, photographers, audio professionals or app developers. Think of this as the right MacOS laptop for most people, especially students.

The new MacBook Air retains its famed wedge-shape, yet it’s 10 percent thinner and a quarter pound lighter than the old MacBook Air. It also comes in gold.

Watch Out For: It only has two ports, both USB-C Thunderbolt, so you’ll likely need to purchase several dongles (especially if you want to match all the ports on the old MacBook Air). For a lot of people, especially those who don’t rely on cloud-based storage, the base MacBook Air with 128GB of storage probably won’t be enough. This means you’ll want to consider the model 256GB, which will also drive the price up to $1,399 and that isn’t cheap. The MacBook Air’s processor is also still less powerful compared to those found in many competing laptops, and in general, it’s important to remember that you can get more for your money if you go with a Windows laptop (see below for alternatives). Like any Apple computer, you’re paying a little extra for the premium build quality and the MacOS operating system.

Alternatives: The Dell XPS 13 ($930+) and Microsoft’s new Microsoft Surface Laptop 2 ($999+) are similarly spec’d alternatives that cost less and have a touchscreen. On the MacOS side, you can go for the similar-yet-more-powerful 13-inch MacBook Pro ($1,299+) or the smaller, less powerful and more expensive MacBook ($1,299+).

The new MacBook Air has the same exact port situation as the 13-inch MacBook Pro: two Thunderbolt 3 (USB-C) ports.

Review: Anybody in the market for a laptop running MacOS with modern features such as a high-resolution screen only had two options for several years. The MacBook ($1,299+), is still Apple’s thinnest and lightest laptop, but it’s also very underpowered, especially relative to its cost, making the MacBook an impractical choice for anyone looking for a primary computer to handle more than just email and casual web browsing. Alternatively, the 13-inch MacBook Pro ($1,299+), is a bigger and heavier option with a significantly better Retina display and more computing power for the same price

Now the 2018 MacBook Air finally fills an obvious gap in Apple’s lineup, striking the same balance of portability and performance that made the previous generation a runaway hit. Its essentially now the perfect computer for anyone looking for a MacOS laptop for “normal” things, like browsing the web, drafting documents, answering emails, watching movies or even occasional work in Adobe’s creative suite.

A Retina display on the new MacBook Air. Some dreams do come true.

It’s a little bit funny; actually, I’d consider myself as the perfect candidate for Apple’s new MacBook Air. As a writer and journalist, my job is a constant balance between drafting stories and answering emails. I’ll occasionally have to take photos and then upload them, sure, but most of the extensive photo editing work on Photoshop and Lightroom I leave to our designers. This is why two years ago when I was looking to replace my five-year-old MacBook Pro, I was particularly interested in reviewing the 2016 MacBook Pro sans Touch Bar. It was thin, beautiful and powerful (maybe too much for my needs), and it wasn’t too expensive – in my review I ended up calling it “Apple’s secret weapon.” Looking back, I still agree with that statement, but it was really because the 2016 MacBook Pro was the closest thing to what the MacBook Air should’ve been.

I ended up buying a 2016 MacBook Pro and have used it for the better part of two years. I love it. After using the new MacBook Air for the last four days (that’s all the time we were given before review embargos were allowed to lift), however, the similarities are stark. I wouldn’t say I’ve got regrets, but if this MacBook Air was around two years ago, this would’ve been the laptop I would have chosen. Hands down.

Touch ID is a welcome addition to the MacBook Air. Forgot your password? Just press your finger.

Yes, it has a less powerful processor, but the reality is that the 2018 MacBook Air and my current MacBook Pro aren’t too dissimilar. And for what I use a computer for – working in Google Docs, WordPress and browsing Chrome – I really didn’t notice any difference. They have virtually the same 13-inch Retina display (although the MacBook Pro’s display has a little better max brightness). They look very similar, although the new MacBook Air is definitely thinner and looks more svelte thanks to its wedge form factor. And they have the same two USB-C Thunderbolt charging ports and a headphone jack. Actually, in a few cases, the MacBook Air is better than my MacBook Pro. It has Touch ID, for example, so it’s even easier unlocking the laptop (no password required) and if you use Apple Pay, it’s easier for that too. Even more important, the new Air also gets two-plus more hours of life on a single charge.

For those still clinging to an older MacBook Air, this new model will undoubtedly feel like a night-and-day upgrade. It’s 10 percent thinner and a quarter pound lighter. It has a bigger and Force Touch trackpad. It has louder stereo speakers. It has the same second-gen Butterfly keyboard as the latest MacBook Pros. It’s decked out with two USB-C/Thunderbolt 3 ports, one of which can be used to power a 5K external monitor.

The Retina display on the new MacBook Air is way higher resolution than the mid-2013 model: 2560 x 1600 versus 1440 x 900.

Verdict: With the 2018 MacBook Air, Apple’s has finally answered the demands of its costumers. Though it’s nowhere near as game-changing as the previous generations were, the new iteration is still perfectly positioned as a capable and beautifully built mass-market laptop for anyone who loves using MacOS. It takes many of the same great features of its 13-inch MacBook Pro sans Touch Bar and puts them into a thinner laptop that’s also cheaper (albeit slightly less powerful). If you’re looking for a fully fledged Mac laptop for typical personal or work needs and hoping to spend less than $1,500, you can’t go wrong with the new MacBook Air.

Key Specs

Display: 13.3-inch Retina display
Processor: 1.6GHz dual-core Intel Core i5
Graphics: Intel UHD Graphics 617
Battery: up to 12 hours, up to 30 hours
Storage: 128GB, 256GB, 512GB or 1.5TB SSD
Memory: 8GB, configurable up to 16GB
Ports: two Thunderbolt 3 USB-C
Weight: 2.75 pounds
Key features: Touch ID
Finish: gold, silver, space gray

Apple provided this product for review.

Read More Gear Patrol Reviews

Hot takes and in-depth reviews on noteworthy, relevant and interesting products. Read the Story
Note: Purchasing products through our links may earn us a portion of the sale, which supports our editorial team’s mission. Learn more here.

2019 Volvo S60 T6 R-Design Review: A Sports Sedan for the Sensible Guy

The 2019 Volvo S60 is the latest car from the Swedish automaker. A compact sedan, the S60 is the entry-level Volvo that is designed to be more sporty than its big brother, the S90 luxury sedan.

The Good: The nine-inch tablet touchscreen is responsive and easy to use if a little distracting. Interior touch-points feel great and overall comforting.

Who It’s For: Volvo caters to a more mature audience, a crown the S60 will satisfy. Those not in need of a large family car but who still want something with a more grown-up demeanor will find this entry level Volvo a good fit.

Watch Out For: Just because it’s sportier than the S90 doesn’t make it a sports car. Fun can be had, but it makes a better impression in other ways.

Alternatives: Other premium compact sedans that compete with the S90 include:

• Audi A4 ($36,000, base)

• Mercedes-Benz C-Class ($41,400, base)

• Lexus IS ($38,310, base)

Review: Haven’t been paying much attention to Volvo lately? I don’t blame you. Though they’ve been around for ages, Volvo cars tend to get relegated to the background, mainly for being far too sensible than exciting while flashier cars hog the spotlight. For its part, Volvo has seemed okay with this, doing things its way until 2015, with the release of the XC90, where heads starting turning its way. Thanks to its sharp design, crisp interior, upgraded tech, the car set a standard that all Volvos would reinforce over the next few years, the latest of which is the S60 sedan.

The S60 concentrates the XC90 and S90’s design language into a compact entry-level sedan that carries over very little from the outgoing model. Built on the same scalable architecture as the XC and S90s, the S60 is now longer and lower, reducing the front and rear overhang for an overall sleeker profile. All of it is pulled together to the front fascia by the “Thor’s hammer” headlamps in the front, while its rear partly retains the stumpy rump of the outgoing model, though it doesn’t appear to end so abruptly.

Exterior style updates certainly make a difference, but the interior cabin is where the Volvo S60 excels. The single-piece, door-to-door metal dashboard trim is like an exposed rafter, physically and decoratively giving the cabin features structure. In the center is the nine-inch Sensus Connect touchscreen, the most tablet-like of interfaces outside of a Tesla. It’s actually divided into two screens, with the lower portion displaying immediate data, while the large upper part houses most menus and settings. Its great to look at and works quickly, but it’s almost too analogous to an iPad, in that some things don’t feel optimized for quick in-car inputs and can pull attention away if you’re not careful. This is balanced out by everything being very intuitive and easy to discern.

I’d be remiss if I didn’t mention that just about every surface, button, and dial just simply feel nice to the touch. The Nappa leather seats are so incredibly soft, it’s almost a shame that you’ll be separated from them by clothes most of the time. Knobs for air vents and other inputs feel weighty, too. Not Bentley heavy, but enough heft to their movement that it feels like a solid premium material and not a plastic parts-bin afterthought.

You can’t talk about a Volvo and not talk about its safety features. As a company that prioritizes this aspect with as much importance as performance, you’d be right to expect loads of tech baked in to give the driver a second set of eyes. Auto braking, for instance, continues to be available, now able to recognize large animals and bicyclists as well as pedestrians. While that protects others from you, there are several systems to protect you from yourself. A suite of functions like steer assist and brake support work together to mitigate the unfortunate. Steer assist in particular now nudges you back into your lane if it detects the car meandering over the line in an unpredictable manner. It is thankfully a nudge and not an aggressive pull, as I’ve noticed in other cars who employ such functions. The list of preventative safety measures as well as injury mitigating touches is a long one, and like other Volvos, the S60 is one of the safest cars to not get into an accident with.

With its four trim levels, the S60 also has many propulsion options. At the base end, the T5 engine is a 2.0-liter turbo four-pot that sends 250 horsepower to the front wheels. The T6 takes the same engine but adds a supercharger into the mix, producing 316 horsepower to drive all four wheels. The T8 ups the ante further, hybridizing the car for better fuel efficiency when you need it, and extra horsepower when you want it. This maxes out the power output to 400 horsepower and 472 pound-feet of torque. All this flows through an eight-speed automatic and rides and a double wishbone front suspension and an integral link rear.

Polestar, Volvo’s performance division even got to add its touch to a version of the S60. The Polestar Engineered edition is the semi-secret fourth trim that only unlocks when you sign up for Volvo’s car subscription service, Care. the special trim adds specific badging, distinct gold seatbelts and brake calipers, but more importantly adds performance enhancements like Öhlins dampers, an increase in output to 415 horsepower, a front strut bar and 19-inch alloy wheels to roll on. If you want one of these, you may have to wait a while. Volvo plans to only produce 20 this year, and they’re already spoken for.

Polestar touched or no, the S60 is meant to be the sportier model in the lineup. While it succeeds in being more engaging than the S90, luxury and comfort remain its strengths. I started my time in the T6 R-Design, getting a feel of the non-hybrid configuration before saddling into the Polestar Engineered version. I set out for the Californian hills to put both to work, and though there was fun to be had, it was mostly due to the switchbacks at my disposal. Both the T6 and T8 Polestar lagged behind my throttle presses when I tried to power out of an apex. The Polestar’s dampers made a difference in mitigating the body roll, allowing me to enjoy myself, but either iteration performed just well enough to enjoy cutting through the hills that I happened to drive through.

The S60 is quite happy to switch back into a luxury setting, where the car very much made a difference in both highway cruising and bumper-to-bumper traffic. Employing the Drive Assist system eased the drudgery of motorway driving, with light steering help and automatic lane-keeping so that the commute was less tedious.

Verdict: Like the rest of the vehicles it joins in the lineup, the Volvo S60 is sensible in every regard. Its powertrain options focus on efficiency but still deliver on power, but not more than is necessary. Styling is crisp without being audacious, and the safety systems make it a smart buy, just not much of a passion purchase. Every part of your brain knows getting a Volvo makes the most sense, it’s just that you’ll find your heart levying its objections when it’s time to choose.

What Others Are Saying:

• “The front seats are some of the most supple and supportive I’ve ever had the privilege of sitting in, and a low beltline and expansive windscreen offer a commanding view of the world outside.” – Steven Ewing, Roadshow

“It’s easy to swipe around and find most of the functions or to switch between a full-screen map and what’s playing on the stereo, but some bits of the interface need work” – Aaron Gold, Automobile

“Grip levels were remarkably high, with mild understeer apparent only in a couple of corners when we were really hustling.” – Steve Siler, Car and Driver

2019 Volvo S60 T6 R-Design Key Specs

Engine: 2.0-liter turbocharged and supercharged four-cylinder
Transmission: 8-speed automatic
Horsepower: 316 horsepower
Torque: 295 lb-ft
Weight: 3,907 lbs
0-60: 5.3 seconds
Top Speed: 155 mph

Volvo hosted us and provided this product for review.

Read More Gear Patrol Reviews

Hot takes and in-depth reviews on noteworthy, relevant and interesting products. Read the Story
Note: Purchasing products through our links may earn us a portion of the sale, which supports our editorial team’s mission. Learn more here.

Google’s Smart Display Doesn’t Have a Camera and I Love it

After the Pixel 3 ($799+), Google’s most interesting new product of 2018 has to be the Google Home Hub ($149). It’s a smart display with a seven-inch touchscreen and, in most ways, it works exactly the same as a Google Home Mini ($49) smart speaker – you can ask Google Assistant to play music, tell you the news, and control your smart home devices. The addition of the screen, however, gives users a new way to interact with Google’s super intelligent smart assistant. It has a seamless integration with Google Photos and act as a digital picture frame when left idle. Since Google owns YouTube, the Home Hub can access more and better how-to videos and other content than the competition. Most interestingly, the Google Home Hub lacks a camera, so people using it won’t have the same concerns around placing it in their bedroom or elsewhere that come with other smart displays. It’s small, relatively inexpensive and works seamlessly with those invested in Google apps or smart home ecosystem.

The Good: It pairs beautifully with any other Google smart home devices. It doesn’t have a camera. And it pulls from YouTube – which Amazon and Facebook smart displays cannot – for recipes and hard to answer questions that deserve a video explanation. As a tiny piece of hardware, it can fit basically anywhere. It’s a breeze to create new smart home routines – say ‘Good Morning,’ and you’ll hear the news, get up to the minute updates on your commute, remind yourself of any important meetings and the weather. At night, say ‘Goodnight, Google,’ and you’ll get the next day’s weather, meetings and reminders, followed by the calming sound of crickets. Close your eyes, and you’ll almost think you’re out in the woods nodding off to the sounds of the creatures just outside your window. Regarding a sound system, YouTube Music, Spotify, Pandora, iHeartRadio and more all work seamlessly with Google’s Home Hub. It also comes with a free six-month trial of YouTube Premium.

Watch Out For: It’s not portable. The screen is really small and it’s fixed, so you can’t tilt it up or down to adjust the viewing angle.
The size of the Home Hub is both great and not ideal, as it doesn’t take up a lot of counter space, it’s too small and not portable to really watch any lengthy content. And the sound quality isn’t great, which to be fair is what you’d expect from a speaker this size. Google Assistant is smart enough to recognize six different people’s voices and manage six different accounts, which is great, but managing them for everybody in your home can get a little complicated; you’re going to have to go in the Home app and set up Voice Match for each individual person, otherwise anybody will be able to access your account (click here to learn more).

Alternatives: There are several other smart displays on the market, including Facebook’s Portal and Amazon’s Echo Show and Echo Spot. Facebook Portal ($199+) is a way more sophisticated device that has a really smart camera and is designed to make calls through the Facebook Messenger app (although you can make calls via Google Duo on the Google Home Hub). The Echo Show (2nd Gen) ($230) is bigger and more expensive, but it’s the better option for those who subscribe to Amazon Music and Prime Video. The Echo Spot ($130) is another option, but it’s more of a smart alarm clock than a smart display. The Lenovo Smart Display ($180+) is probably the most similar to the Google Home Hub as it works with Google Assistant and YouTube, but it’s bigger and more expensive.

Review: When I first saw the Google Home Hub, it didn’t jump out as something that I would need. As someone who already has three Google Home products (the Home Max, Home and Home Mini), I felt set – my Spotify account syncs and plays whatever music I want in three different rooms, and I use the Goole Home to set the alarm every night and listen to the weather forecast for the next day. And as someone who didn’t grow up with a television in the kitchen, I had trouble visualizing uses. After just one week of use, I’d be willing to wager that this is the most helpful Google device I have. The reasons for that? The built-in recipe help, a custom routine and the ability to display photos.

While I’m the first to admit that I don’t cook as often as I would like, the possibilities seem almost endless with the Home Hub. In the mood for some pumpkin bread? A simple, “Hey Google, find me a pumpkin bread recipe,” pulls loads of potential future loaves. Scroll through, pick one you like and then Google will even read you the recipe. So when there’s flour all over your hands, you don’t have to touch a screen. If you’re prone to forgetting what ingredient you added last, Google talks you through each step. Don’t know how to cut or prepare a certain ingredient? “Hey Google, show me how to do [X]” – and the Home Hub will pull up a YouTube video that’s sure to help you cut the butternut squash in the right way. It’s basically like having a sous chef.

When I first set up the Home Hub, I quickly scrolled through the routine option, opting for the default. As the sun rises every day, I say, “Good morning, Google,” and she’ll (the voice I chose is slightly more feminine, but you can choose a deeper sounding one) tell me about the weather, then my commute, then read me the news and then play a song. I can wash my face, brush my teeth and pack my lunch, all while listening to the broadcast. While I take the subway to work and my commute doesn’t change depending on traffic, it’s helpful to see what’s on my calendar and hear any reminders I set, since I typically set a date in my calendar and then promptly forget about whatever it was that I planned. In my calendar I trust. All of these options are customizable – I can pick which news sources I prefer, or jump right to a song of the day. Even better than my morning routine is my routine in the evening when, yet again, Google Assistant preps me for tomorrow by telling me weather and what’s on my calendar, and then – my favorite part – it helps me fall asleep by playing sounds of the great outdoors. As someone who escapes the city on the weekends to find some calm, the sound of crickets coming through the speaker is comforting.

In between the morning and evening, I found myself regularly using the Home Hub to control my other Google Assistant-enable smart speakers (you can easily configure them all in a multi-room setup if you’d like). And then when I ask Google Assistant to play a song or playlist, the Home Hub would then jump back into its ‘screensaver’ mode where it essentially works as a digital picture frame. For anybody who uses Google Photos – which everybody should take advantage of for the unlimited free photo and video storage (if you already don’t) – the Home Hub is really great. Whenever you’re not using it, instead of going blank, the screen pulls from your different albums in Google Photos and flips through a slideshow of your different photos. (You can curate the specific photos you want the Home Hub to display, too.) But it’s also way more sophisticated than just that.

When my parents or brother would come over to my apartment, I was able to ask Google to show the pictures from our last family vacation (it was South Africa, in case you were wondering). When I was cooking dinner for friends, I could ask it to show photos of those same friends. Or to show photos of sunsets or nature or anything. It’s great, in fact The Verge‘s Dan Seifert writes that “it’s such a good digital photo frame that if it did absolutely nothing else, I could see many parents and grandparents paying the asking price for it without thinking twice.”

While the digital photo frame I was gifted years ago for graduation has been buried in a desk drawer somewhere, the Google Home Hub and its ever-changing photo reel will no doubt stay put on my kitchen counter. It’s way more than just a digital picture frame, after all, plus studies have shown that looking at pictures of happy memories can increase your optimism as well as boost your mental performance. And I can’t say “no” to that.

Verdict: The Google Home Hub is a jack-of-all-trades smart home device. It’s a smart speaker, tablet and a digital picture frame – all rolled into one. It’s brilliant for anybody using Google’s popular apps and web services (i.e Gmail, Google Calendar, Google Photos and Google Maps), meaning it’ll be brilliant for a lot of people. The YouTube integrating is key, too, as it makes the Home Hub different from other smart displays. The no-camera is a nice touch, as it alleviates many of the privacy concerns that people have. The key feature, though, might be the price. It’s way cheaper than other smart displays on the market, and it’s most definitely smarter too.

Do you need one? Of course not – it’s a smart speaker, essentially, and you probably already have one or two by now. But after using the Home Hub for the last few weeks, whether it’s teaching me how to cook, playing music, or just idly showing off photos I’ve taken, it’s sort of become an integral part of my day. And that’s something I never expected.

What Others Are Saying:

• “But, while its small stature might have you concerned, it’s a surprisingly well-built product. It feels sturdily made and while the screen could break if something heavy came in contact with it, we felt more than safe with it sitting on our kitchen shelves and dining room table. Even if you are afraid of what might happen to it, you might not want to put it too far away – the 7-inch HD touchscreen is great up close and, unsurprisingly, much less dramatic when seen from afar. ” — Nick Pino, Tech Radar

• “The Home View is another feature that users have longed for. This provides a slide-down dashboard that gives quick and easy access to all of your connected smart home devices. When you don’t want to go to the hassle of telling Google to light up a specific room, just select it from the menu and activate the lights. This Home View feature comes alongside better Nest Hello smart doorbell integration. When someone rings your doorbell, your smart display will show a live feed of your door.” — Patrick Hearn, Digital Trends

• “The Google Home Hub’s touchscreen is responsive and works well in combination with Google Assistant, whether you ask for help on a recipe or to check what’s on your calendar. Pictures and videos look particularly crisp thanks to an ambient light sensor that adapts the screen brightness and warmth to match the room. A control panel screen makes it easy to organize and control your smart home devices. The cameraless, petite Google Home Hub will blend into any room in your home. It’s affordable, and quite useful as a digital assistant (especially in the kitchen), a photo frame and a smart home control panel.” — Andrew Gebhart, CNET

Key Specs
Colors: Grey, black, aqua and sand
Dimensions: 7.02″ x 4.65″
Display: 7-inch LCD touch screen
Connectivity: Bluetooth and wi-fi
Power: 15-watt adaptor

Google provided this product for review.

Read More Gear Patrol Reviews

Hot takes and in-depth reviews on noteworthy, relevant and interesting products. Read the Story
Note: Purchasing products through our links may earn us a portion of the sale, which supports our editorial team’s mission. Learn more here.