
It is the stuff of nightmares for outdoor adventurers. A quick, one-day ski tour turns up a storm and there is no chance of getting out before nightfall. In this type of winter emergency, the best course of action is to build a snow shelter. There are different ways to approach building one, so to hear the best techniques and designs, we spoke with Marco Johnson, the Field Staffing Director for the National Outdoor Leadership School, and JJ Jameson, a senior instructor for the REI Outdoor School. Spending the night freezing (literally) is no one’s idea of a good time, so enter the backcountry prepared and well informed on how to best save your own life.

Snow Cave
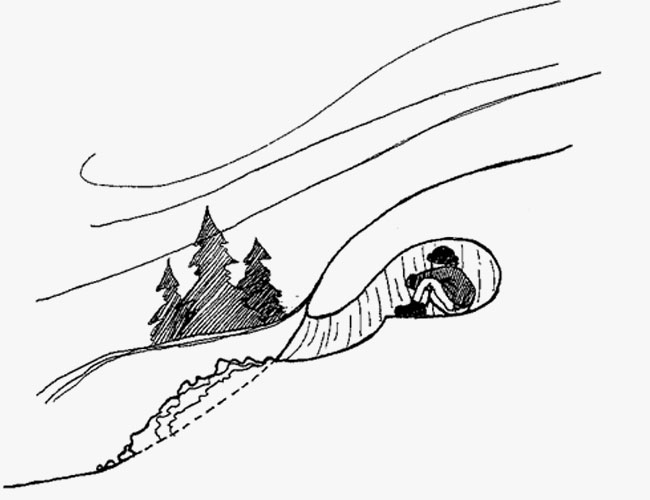
Photo: Alastair Mcdowell
The snow cave is one of the quickest emergency shelters that you can build in the backcountry to escape impending bad weather. It requires the fewest tools and can be built with minimal exertion. According to Johnson, a snow cave is “the best shelter you can build, in the least amount of time.”
Scout a location. With any snow shelter, scouting a location is crucial. For a snow cave, your location will be determined by where snow depth and snow consistency is best. “You want to find a fairly big drift of snow — a place where the wind has piled up the snow,” says Johnson. Ideal snow conditions for building a snow cave are the same those for building a snowman. Snow that compresses and packs easily will yield a stronger structure and will be easier to build.
Hollow out a sleeping area. The next step is to dig. When you are hollowing out the snow bank, shape the inside of the structure like an upright bell. Johnson says that’s important because “the bell shape is very strong structurally and it prevents the roof from sagging due to your body heat.”
Dig up. When you are hollowing out the inside and building the bell shape, you want to start as low as you can and work up. This will allow you to make a sleeping platform inside the structure that sits higher in elevation than your entrance. Johnson stresses that this is key to keeping warm. “It creates a heat trap. So all the cold air moves out and all the warm air stays in. It is very much like the way that beavers build their lodges.”
Tree Pit
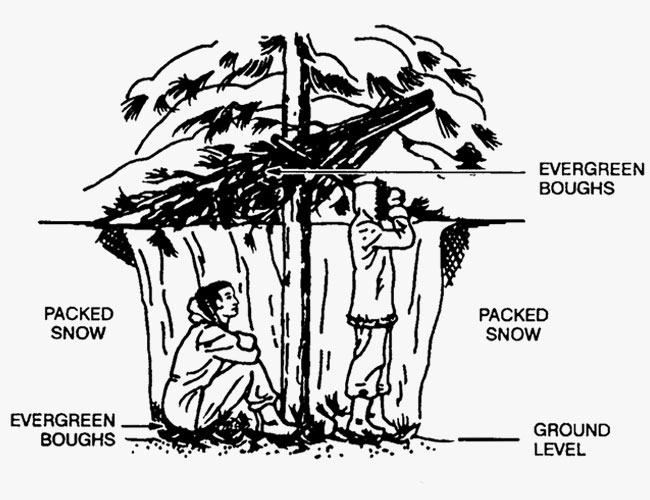
Photo: Off Grid Web
Depending on your location, you may be able to use trees to your advantage. Though tree wells are often dangerous to skiers and snowboarders, they can also be used for survival.
Scout your location. Just like the snow cave, scouting your location is crucial. A number of factors determine whether or not building a tree well shelter is possible, including snow depth and tree type. In areas of deep snow, pockets of space are often created where there are evergreen trees with low-hanging boughs. “Inside these snow-covered boughs, you can dig in and actually make yourself a makeshift shelter,” says Johnson.
Burrow. It is important to be extremely careful when starting to burrow into a tree well. It can be very easy to become stuck if snow starts to cascade down and fill the hole. Work slowly and methodically. Dig down until you get to ground level. Then cover the bottom of the pit with evergreen boughs to help keep the shelter insulated.
Pack out the walls. Compact the walls around you. This will help stabilize the shelter and keep snow from falling down the walls. Once inside, cover the hole that you came through with evergreen boughs to keep heat in and snow out.
Quinzee
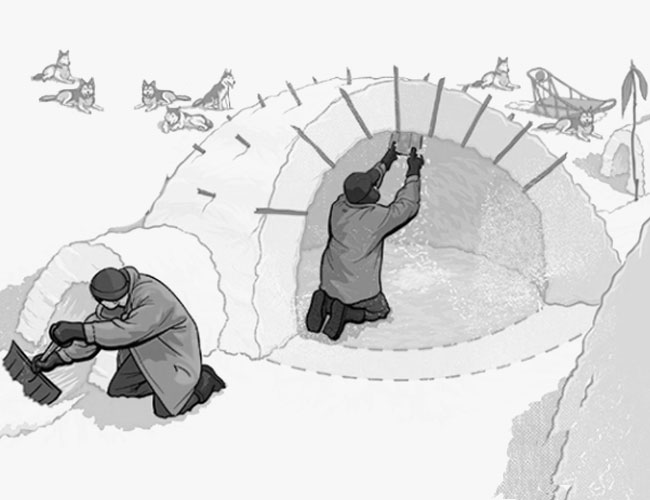
Photo: Boys’ Life
The quinzee is the shelter that takes the most effort out of the three, but can also last the longest and is the most comfortable. It’s also the only one out of the three that can be built in completely flat terrain with light powdery snow.
Prepare yourself. Building a quinzee isn’t easy, and it is going to take a lot of work. The first thing to do is assess whether it is worth the effort, or if a snow cave or tree well better suits the situation. If a quinzee is the right fit, Jameson says, “take off your jacket and roll up your sleeves — this is going to be hard, heat-producing work.”
Mound up a large pile of snow. In flat terrain, you are going to need to create the mound of snow that you will eventually tunnel into. Jameson says the goal is “something the scale of a small car, like a VW Bug.” Aim for a pile that is 4 1/2 feet tall and roughly 6-10 feet wide. Once you have the snow piled up, it is best to let it set for an hour or two so that the snow can consolidate (if the weather permits this time).
Tunnel directly into the middle of the structure. Start by tunneling along the ground straight toward the middle of the mound. As you remove snow from the inside of the structure, throw it onto the outside of the shell. “When you are putting snow onto the outside of the structure, you are actually throwing the snow. You are shoveling, but to empty the snow out of the shovel, I just sort of fling the snow onto the outer surface.” And during this process, aim to keep the structure as circular as possible, distributing the snow evenly across the outer surface.
Carve upwards. “Slowly start to carve vertically upwards in arcs,” Jameson notes. “You want the inside of it to be a dome shape because that is very strong.” Scrape in an arcing pattern hollowing out the middle of the mound, again throwing the removed snow onto the outside. Scrape off snow upwards but also around in circles, taking off two to three inches of snow as you go around. Continue the process until you have a space that is large enough for you lay down and stretch out in.
Repair as needed. As you hollow out the middle of the structure, you may make small holes in the walls. Don’t worry about them. Simply pack more snow onto the outside to fill the hole(s). “One individual hole isn’t going to make the thing fall down,” Jameson advises. “You would have to have about a fifth of a wall removed for it to actually collapse.”
Buying Guide
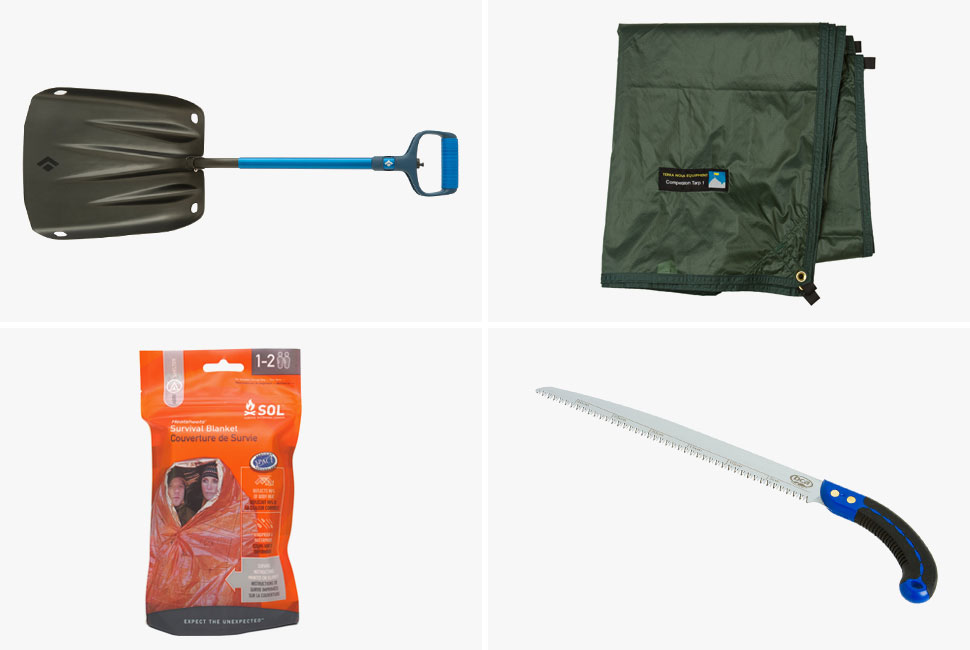
Having the right tools in a survival situation can mean the difference between life and death. For Johnson, traveling in the winter means ski touring. Because of this, he always has his snow shovel and snow saw. “Having a snow shovel and a snow saw is really important because you can’t move snow without a shovel,” he says.
On top of an avalanche shovel, Jameson’s must-carries skew more towards making quinzee-building easier. “It can be helpful to have a tarp and an emergency blanket,” he says. “Once you’re really digging a lot you can lay that tarp near the opening with a corner of it sticking out. Your buddies can then just pull that and drag big piles of snow out without having to shovel it out.”


