All posts in “Eats”

A Simple and Hearty Curry for Busy Weeknights

Green curry is an easy fix — especially take-out versions. But familiarity breeds contempt. Bangkok: Recipes and Stories from the Heart of Thailand ($24), a new cookbook from Leela Punyaratabandhu, founder of the award-winning cooking blog SheSimmers, features an easy yet flavorful beef-based rendition to break the after-work monotony.

“Here is the most satisfying and delicious beef green curry I’ve ever made,” she writes. “It’s thicker than most versions, with just enough sauce to coat the meat.” The recipe relies on three basic ingredients: cumin, beef and coconut milk. Garlic, shallots, a few mild chilis and lime leaves are added to taste, but the recipe as a whole lets the beef and curry paste do the heavy lifting — so you don’t have to.

Beef Green Curry

Serves 4
Ingredients:

Curry Paste
1 tablespoon coriander seeds
1 tablespoon cumin seeds
1 teaspoon white peppercorns
1 teaspoon coarse salt (omit if using a food processor)
1 tablespoon finely chopped galangal
1 tablespoon paper-thin lemongrass slices (with purple rings only)
1 teaspoon finely chopped makrut lime rind
½-inch piece turmeric root (or: ½ teaspoon ground turmeric)
1 teaspoon packed Thai shrimp paste
5 fresh green Thai long chiles, deveined and coarsely chopped
7 fresh green bird’s-eye chiles
1 tablespoon finely chopped cilantro roots or stems
5 large cloves garlic
1/4 cup sliced shallots, cut against the grain

Curry
1/2 cup freshly extracted coconut cream, or ½ cup canned coconut cream plus 1 tablespoon extra-virgin coconut oil
1/2 cup coconut milk
2 pounds untrimmed boneless well-marbled chuck steak or rib-eye steak, thinly sliced against the grain on a 40-degree angle into bite-size pieces
2 teaspoons fish sauce, or as needed
1 teaspoon packed grated palm sugar, or as needed
4 makrut lime leaves, lightly bruised and torn into small pieces
Fresh green Thai long or bird’s-eye chiles, stemmed and halved lengthwise
1/4 cup packed Thai sweet basil leaves

Preparation:
1. To make the curry paste, in a small frying pan, toast the coriander and cumin over medium heat, stirring constantly, until fragrant, about 2 minutes.

2. Transfer to a mortar, add the peppercorns and grind to a fine powder. Add the salt, then, one at a time, add the galangal, lemongrass, lime rind, turmeric, shrimp paste, chiles, cilantro, garlic, and shallots, grinding to a smooth paste after each addition. Alternatively, combine all of the ingredients except the salt in a food processor and grind to a smooth paste.

3. To make the curry, put the paste and coconut cream in a 4-quart saucepan, set over medium-high heat, and stir until the fat separates and you can smell the dried spices, 1 to 2 minutes.

4. Add the beef, the coconut milk, fish sauce, and sugar, stir well, cover, turn the heat to medium, and cook until the beef is no longer pink, 7 to 8 minutes. Taste and adjust the seasoning with more fish sauce and/or sugar if needed. Check the consistency and amount of the sauce and add water if needed. “For this curry, I like just enough sauce to coat the meat-like pot roast,” Punyaratabandhu writes.

5. Stir in the lime leaves, fresh chiles, and basil leaves.

6. The curry can be transferred to a serving dish and served right away with rice, or it can be cooled, covered, and refrigerated overnight and then reheated the next day (the flavor will be even better). When you serve the curry, top it with the coconut cream.

Buy the Book

The recipe above appears in Bangkok: Recipes and Stories from the Heart of Thailand by Leela Punyaratabandhu, published by Ten Speed Press, an imprint of Penguin Random House. Buy Now: $24

How to Doctor Up That Old Can of Tomatoes

If you enjoy cooking, you might revel in the special occasions: those two or three times a year when dropping $100 on a roast, or starting a stew two days in advance, seems fun and totally justified. But most times, when that thing called life gets in the way, you’re probably just trying to put food on the table as quickly and cheaply as possible. The Italians have just the thing for these kinds of nights. It’s called spaghetti alla puttanesca — or “spaghetti of the prostitute” (yes, really) — a briny, delicious pasta dish, first popularized in the ’60s, that derives its flavor entirely from pantry staples you might already have: canned tomatoes, anchovies, capers and olives. Even better, it takes just a few minutes to prepare.

Spaghetti alla Puttanesca

Serves 2

Ingredients:
Half box dried spaghetti (8 ounces)
2 tablespoons olive oil
1 whole clove garlic
3 anchovy fillets, canned in olive oil
1 teaspoon red chili flakes
1 28 oz can of crushed tomatoes
1/2 cup preferred olives (i.e. Kalamata), pitted
1 1/2 tablespoons capers, drained
2 tablespoons fresh Italian parsley, chopped

Preparation:
1. Start cooking spaghetti by following instructions on the box. Drain two minutes before ready, and be sure to reserve half a cup of cooking liquid for later step.

2. Heat olive oil in a skillet over medium heat. Add clove of garlic, and cook until brown, about 1–2 minutes; then discard. Add anchovies to the pan and smear with a spatula until it forms a paste with the olive oil. Sprinkle red chili flakes, cook for about 10 seconds, then add tomatoes. Simmer for about 8–9 minutes, or until the sauce starts to thicken.

3. Lower the heat, and toss in capers and olives. Fold in the cooked spaghetti, and stir to coat. Cook for an additional minute or two until preferred doneness. If the sauce is too thick, use the reserved pasta water to help coat the spaghetti.

4. Plate, drizzle with olive oil and sprinkle with parsley.

20 Essential Kitchen Tools Under $20

Great tools don’t need to cost a fortune. In fact, a majority of your kitchen essentials can be had for less than $20. Read the Story

Jack Seemer is the deputy editor at Gear Patrol. Since joining the publication in 2014, he has reported on a wide range of subjects, including menswear, smart home technology, cookware and craft beer.

More by Jack Seemer | Follow on Instagram · Twitter · Contact via Email

How to Make Take-Out-Quality Orange Chicken, from Scratch

Panda Express is an airport indulgence. It’s rarely the go-to when presented with other dining options. But when choices are limited and healthfulness isn’t a priority, orange chicken before a long flight, while seemingly ill-advised, becomes somehow irresistible. Copycat recipes usually disappoint, so riffing becomes the wiser option when looking to replicate the dish at home.

From Kris Yenbamroong, owner of Los Angeles Northern Thai street food destination Night + Market and author of the restaurant’s eponymous cookbook, Night + Market, comes an umami-rich ode to Panda Express’s best-selling dish. Served alongside jasmine rice, it’s a worthy tribute to the airport standby (or weekend indulgence — no judgment).

Not looking to go through the trouble of frying chicken at home? Yenbamroong offers a shortcut: “Consider using KFC popcorn chicken or something nugget-size from your favorite fast-food spot,” and skip straight to step four.

Orange Chicken Night + Market

Serves 2 to 4

Ingredients:
Vegetable oil, for deep frying
1 cup tempura flour
3/4 cup club soda or seltzer
1/2 teaspoon kosher salt
1/2 teaspoon ground white pepper
1 pound chicken thighs, brined 15-30 minutes with water, 1 tablespoon minced garlic, 1 tablespoon minced lemongrass, 1/2 tablespoon kosher salt, 1/2 teaspoon ground white pepper, then cut into nuggets
1 heaping teaspoon tapioca flour
1/4 cup fish sauce
1/4 cup distilled white vinegar
1/4 cup sugar
3/4 cup orange marmalade
1/4 cup orange juice
Pinch of kosher salt
1 1/2 tablespoons thinly sliced orange zest, for serving
1 green onion, slivered, for serving
1 teaspoon chile powder, for serving

Preparation:
1. Pour enough oil into a deep pot or wok to come halfway up the sides. Heat the oil over medium-high heat until it reaches 350 degrees Fahrenheit. (Throw in a fleck of batter; if it pops up and starts sizzling right away, it’s ready. Or use a thermometer.)

2. In a large bowl, stir together the tempura flour, club soda, salt and white pepper until a thick batter forms. Fold in the chicken until coated.

3. Once the oil is hot, remove the chicken from the batter, letting the excess drip off. Working in batches of 6 or 7, fry until the nuggets are golden brown on all sides, 4-5 minutes. Let cool on paper towels or a wire rack while you make the sauce.

4. To make the sauce: In a small bowl, whisk the tapioca flour with just enough warm water to dissolve with no clumps. In a small saucepan, combine the fish sauce, vinegar, sugar, marmalade, orange juice, tapioca flour slurry and salt and stir over medium-low heat until bubbling and slightly thickened.

5. Pour the oil from the wok into a heatproof container for future use. Add the orange sauce to the empty wok over medium heat. Once the sauce is bubbling and syrupy, add the chicken and toss to coat. Transfer the chicken to a plate and garnish with the orange zest, green onion and chile powder.

Buy the Book

The recipe above appears in Night + Market: Delicious Thai Food to Facilitate Drinking and Fun-Having Amongst Friends, by Kris Yenbamroong, published by Clarkson Potter, an imprint of Penguin Random House. Buy Now: $22

Note: Purchasing products through our links may earn us a portion of the sale, which supports our editorial team’s mission. Learn more here.

How to Build a Charcuterie Board Like a Pro

Last Updated November, 2017.

On the surface, a charcuterie plate seems like a simple hors d’oeuvre. After all, there’s no cooking involved — just take some deli meat and throw it on a cutting board and call it a day, right? Wrong. For a charcuterie plate to stand out and have a well-rounded selection, some serious thought and preparation is required.

In the vast world of charcuterie, it’s good to have a guide. For that reason I spent some time with Greg Blais — a salumi (meat) and formaggi (cheese) expert at Eataly NYC. Blais gave me a lesson in putting together a masterfully crafted plate of meat, and the time I spent with him revealed it isn’t as hard — or as easy, for that matter — as it may seem. Knowing a few basic rules will help any novice curate a meat board that is balanced, unique and bound to impress.

Meats

Charcuterie-Meat-gear-patrol

Charcuterie-Meat-gear-patrol

Build Around Prosciutto

When starting a board it’s essential to consider how many people you’ll be serving. Greg says this breaks down the overwhelming nature of choosing from a large selection of meats, and it will help focus attention on how many meats to pick out and how much to buy. “No one is going to eat a pound of everything…we don’t push too much on anybody because it’s not about overfeeding everybody, it’s about them enjoying it,” he says. Let your butcher know how many people you’ll be serving and they’ll cut the right amount of meat for you — two or three ounces of meat per person should cut it.

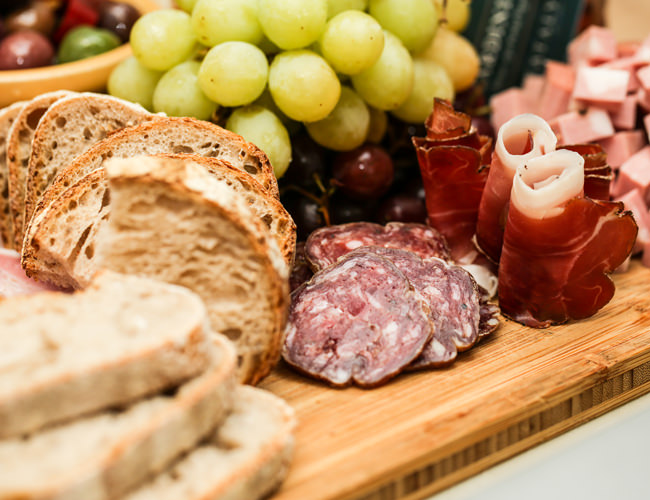
When choosing the meats themselves, Greg recommends one solid starting point: prosciutto. Use it as the pillar of your plate and move on from there. Greg recommends having a balance between crudo (cured raw) and cotto (cooked meats). Cured meats — like prosciutto crudo, capicola and sopressata — are raw and cured with salt. Using too many crudo meets can be overwhelmingly salty, so adding cotto meats — like mortadella and cooked hams — helps maintain balance.

Greg also believes diversity is important, both in mouthfeel and flavor. To keep mouthfeel diverse, have meats that work well at different thicknesses. Greg cut up our prosciutto and speck thin, but rather than having thin strips of mortadella, he cut them up into thick chunks. Mortadella, Greg notes, is another staple of charcuterie platters. For diversifying the flavor profile, pick some meats with some kick to them. “Put spicy capicola, spicy sopressata or calabresse with red pepper in there and that’s good for heat,” says Greg, but don’t overdo it. “You don’t want to do too much of anything or too little of anything.”

Six Meats to Try

Prosciutto di Parma: Made in Parma, Italy, this type of prosciutto is considered some of the best money can buy. It is made from specially-raised pigs, salt and that’s it.
Salame Felino: Often considered “The King of Salami,” Salame Filino is named after the small town of Felino where it originated centuries ago. It has a smooth, sweet taste and is flavored with white wine and peppercorns.
Wild Boar Sopressata: Another type of Italian salami, this sopressata made from wild boar has a rich, deep red color and is robust in flavor.
Mortadella: Similar to bologna — but far better — mortadella is cooked rather than cured, and is seasoned with black pepper and occasionally pistachio.
Porchetta: Made by gutting, deboning and roasting an entire pig, porchetta has a fatty and savory taste, and is heavily salted and seasoned with herbs like garlic, rosemary and fennel.
Alto Adige Speck: Speck from Alto Adige — an autonomous region in Northern Italy — is a cured and smoked meat with incredibly bold flavor that stands out on any charcuterie board.

Accouterments

Charcuterie-accouterments-gear-patrol

Charcuterie-accouterments-gear-patrol

Balance Your Flavors

Adding accouterments is essential to making a great charcuterie plate because they act as both palate cleansers and pairings, and will also add a variety of texture to the plate. Picking good accouterments is actually very simple. “Cured meats are very salty … you want to counteract that with things that aren’t,” Greg tells me. “You want sweet things, or tart things or crunchy things — anything that’s the opposite of [salty], just to balance it out.”

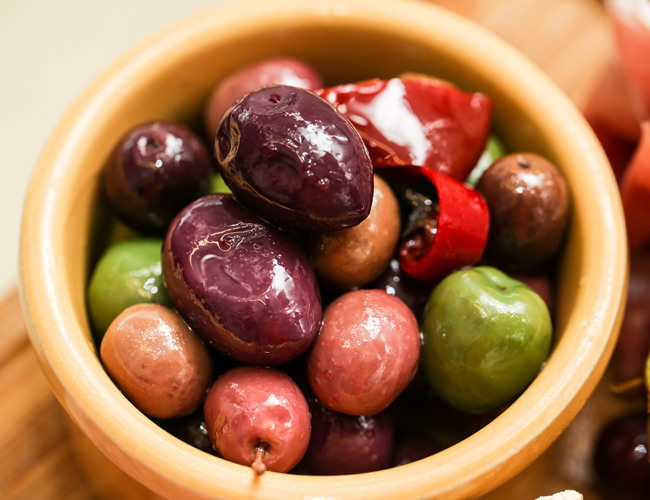
A classic palate cleanser is pickled vegetables, which you can either make yourself or buy in jars. The acidic qualities will neutralize any strong flavors left on the palate. Grapes and olives pair well with salty cured meats, cleansing the palate and giving some appealing color to the board as well. Jams are also a must-have, as they are a simple way to add some sweetness into the mix. Greg used tomato and pear jam on our plate, but also highly recommends mustard fruits — cooked-down fruit with spices and mustard seed.

Traditionally, a genuine charcuterie plate is just meat, but it’s okay to add one or two cheeses. Just like your other accouterments, it’s important to choose a cheese that will counteract the saltiness of the meat. For my board Greg gave me a small wedge of Calcagno, a hard sheep’s milk cheese from Sardinia. “It’s a beaut … it’s nice and sweet, it’ll mix well with salt.” Greg also says bread is an essential vehicle for the meat, but like everything else on a charcuterie plate utilizes restraint. “People always overdo the bread on these platters … then start throwing it down and the food shows up and [they] don’t even want it.”

Five Cheeses to Try

Calcagno: A sheep’s milk cheese from Sardinia, calcagno is firm and sweet, making it a great counterbalance to salty cured meats.
Asiago Pressato: Made from whole cow’s milk, this cheese has a mild flavor that makes it a perfect match for subtly sweet cooked meats like mortadella and prosciutto cotto.
Paglierino: This sheep’s milk cheese is tangy but rich in flavor, and it goes well with porchetta or cooked and herbed salumi as it contrasts in flavor and texture perfectly.
Taleggio: A semi-soft cow’s milk cheese with a mild, slightly tangy flavor that is perfect for pairing with the smokey flavors of Alto Adige speck.
Parmigiano Reggiano: By Italian law, this cow’s milk cheese can only be made in the providences of Parma, Reggio Emilia, Bologna, Modena and Mantova, otherwise it’s just generic parmesan. It’s sharp and savory and will go with just about anything.

Presentation

Charcuterie-presentation-gear-patrol

Charcuterie-presentation-gear-patrol

Eat With Your Eyes

If the countless iPhone photos and hungry looks that Greg’s finished platter got from the patrons at Eataly are any indicator, the arrangement is as important as the items on the plate. “You always eat with your eyes,” says Greg. The layout is a great place for beginners to get creative, and to really make a board their own. However, there are some things to keep in mind.

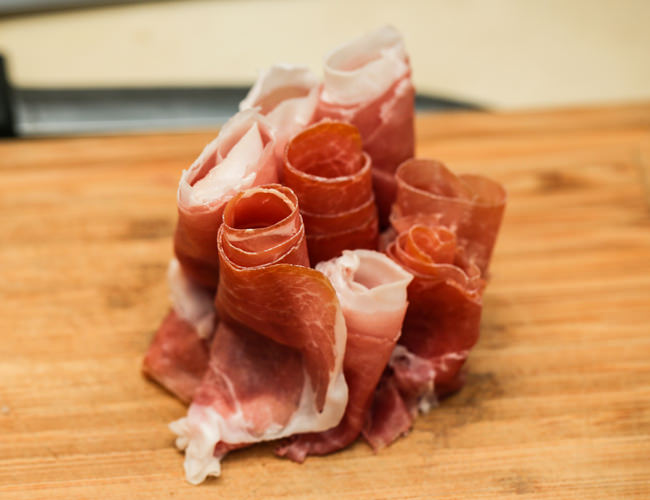
In Italy, slices of meat are ideally laid out flat, but if you’re serving a larger amount of people you need to make space where you can. “You might not get a lot of room for anything else if you lay out these monstrous strips so … roll them up,” Greg advises. The rolls should be done up loosely, so they can be unfurled before eating. If they’re done too tight they get packed together and will feel “gummy” and “gross” (as Greg puts it). By doing this, you not only clear space for more meat and accoutrements, you have an eye-catching display of meat.

The rolls will add some height to the platter as well, something Greg likes to do. “When you lay things out … kind of make things three dimensional.” He did this by piling up accoutrements (like grapes), as well as adding in some Mario Fongo breadsticks that he stood up vertically. It was a small, simple and inexpensive touch that made the platter look unique.

About Our Expert

Charcuterie-expert-gear-patrol

Charcuterie-expert-gear-patrol

Greg Blais is the Salumi and Formaggi Manager at Eataly NYC and is an instructor at Eataly’s school, La Scuola di Eataly, where he educates interested individuals on artisan cheese pairings and history. Greg is also a host on the Heritage Radio Network’s weekly Cutting the Curd podcast, and served as an American Cheese Society judge and was the only American judge in the first Concorso Nazionale dei Formaggi a Latte Crudo.

This is a test of integrating author bio data.

More by Andrew Connor | Follow on Contact via Email

How to Make Mapo Tofu, a Spice Bomb Served as a Meal

In recent years, the trend in cookbook writing is to tell a restaurant’s story alongside the recipes that epitomize the cooking. The story of a place’s growth is, naturally, intricately linked to the team behind it (kitchen and managerial staff) and the vision and leadership of the head chef. The Mission Chinese Food Cookbook ($21), penned by head chef Danny Bowien and writer Chris Ying, takes this concept of biography/cookbook to the extreme, which fits well with Mission Chinese’s iconoclastic ethos.

The Mission Chinese Food Cookbook is a personal look into Bowien’s life. Set up as a conversation between Bowien and Ying, with interjections by Mission Chinese cofounder Anthony Myint, no aspect of Bowien’s life is overlooked — from his early years in Oklahoma as an adopted child, to problems in his twenties with drinking and drugs, to soured professional relationships in various kitchens. After co-founding Mission Chinese, Bowien’s career took off, and as he grew professionally, his restaurant exploded in popularity. Mouth-numbing Chongqing chicken wings and smoky thrice-cooked bacon exemplify Bowien’s San Francisco years, while the lighter Machta Noodle and luxurious Beggar’s Duck typify Mission Chinese’s transition in New York (and as such, certain recipes developed in New York are told by Executive Chef Angela Dimayuga).

The recipes in this cookbook aren’t watered-down versions for the home chef, and thus, inception-like recipes within recipes are quite frequent. If the goal is to recreate Mission Chinese food with its layers upon layers of flavor at home, the reader must take time to assemble and build the proper pantry, and mind the fact that they’ll need a ripping-hot wok.

As for the recipe below, it is Bowien’s take on Mapo tofu, which hooked me on his cooking when I first visited Mission Chinese at its dimly lit San Francisco location. The dish is an umami-heavy whirlwind of mouth-numbing spice, rich pork and fermented seasonings. The recipe is similar, preparation-wise, to that of a ragù and has flavors that will excite your imagination and induce cravings of this new “American cuisine.”

tofu-recipe-gear-patrol-650-3

tofu-recipe-gear-patrol-650-3

Mission Chinese’s Mapo Tofu

Serves 4 (or 6 as a part of a larger meal)

Ingredients:
Base
2 ounces dried whole shiitake mushrooms
3 cups very hot water
1/3 cup soy sauce
1/2 cup doubanjiang (spicy bean paste)
1/3 cup tomato paste

Braise
1/2 cup chili oil, or as needed
15 garlic cloves, minced
1/4 cup fermented black beans
1/3 cup Chili Crisp
1 (12-ounce) bottle cheap beer
2 teaspoons mushroom powder
1 teaspoon toasted and ground
Sichuan peppercorns
1 (15-ounce) package firm tofu, cut into 1-inch cubes
1 teaspoon cornstarch slurry
Soy sauce

Sichuan peppercorn oil, for drizzling
Ground Sichuan pepper
Several sprigs fresh cilantro, chopped
1 or 2 scallions, trimmed and sliced
Steamed rice

1. Prepare the base. In a medium bowl, combine the shiitake mushrooms and hot water. Add the soy sauce and allow the mushrooms to soak for at least an hour, or until they are completely rehydrated and soft.

2. Drain the mushrooms through a sieve set over a bowl and reserve the liquid. In a food processor, pulse the mushrooms into small chunks. You should have about 1 cup of chopped mushrooms.

3. Combine the reserved mushroom liquid, doubanjiang, and tomato paste in a medium bowl. Whisk to combine, then add the chopped mushrooms. You will have about 3½ cups of the base—reserve 1¾ cups for this recipe and transfer the rest to an airtight container and refrigerate for later.

4. Prepare the braise. In a Dutch oven or large saucepan, heat the chili oil over medium heat. Add the garlic, fermented black beans and Chili Crisp and cook, stirring occasionally, until the garlic softens and the mixture becomes spine-tinglingly aromatic.

5. Add the beer, mushroom powder, Sichuan pepper and reserved 1¾ cups base to the pan and stir to combine. Bring the sauce to a simmer, then reduce the heat to low and simmer gently, uncovered, for about an hour. (At this point, you can cool and then refrigerate or freeze the sauce for up to 2 months.)

6. Bring a pot of well-salted water to a boil. Blanch the tofu cubes for 1 minute, then drain carefully and set aside.

7. If you want a thicker sauce, stir in the cornstarch slurry. Once the sauce thickens, fold in the tofu. Taste and season with soy sauce as needed.

8. There should be a thin puddle of shiny red oil on top of the sauce — if not, add a few more tablespoons of chili oil. Finish with a drizzle of Sichuan peppercorn oil, a sprinkling of ground Sichuan pepper and a scattering of cilantro and scallions. Serve with steamed rice.

* * *

Meat Variation

Ingredients:
1/2 pound ground pork or a mix of ground pork and diced pork shoulder/belly
1/2 teaspoon fish sauce
1 bottle of beer

1. Make the vegetarian mapo tofu through step 4. Once the garlic softens and spine tingles occur, scoop out the aromatics as best you can and set them aside.

2. Crank the heat up to high and get the chili oil almost smoking hot. Add the pork to the pan and brown it thoroughly, using a spoon to break up the meat. When you’ve got good color on the meat and you’re teetering on burning things, crash the party with the bottle of beer. Use a wooden spoon to scrape up all the crispy bits from the bottom of the pan and stir them into the liquid. Add the aromatics back to the pan, along with the fish sauce, mushroom powder, Sichuan pepper and 2 cups of the base and bring to a simmer. If the sauce looks thick, thin it with some more base or beer until it looks like a thin marinara sauce. Cover and braise over low heat for 2 hours. (At this point, you can cool and then refrigerate or freeze the sauce for up to 1 month.)

3. If you want a thicker sauce, stir in the cornstarch slurry. Once the sauce thickens, fold in the tofu and slowly warm it through. Taste and season with soy sauce as needed, then finish as you would in steps 6 through 8 of the vegetarian version.

From The Mission Chinese Food Cookbook by Danny Bowien and Chris Ying.

John Zientek is Gear Patrol’s style editor and in-house guitar authority. He grew up on the West Coast.

More by John Zientek | Follow on Contact via Email

How to Make the Perfect French Omelet

However humble its composition, the French omelet has for years been considered the litmus test for many aspiring chefs. “One of our deans, André Soltner, who was the former chef at Lutèce, felt that if you could make a good French omelette, then you were going to gain entry into his kitchen,” says Candy Argondizza, the Vice President of Culinary and Pastry Arts at the International Culinary Center in New York City. “Eggs are really sensitive to heat,” she says. “Knowing how to regulate that heat, as to not overcook them, is really hard.”

Students at the ICC learn about the shape, color and texture of a well-made omelet, says Argondizza. It should be color free, wrinkle free and, above all, baveuse. That means that in contrast to a country omelet, which is browned, firm and wrinkly, the classic French omelet is rolled like a burrito and left half-cooked in the middle.

The average French omelet takes just over a minute to cook. Though the end result should be fairly consistent — a football-shaped torpedo that’s creamy in the center — the exact timing can vary from omelet to omelet. Success depends on the cook’s ability to read how the eggs are reacting in the skillet, and then interfere accordingly. Here’s how.

Classic French Omelet

Makes one single-serve omelet

Ingredients:
2 eggs
1 teaspoon whole milk
1 teaspoon butter
Kosher salt

Preparation:
1. Heat an empty 8-inch non-stick skillet on high. “Before non-sticks, you’d have to use cast-iron pans that were only used for omelettes or eggs,” says Argondizza. “Now non-sticks are the way to go.”

2. Beat two fresh eggs in a mixing bowl until the whites are totally emulsified with the yolks. “You’re not doing this to add air,” says Argondizza. “You just want to make sure that the egg yolk and the egg white are properly mixed.”

3. Add a teaspoon of milk or cream, the fat of which will make the omelet softer. Salt the egg mixture with a pinch or two just before you add it to the skillet. “You always season the eggs before cooking an omelet,” says Argondizza. “You never want to plate an omelet and then have to put salt on top.”

4. Once the skillet is hot, add roughly a teaspoon of butter to pan and swirl to coat the entire surface of the pan. Before the butter browns, add egg mixture to the skillet and lower heat halfway between medium and high. (Immediately move on to next step.)

5. Using a heat-resistant silicone spatula, vigorously mix eggs to prevent curds or wrinkles from forming on the skillet. “Otherwise, you’re going to have scrambled eggs,” says Argondizza. Do this for about 30 seconds, occasionally scraping the sides of the skillet to prevent any part from overcooking.

6. Once the bottom of the eggs firm up (the top should still be wet and runny), stop whisking and swirl the skillet to close any surface area of not covered by eggs. Turn off the heat and let the omelet sit for a few seconds to lock the shape.

7. With your spatula, roll one of the top quarters of the omelet onto itself. Follow with the other top quarter. You’re aiming for a convex shape similar to the gibbous moon.

8. Grab the handle of the skillet and tap the bottom edge of the skillet on a hard surface to inch the other side of the omelet above the lip of the pan. Fold that back over the rest of the omelet and simultaneously roll onto a plate. “Technique is really important,” says Argondizza. “There are flat omelets, like a frittata, and then there are rolled omelets. Rolled omelets are tricky, but, just like anything, the more you do it, the better you get.”

9. If you’re unhappy with the shape, use the side of your palms to tuck in the sides of the omelet.

10. To finish, “luster” the omelet by brushing melted butter across the top, which gives it both flavor and shine.

Use Your Instant Pot for Better Pasta Sauce

Get the flavor of a daylong simmer in under an hour. Read the Story

Jack Seemer is the deputy editor at Gear Patrol. Since joining the publication in 2014, he has reported on a wide range of subjects, including menswear, smart home technology, cookware and craft beer.

More by Jack Seemer | Follow on Instagram · Twitter · Contact via Email

For Better Garlic Bread, Add Cheese and Use the Entire Loaf

A little effort goes a long way. In the case of garlic bread, there’s nothing wrong with spreading butter on bread, topping it with minced garlic and broiling it; but a butter-basted loaf sprinkled with cheese and smeared with roasted garlic is simply a better way of doing things.

San Francisco–based bakery Tartine churns out French-style rustic loaves that have garnered a rabid following (and a James Beard Award). Its bread is impossibly good straight-up, but when stuffed with butter, garlic and herbs, it transforms into a crowd-pleasing side dish. From Tartine’s Elisabeth Pruiett comes a new cookbook, Tartine All Day, rife with recipes grounded in technique and easy to iterate on — like Whole-Loaf Cheesy Garlic Bread. As a game-night snack, accompaniment to grilled steaks or roast chicken, it’s a perennial favorite made new. Just be sure to start with the best bread you can find.

Whole-Loaf Cheesy Garlic Bread

Makes 4–8 Servings

Ingredients:
1 oval or round loaf of country-style bread
1–2 cups grated semi-firm or firm cheese (such as raclette, fontina, cheddar or gruyère)
3/4 cup unsalted butter (plus more as needed)
2 full heads plus 4 chopped cloves garlic
2 tablespoons olive oil
1 teaspoon plus 2 pinches sea salt
1/4 teaspoon ground black pepper
2 tablespoons chopped flat-leaf parsely
1 teaspoon chopped fresh thyme
1/4 teaspoon chopped fresh rosemary

Preparation:
1. Preheat the oven to 375°F. Cut the top quarter off of the garlic heads and rub with the oil, making sure some seeps into the top of each. Season with 2 pinches of salt. Wrap in aluminum foil and bake for 30 minutes.

2. Lower the oven to 350°F. Slice the upper crust of the loaf in a crosshatch pattern, cutting down through the upper crust and the middle of the loaf but not cutting all the way through to the bottom crust. Place the roasted garlic heads, cut-side down, in the center of a baking dish and set the loaf on top of them, gently pressing the ends of bread so that it curves in a convex shape to reveal the interior cubes and crevices.

3. Melt the butter in a small saucepan over medium heat. Decrease the heat to low, add the chopped garlic, and swirl the pot to gently cook the garlic without letting it brown, about 1 minute. Add the salt, pepper, parsley, thyme, and rosemary, swirling to mix well.

4. Brush the flavored butter into all the crevices and on top of the bread. If you need more butter, melt a few more tablespoons and keep basting the bread until it’s covered.

5. Sprinkle the cheese over the loaf, making sure some settles between the cuts as well as on top. (The loaf can be made up to this point, then wrapped well and placed in the refrigerator for up to 3 days.)

6. Bake for about 20 minutes, until the cheese has melted and is crisp on top. Serve straight out of the oven, along with the roasted garlic for scooping out and spreading on the bread.

Buy the Book

The recipe above appears in Tartine All Day: Modern Recipes for the Home Cook, by Elisabeth Prueitt, published by Ten Speed Press, an imprint of Penguin Random House. Buy Now: $26

A Vitamin-Rich Soup That’s Delicious, Too

“If a soup could do push-ups, this one would,” writes wellness author Rebecca Katz of the “Power Green Soup” found in her cookbook Clean Soups. Though the original recipe calls for Katz’s proprietary “Immune Broth” — comprised of kale, chard, leek, fennel, garlic and shiitake mushroom — you could just as easily swap it with a store-bought vegetable broth. “The challenge here was making a green soup that tasted delicious,” Katz writes of the recipe. “I think this one passes with flying colors.”

Power Green Soup

Makes Six Servings

Ingredients:
2 tablespoons extra-virgin olive oil, plus more for drizzling
1 yellow onion, chopped
Sea salt
1 large leek, white parts only, rinsed and chopped
1 Yukon gold or Yellow Finn potato, peeled and diced small
2 cloves garlic, minced
1/4 teaspoon red pepper flakes or freshly ground black pepper
6 cups vegetable broth
1 bunch Swiss chard, stemmed and coarsely chopped
1 bunch dinosaur kale, stemmed and coarsely chopped
1/4 cup loosely packed chopped fresh flat-leaf parsley
1 teaspoon lemon zest
1 tablespoon freshly squeezed lemon juice

Preparation:
1. Heat the olive oil in a soup pot over medium heat, then add the onion and 1/4 teaspoon salt and sauté until the onion is golden, about 10 minutes. Add the leek and potato and sauté for three minutes more. Add the garlic and red pepper flakes and stir for another 30 seconds. Pour in 1/2 cup of the broth, stirring to loosen any bits stuck to the pot, and cook until the liquid is reduced by half. Add the chard, kale, and another 1/4 teaspoon salt. Stir well to combine so the greens will wilt. Then add the remaining broth and bring to a boil. Cover, and simmer for five minutes, or until the greens are just tender.

2. In a blender, puree the soup in batches until very smooth, each time adding the cooking liquid first and then the greens. Blend the parsley into the last batch. Pour the soup back into the pot, heat gently over medium-low heat, and stir in the lemon zest and juice. Taste; you may want to add a pinch more salt. Serve garnished with a drizzle of olive oil, or store in an airtight container in the refrigerator for up to 5 days or in the freezer for up to 3 months.

Buy the Book

gear-patrol-clean-soups-sidebargear-patrol-clean-soups-sidebar

This recipe has been adapted for convenience and clarity. The original appears in Clean Soups: Simple, Nourishing Recipes for Health and Vitality, published by Ten Speed Press. Buy Now: $15

A Better Tortilla Soup, Perfect for Cold Days

Bin 707 Foodbar is the culinary center of Colorado’s Western Slope, with a chef from the Front Range and a reputation that lures the urbanites of Denver. Industrial-designer-turned-restaurateur Josh Niernberg, along with his wife Jodi, works with local farmers and winemakers to bring the region an unconventional — in the best possible way — restaurant.

Where the coasts and cities of the US have worn thin phrases like “farm to table” and “seasonal cuisine,” that ink is still fresh on the menu of high desert destinations. Niernberg, working with farmers like Scott and Jessica Washkowiak of Field to Fork — an organic CSA selling orchard fruits and annual fruits and vegetables — is slowly, steadily educating diners and lifting the region’s cuisine. Bin 707 Foodbar, for now, is an anomaly in the region and — if Niernberg’s aspirations pan out — a portent of what’s to come.

On a recent fall Sunday night, after walking rows of autumn vegetables at the Field to Fork farm with Scott Washkowiak, Niernberg flipped on the construction lights at his next two ventures, an adjoining taco shop and event space (for private parties and dinners). He’s forming a small food empire in this oil boom and bust town, in line with the likes of chefs in NYC and L.A. After the construction walk-through, he headed back to his small enclave of culinary acuity to present a range of dishes from the fall menu. One of the highlights — and a fair representation of Colorado’s high desert cuisine — is this green chili pumpkin tortilla soup. Niernberg shared the recipe, and this creamy-with-a-backend-kick soup is easy to prepare and perfect to share or store for future meals.

Green Chili Pumpkin Tortilla Soup

Makes Eight Servings

Ingredients:
5 cups roasted, peeled pumpkin and squash mixture*
Mirepoix (1/2-inch dice): 2 cups onions, 1 cup carrots, 1 cup celery
1 cup green chilies (roasted, peeled, rough chop)
1/2 lb corn chips
1/2 gallon water
1/4 cup (to taste) salt
1/2 cup (to taste) honey
*Niernberg uses a mix of pumpkin, blue hubbard squash and red kuri squash. You can use just pumpkin, if squash is unavailable.

Preparation:
1. Halve and core the pumpkin and squash and place flesh-side down in a roasting pan with 1 inch of water in the pan. Cover with tinfoil and roast in oven at 250°F for 2 hours or until soft. Peel the pumpkin and set aside. Once the mirepoix is cut, place on a sheet pan and mix with about 2 tablespoons cooking oil and roast at 425°F until deeply, evenly browned (but not burnt).

2. Place the pumpkin, corn chips, mirepoix and green chilies in a large stock pot, cover with water and simmer for 2 hours or until reduced by about 15 percent. Stir the soup every 5 minutes, or it will burn. Let cool, then puree the soup in the blender and strain through a chinois. Add remaining water to desired consistency. Once finished, reheat and then season with salt and honey to taste.

3. Garnish with sour cream, roasted pepitas, olive oil, and a fresh herb such as cilantro or parsley.

About the Chef

pumpkin-tortilla-soup-gear-patrol-chefjoshpumpkin-tortilla-soup-gear-patrol-chefjosh

Chef Josh Niernberg has a background in industrial design, but gained experience working in kitchens and launching new restaurants in Denver. When he and his wife relocated to Grand Junction, they started their own restaurant, which eventually evolved in Bin 707 Foodbar, the best restaurant on Colorado’s Western Slope. Learn More: Here

How to Refurbish a Vintage Cast-Iron Skillet

Among collectors, conversations about cast iron have a way of getting sentimental, and often land in the same place: the quality of craftsmanship. “Cast-iron pans used to be made by hand,” said Mary Theisen, an enthusiast-turned-businesswoman who travels the country in search of rare and collectible cookware. In 2012, Thiesen founded a site called The Pan Handler, which sells her refurbished cast-iron discoveries for upwards of $1,000 or more. (Trophy pieces of cookware can go for more than $20,000.) “Vintage pans are going to be lighter,” Theisen added. “They have thinner walls. The cooking surfaces on most modern-day pans aren’t as finely polished.”

The value of an antique cast-iron skillet largely depends on the manufacturer. Due to rarity, names like Griswold, Wagner and Favorite (all defunct) fetch higher prices on the secondhand market. That said, even unbranded cast-iron cookware can be desirable for utility alone. Many brands of the early 20th century followed the same manufacturing process.

The first step in restoring an old pan involves evaluating the integrity of the pan and asking yourself: “Is it worth saving?” For some, like Theisen, the answer goes beyond the pan’s collectibility, or even serviceability; nostalgia also plays a part. “I’m taking pans that are sometimes over 100 years old and giving them new life,” she said. “Sometimes I feel like I’m helping preserve a part of American history.”

gear-patrol-refurbish-vintage-skillet-ambiance

gear-patrol-refurbish-vintage-skillet-ambiance

Evaluate the pan’s condition. There are five common problems with vintage cast-iron cookware: crud, rust, cracks, pits and warpage. If you’re on the hunt for serviceable pan, and care little about its collectibility, some issues are less pronounced. Hairline cracks, for example, still hold liquid and do not necessarily render a pan unusable. But long neglected pans can reach a point of no return, so tread with caution if purchasing one without knowledge of its origin.

“You’re taking a big gamble when you buy something with a lot of crud and rust because you don’t know what’s going to be under there,” Theisen said. “The iron may be heavily pitted. There may be cracks.” Another common issue, of course, is warpage on the bottom of the pan, which occurs when spots of iron expand under extreme heat. “A little warpage is not a big deal,” Theisen added. “But a pan that rocks or even spins just isn’t going to sit as well on your cooktop.”

Worth Restoring? Remove the crud. “My first step in cleaning is always a lye bath,” Theisen said. “But if you only have one pan, and just want to get it clean, I’d recommend Easy-Off.” Wearing gloves, spray the pan with Easy-Off Oven Cleaner, following directions on the can. Enclose it in a jumbo plastic bag and let it sit for two days. Rinse the pan and test the leftover crud with dish soap and a stainless-steel scouring pad. “Crud can be very tough to get off,” Theisen said. “Somebody could have used a pan for 30 years without ever cleaning it.” Ultimately, you should be able to scrub the crud off without a huge amount of physical exertion. If not, repeat this step.

Address the rust. Assuming the rust is not “really, really bad,” place the pan in a bucket and cover with a solution of equal parts water and white vinegar. “It’s important to check it every 30 minutes,” Theisen said. “If it’s in there too long, the acidity of the vinegar will start eating away at the iron.” Use a fresh stainless steel scouring pad to scrub away the remaining rust. The pan will be bare, and dark gray instead of black.

Season the pan. Preheat your oven to 450 degrees Fahrenheit. Turn the oven off and place the dry pan in the oven for one hour. Take it out and rest until cool enough to handle with an oven mitt. Use a rag or paper towel to spread Crisco shortening around the surface of the pan, handle and all. Wipe clean, making sure to remove all the liquid. “You don’t want it to look wet,” Theisen said. “You might not think there’s oil on the surface but there is. If you have too much oil it’s going to smoke to holy hell.” Heat your oven to 500 degrees and bake the skillet, upside down, for another hour. “This polymerizes the oil and bonds it to the cast-iron surface,” Theisen added. “It gives you a hard, non-stick layer to cook on.”

Additional Illustrations by Silvana Volio

For Better Scrambled Eggs, Add Cognac and Caviar

Scrambled eggs are what you make of them. Relying on high heat for the sake of hasty cooking produces a dry, browned dish; using the steam wand of an espresso machine yields delicate, airy eggs. Some splash in some milk, others white wine or champagne. But it’s technique and late additions that most greatly impact a plate of eggs — a fact few know better than Nick Korbee, chef of all-day Manhattan eatery Egg Shop, whose menu celebrates the myriad possible preparations of the egg. As outlined in his new collection of recipes, Egg Shop: The Cookbook, Korbee adheres to two rules when cooking eggs: “Let the garnish suit the egg-cooking technique and add the garnish at the end, not during the cooking process.”

Case in point: Eggs Caviar. A scramble flavored with Cognac, finished with sour cream, topped with roe and served with buttered toast. Rich and creamy, it’s grounded in the soft scramble technique, yet elevated by complementary textures and flavors. “Caviar is like next-level sea salt,” Korbee explains. “When used as a garnish for soft scrambled eggs, caviar provides a deep umami component to balance the unctuous nature of all that yolky goodness.” And that reveals just how good eggs can really be.

Which Caviar Pairs Best With Eggs?
“My favorite kind of caviar for this recipe is the highest quality I can best afford,” says Korbee. “This usually means the beluga and sevruga world is off limits. In this case I prefer American paddlefish, golden trout or salmon roe. If I’m really pinching pennies or showing off, I like wasabi tobiko (flying fish roe) from the local sushi spot.

Eggs Caviar

Makes 1 Serving

Ingredients:
2 eggs
1 teaspoon Cognac (like Pierre Ferrand 1840)
1 teaspoon unsalted butter
2 tablespoons sour cream or labneh
2 grams of your favorite caviar or roe
1 slice sourdough or pumpernickel rye bread, toasted and buttered

Preparation:
1. Gently whip the eggs with a fork.

2. Heat a saucepan over medium heat, then add the Cognac and butter (they should sizzle/simmer immediately). Add the eggs and whisk constantly — working on and off the heat in order to develop the curds little by little and prevent the eggs from sticking or otherwise overcooking at the base of the pan — until the eggs begin to resemble [soft scrambled eggs]. Add 1 tablespoon of the sour cream and stir to incorporate, letting the eggs sputter and pop a few times on the heat. Barely fold in the remaining sour cream (some streaks should still be visible).

3. Top the buttered toast with plenty of soft scrambled eggs and a heaping spoon of the caviar. Or pour eggs in a bowl and top the whole thing with the caviar, use the toast as a spoon, and knock yourself out.

Buy the Book

The recipe above appears in Egg Shop: The Cookbook, by Nick Korbee, published by William Morrow Cookbooks. Buy Now: $17

Meet the King of Hearty Winter Stews

Some foods nourish. Apples, turkey burgers, Sweetgreen salads with light to medium dressing — many of us have agreed to call these things healthy. They feed our bodies and our minds. They sustain us.

Then you have your fried chickens of the world. Your queso dips and your corndogs. Say what you will about their ratio of nutrients to calories — comfort food is good, and not just because of the way it tastes. In moderation, it feeds that crucial part of the self we call the soul.

Reigning over this category of caloric flavor bombs is cassoulet, a hearty 14th-century invention Sam Sifton describes as a “culinary jigsaw puzzle” for its lengthy list of ingredients and cook time. Those already familiar with the hearty stew know: Comprised primarily of heavy meats (ham, bacon, duck confit) and white beans, it takes hours to cook — but days to cook well.

“Finding enough time to prepare it will always be your biggest challenge,” writes acclaimed Brooklyn chef Andrew Tarlow (Diner, Marlow & Sons) in his new cookbook, Dinner at the Long Table. “Keep in mind that cassoulet is a very rich dish, so smaller portions per person will do.”

Like many things that are difficult but also delicious, the justification for cassoulet verges on the romantic, and shouldn’t occur daily. But sometimes it’s okay to crave meals that satisfy, rather than just sustain. Especially when it’s cold out.

Cassoulet

Ingredients:
1 1/2 pounds boneless pork shoulder
Kosher salt and freshly ground pepper
2 pounds dried Tarbais beans or cannellini beans
1 bunch sage
1 head garlic, halved lengthwise, unpeeled, plus 4 peeled cloves
1/3 cup duck fat
1 pound thick-cut bacon
1 (1 1/2-pound) ham hock
4 confit duck legs (recipe here)
2 medium onions, chopped
3 small carrots, diced
2 ribs celery, diced
1 tablespoon tomato paste
2 quarts unsalted chicken stock
2 sprigs parsley
1 small bunch thyme
2 bay leaves
1 (6-inch) square uncured pork skin
1 stale baguette
Olive oil
1 small bunch parsley, leaves chopped
3 leaves fresh sage, minced
3 sprigs oregano, leaves chopped

Preparation:
1. Two days before you plan to serve the cassoulet, season the pork shoulder with salt and pepper and soak the beans overnight in plenty of water. The next day, drain, rinse and place the beans in a large or medium pot with plenty of cold water, the sage, and the halved garlic. Bring to a bare simmer and cook for one hour. Cut the heat, add a handful of salt, and let the beans sit on the stove top while you proceed with the recipe.

2. Melt the duck fat in a pan over low heat and slowly brown the bacon on both sides until crisp. Transfer the bacon to a platter. Brown the ham hock on all sides in the duck fat and transfer to the platter with the bacon. Do the same with your pork shoulder. Slowly warm the confit duck legs in the fat and transfer to the platter. Let the legs cool slightly, then pick the meat and discard the skin and bones. Cut the pork shoulder into large cubes, with a good amount of fat left intact.

3. In an earthenware or heavy-bottomed pot, add the onions, carrots, celery and duck fat from your pan, season with salt and pepper, and sauté until soft and golden. Add the tomato paste, mashing it with a spoon. Add the chicken stock and bring to a simmer. With kitchen twine, tie the parsley, thyme, and bay leaves together and submerge the herbs in the stock. Roll and tie the pork skin with twine and add to the stock. Add the beans and simmer for an hour, then cut the heat. Submerge the ham hock, pulled duck meat, pork shoulder and bacon into the pot of beans. Cover and refrigerate overnight.

4. The day you’ll serve the cassoulet, preheat the oven to 325°F. Remove the herbs and pork skin from the pot and discard. Retrieve the garlic head from the pot and squeeze the softened cloves out of their papery skins and stir into the cassoulet. On a cutting board, mash the 4 peeled garlic cloves to a paste with a pinch of salt — the slow-cooked garlic will be nice and sweet, while the fresh garlic provides punch — and stir the garlic paste into the cassoulet. Bring the cassoulet to a simmer, then slide it into the oven and bake for an hour.

5. Meanwhile, trim the crust from the baguette. Cut into cubes, spread out on a baking sheet, and bake until dry to the touch. Pulse the dried bread in a food processor until large crumbs form. Toss with olive oil and season with salt and pepper. Return to the baking sheet and bake until crisp and golden, about 10 minutes. Toss the bread crumbs with the parsley, sage and oregano. Sprinkle the bread crumbs over the top of the cassoulet and bake for 30 minutes more. Remove from the oven and let the cassoulet sit on the counter for 10 minutes while you test your resolve.

Buy the Book
cassoulet-gear-patrol-sidebarcassoulet-gear-patrol-sidebar
The recipe above appears in Dinner at the Long Table, by Andrew Tarlow and Anna Dunn, published by Ten Speed Press. Buy Now: $22

Win Weeknight Dinners with These 3 Simple Pasta Dishes

Sunday Gravy is the stuff of legend. Simmered gently for hours, until tomato and garlic and onion and herbs and meat have melded together, it’s among the most iconic of Italian cooking traditions. But most nights don’t allow for a six-hour sauce, let alone one hour. If Sunday Gravy is on one end of the spectrum, weeknight pasta is on the other. Like buttered toast and fried eggs eaten over the sink at 9:30 p.m., it can seem like a last resort. With a little bit of know-how, though, it’s anything but.

The three recipes below are less hard-and-fast rules and more outlines that welcome improvisation, relying entirely on pantry staples — those items that you use often, or maybe rarely, but which have a long shelf life. Simmering complementary ingredients just long enough for the flavors to mingle (and for the pasta to cook) turns weeknight pasta into something worth celebrating, rivaling Sunday Gravy in spirit (if not in satisfaction).

Easy, Indulgent, Weeknight Pasta for a Near-Empty Fridge

Composed of little more than an emulsion of butter and Parmesan cheese and tossed with al dente pasta, Back Pocket Pasta‘s Fusilli Alfredo is the ultimate in empty-fridge cooking.

How to Doctor Up That Old Can of Tomatoes

A briny, delicious pasta dish that derives its flavor entirely from pantry staples you might already have: canned tomatoes, anchovies, capers and olives. Even better, it takes just a few minutes to prepare.

Italy’s Version of Macaroni and Cheese Is Better, Faster and Easier

As it turns out, this mac and cheese alternative is about as simple to make as the stuff that comes in a box.

This Pasta’s Secret Ingredient: Leftover Beer Malt

Made with spent barley malts, Sfoglini’s BxB Radiators let you eat your beer (kind of). Read the Story

Your New Weekend Recipe: Silver Dollar Pancakes

There’s a novelty in bite-sized foods — an indulgence in eating eight of something rather than three. Silver dollar pancakes and a short stack may share the same recipe, but a smaller diameter makes the former more enjoyable. Topped with syrup and served with sausage, smaller pancakes kick mornings into high gear (and hangovers out the door).

From James Beard Award–winning chef John Currence comes a recipe for pancake batter rich with buttermilk and a generous dose of vanilla — best served silver dollar–style. One of more than 100 recipes outlined in Big Bad Breakfast, this take on silver dollar pancakes is the type of comfort food that renowned restaurateur David Chang calls, in the book’s foreward, “[not] just hard-hitting breakfast deliciousness, but the byproduct of years of hard work and real learning … accumulated working in kitchens all over the South, from North Carolina to New Orleans,” and for which Currence has come to be known.

Silver Dollar Pancakes

Makes about 30 silver dollar-sized pancakes or 8 giant-sized ones

Ingredients:
2 1/2 cups all-purpose flour
6 tablespoons sugar
2 tablespoons baking powder
1 teaspoon baking soda
3/4 teaspoon salt
1 1/2 cups buttermilk
3/4 cup whole milk
3 eggs
2 1/4 teaspoons pure vanilla extract
6 tablespoons unsalted butter, melted
Clarified butter (or your preferred cooking fat)
Unsalted butter, cane syrup, fresh fruit, peanut butter or sausage, for topping (optional)

Preparation:
1. In a bowl, whisk together the flour, sugar, baking powder, baking soda, and salt. In a separate bowl, whisk together the buttermilk, milk, eggs, and vanilla. Pour the buttermilk mixture into the flour mixture and whisk together until the batter is smooth. Pour in the melted butter and stir with a spatula until fully incorporated.

2. Warm 1 1/2 tablespoons of the clarified butter in a sauté pan over medium heat for 30 seconds. To make silver dollar pancakes, spoon heaping tablespoonfuls of batter into the pan. To make regular pancakes, spoon the batter into the pan a scant 1/2 cup at a time. Cook until the tops begin to bubble lightly, about 1 1/2 minutes. Flip over and cook until the other side begins to brown lightly and the pancakes look good and fluffy, about 30 seconds more. Repeat with the remaining batter, adding more clarified butter between batches as needed. Consume immediately with butter and cane syrup and strawberries, and bananas, and peanut butter, and sausage.

Buy the Book

The recipe above comes from Big Bad Breakfast, published by Ten Speed Press. Buy Now: $20

How to Make the Only Steak Sauce You’ll Ever Need

There’s something profound, maybe even a little magical, about a good steak sauce. And few places are as celebrated for its steak, and its sauce, as Argentina, the land of gauchos, open-fire grills and chimichurri — that bright, garlicky, perfectly tangy green condiment typically served with thick, marbled cuts of meat. “The first time I had steak with chimichurri in Argentina, its country of origin, I was struck by how similar [it] is to the mint and coriander chutneys that I grew up eating in India,” writes celebrity chef Floyd Cardoz in Flavorwalla ($20), his eclectically diverse cookbook from Artisan Books. “All of these are perfect to serve with grilled meat, because their bold flavor and moisture can even rescue dry meat.”

Though traditional chimichurri calls for three basic ingredients — olive oil, parsley and oregano — Cardoz here substitutes oregano with thyme and mint for a distinctive herbaceousness that’s suitable to marinate and season just about every family of beef, poultry and pork you plan to cook this summer. If you plan to make a batch in advance, just remember: “Chimichurri really is best if made the same day it’s to be served,” writes Cardoz. “However, if you want to prepare it a day ahead, leave out the vinegar (it will discolor the herbs if stored for more than a few hours). Then stir in the vinegar 30 to 60 minutes before serving and let stand at room temperature.”

steak-sauce-gear-patrol-650

Ingredients:
1 teaspoon black peppercorns
1 teaspoon coriander seeds
1/2 cup extra-virgin olive oil
1/4 cup red wine vinegar
1 teaspoon honey
3 tablespoons minced peeled fresh ginger
1 tablespoon minced shallot
1 large garlic clove, minced
1/2 teaspoon minced serrano chile
Leaves from 2 parsley sprigs, stacked a few at a time and thinly sliced
Leaves from 2 thyme sprigs, chopped
Leaves from 2 mint sprigs, stacked a few at a time and thinly sliced
Leaves from 1 tarragon sprig, stacked a few at a time and thinly sliced
Kosher salt

Preparation:
1. In a small, dry skillet toast the peppercorns over medium-low heat, shaking the pan frequently, until fragrant and several shades darker, about 3 minutes. Transfer to a bowl to cool. Repeat to toast the coriander seeds.

2. Finely grind the peppercorns and coriander seeds together in a spice/coffee grinder.

3. In a small bowl, whisk together the olive oil, vinegar, honey, ginger, shallot, garlic, chile, parsley, thyme, mint, tarragon, the spice mix, and salt to taste. Let stand at room temperature for an hour. Taste and adjust the salt if necessary before serving.

Excerpted from Floyd Cardoz: Flavorwalla by Floyd Cardoz (Artisan Books). Copyright 2016. Photographs by Lauren Volo.
Pellet Grilling Isn’t a Fad, It’s the Future — Here’s Why

Invented in the 1980s, the wood pellet grill was once dubbed the grill of the future. It’s finally earned that title. Read this story

Want to Make Better Pasta Sauce? Use Your Instant Pot

Making authentic bolognese is a daylong affair — a cooking commitment whose extended simmering mellows the acidity of tomatoes and melds flavors. Cooking bolognese with an Instant Pot, though, is like cooking at warp speed. Since it was introduced in 2009, the multi-cooker has risen to cult status, most loved for its pressure-cooking abilities. It’s a perennial bestseller on Amazon and the subject of dozens of blogs, Facebook groups and cookbooks, like The Essential Instant Pot Cookbook. The book offers nearly 100 recipes for new users, as well as those more comfortable with the multi-cooker’s nuances, with tips and tricks to take pressure cooking to the next level.

In the case of bolognese sauce, sautéing before pressurizing kickstarts the Maillard reaction. It’s an extra step that boosts flavor and texture to yield a sauce that tastes like it’s spent a full day simmering — without actually adding any time. And in that regard, it perfectly reflects why the Instant Pot has become an object of kitchen worship.

Fettuccine with Bolognese Sauce

Serves 8

Ingredients:
2 tablespoons olive oil
1 yellow onion, finely diced
2 cloves garlic, minced
2 celery stalks, finely diced
1 carrot, peeled and grated
1 1/2 teaspoons kosher salt
1 pound lean ground beef
1 pound lean ground pork
1 (28-ounce) can whole San Marzano tomatoes, liquid retained
1/2 cup dry red wine
1/4 cup tomato paste
2 bay leaves
1/2 teaspoon freshly ground black pepper
2 pounds fettuccine, or pasta shape of your choice (cooked)
Parmesan cheese (for serving)

Preparation:
1. Select the “Sauté” setting on the Instant Pot and heat the oil. Add the onion, garlic, celery, carrot and salt and sauté for about 5 minutes, until the onion has softened and is translucent. Add the beef and pork and sauté, breaking them up with a wooden spoon or spatula until cooked through and no traces of pink remain, about 10 minutes.

2. Add the tomatoes and their liquid, crushing the tomatoes with your hands as you add them to the pot. Stir in the wine, tomato paste, bay leaves and pepper.

3. Secure the lid and set the Pressure Release to “Sealing.” Press the “Cancel” button to reset the cooking program, then select the “Meat/Stew” setting and set the cooking time for 35 minutes at high pressure.

4. When the timer goes off, you have two choices: You can perform a quick release by moving the Pressure Release to “Venting” and serve the sauce right away, or you can let the pressure release naturally and leave the sauce in the Instant Pot on the “Keep Warm” setting for up to 10 hours.

5. Open the pot and adjust the seasoning with salt and pepper if needed. Spoon the sauce over pasta, sprinkle with Parmesan and serve.

Buy the Book

The recipe above appears in The Essential Instant Pot Cookbook: Fresh and Foolproof Recipes for Your Electric Pressure Cooker, by Coco Morante, published by Ten Speed Press, an imprint of Penguin Random House. Buy Now: $13

Note: Stories published on Gear Patrol may contain links to buy products sold in our curated store as well as by third party retail destinations. Items purchased through the GP store help directly support editorial initiatives. In some cases, we may also receive a small commission for the online customers we refer to external retailers. Learn more about our editorial policies related to commerce and affiliate sales here.

Want a Better Breakfast? Cure Your Own Bacon

The preparation of bacon is a ritualistic, sensory experience. The sizzle as each slice hits the pan. That sweet, greasy scent, lingering for hours. But to cure one’s own bacon from scratch is to wield total control over the weekend breakfast rite. And when duck is used in lieu of pork, what results is a smoky, salty, sweet and craving-worthy dish that’s crispy and indulgent — comforting in its familiarity, yet wholly unexpected.

From New York City restaurant Jack’s Wife Freda, an icon of downtown cool with an indulgent, somehow still health-conscious menu, comes a recipe for house-cured duck bacon. Transforming a fatty cut into a flavor-infused mass is less daunting than it would seem, requiring little more than an overnight cure and an hourlong smoke. While duck bacon is leaner than pork (ergo, a little bit healthier), it doesn’t strive to imitate; it’s singular in flavor, with a meatier texture and toothier bite that will make you wonder why duck isn’t the norm.

Duck Bacon

Makes 4 Servings

Ingredients:
1/4 cup kosher salt
1 teaspoon pink pickling salt
1/4 cup light brown sugar
4 thyme springs
1 bay leaf
1/2 teaspoon whole black peppercorns
2 duck breasts
2 ounces applewood chips, for smoking

Preparation:
1. In a small bowl, combine the salts, sugar, herbs and spices; mix thoroughly.

2. Massage the salt mixture into the breasts, making sure to cover them completely. Put the breasts in a zip-top bag, seal, and refrigerate for 12 hours, turning the bag every few hours. As the breasts sit in the cure they will begin to firm slightly. After 12 hours, rinse the breasts and dry well.

3. Smoke the breasts using your smoker’s specifications for one hour. Once finished, remove and chill.

4. Slice the duck breasts lengthwise into thin strips. Cook the duck bacon similarly to how you’d cook the pork version, which tastes best browned on each side for a few minutes over medium to high heat in a cast-iron pan.

Buy the Book

This recipe appears in Jack’s Wife Freda, by Dean and Maya Jankelowitz and Julia Jaksic, published by Blue Rider Press. Buy Now: $16

5 Hot Sauces with Cultish Followings

“I think hot sauce is akin to drug use,” says Noah Chaimberg, founder of Heatonist, a Brooklyn-based purveyor of small-batch hot sauces from around the world. “You get the rush of endorphins and adrenaline, your blood’s pumping faster, your metabolism goes up. It’s a thrill, and that’s why people get hooked on it.”

Few condiments inspire as much fanaticism as hot sauce. Sure, you get your fair share of utilitarians drenching fish tacos in anything with a Scoville unit. But hot sauce is more than just dressing. Today’s brands each have their own gaggle of acolytes hawking judgment on the lessers — it’s part of hot sauce’s unique appeal. So, fork at the ready, we asked Chaimberg to collect five lesser-known hot sauce bottles with an established or emerging evangelism. Spread the gospel. Cum calor et sapor. Amen.

Secret Aardvark Habanero Hot Sauce


Secret Aardvark is Portland’s so-called “table sauce,” since it’s replaced ketchup in many diners and restaurants of the city. The flavor is a medium-heat blend of habenero and vinegar notes. “We were the first ones to bring Aardvark [to the East Coast],” Chaimberg says. “There’re some sauces you can put it on anything. Aardvark is great for that.”

Inner Beauty Hot Sauce


Inner Beauty was first made famous at the East Coast Grill in Cambridge, Massachusetts, which closed down in 2016. “One of the long-time fans bought the recipe and started making it again,” Chaimberg says. “It’s a real taste of the islands.” The sauce has mustard, curry and tropical fruit. It pairs well with jerk and grilled meats.

Queen Majesty


Queen Majesty was founded in Brooklyn by Erica Diehl, a local DJ. “She makes Jamaican music, so her sauces are Jamaican inspired,” Chaimberg says. There are four in total, each crafted with local ingredients, but Charcoal Ghost, a Heatonist exclusive, features habanero, ghost pepper and activated charcoal.

Hot Ones The Classic


The eponymous sauce popularized by the YouTube show Hot Ones. “People have fallen in love with it,” Chaimberg says of the sauce. It’s slightly smoky, with pineapple, lime and ghost pepper. It’s sweet, with a citrusy tang. [Editor’s Note: Hot Ones rebranded its flagship hot sauce, pictured above, with revised packaging and a new name: The Classic.]

Dirty Dick’s Hot Sauce


Dirty Dick’s Hot Sauce, a blend of habanero and tropical fruits, won the overall best sauce award at the New York Hot Sauce Expo in 2017. “People come in and buy three bottles at a time,” Chaimberg says. “Personally, I’ll use it if I’m grilling chicken or salmon because all that fruit sugar will caramelize on the high heat of the grill.”

Make These Baked Beans from Scratch and You’ll Never Look Back

Canned beans work in a pinch. They’re inexpensive and rich in protein. But the better option, if time allows, is to make beans from scratch — and with a slow cooker, there’s no need to monitor the stovetop, and little risk of over-cooking. From renowned Southern chef and slow cooker evangelist Hugh Acheson comes a recipe for Boston-style “baked” beans.

Published in his new cookbook, The Chef and the Slow Cooker, humble white beans are transformed into a sweet-savory side dish by the addition of rich molasses, thick-cut bacon, herbal thyme and tangy orange zest. It’s a dish that pairs well with quintessential winter meals (think braised meats) and can stand on its own when served with crusty bread.

Boston “Baked” Beans

8 to 12 as a side

Ingredients:
1 pound dried white beans, such as navy beans
1 1/2 quarts chicken broth
1 tablespoon olive oil
1/2 pound thick-cut bacon, cut into small dice
1 medium yellow onion, minced (to yield about 1 cup)
2 garlic cloves, minced
1 teaspoon dry mustard
1 cup blackstrap molasses
1 teaspoon minced orange zest
1 teaspoon chopped fresh thyme leaves
Kosher salt

Preparation:
1. Place the beans in a large bowl and add cold water to cover by 3 inches. Cover the bowl and soak the beans in the refrigerator for 8 hours or overnight.

2. Drain the beans and place them in a slow cooker (minimum 4-quart capacity). Add 4 cups of broth, cover with the lid, and turn the cooker to the low setting.

3. Meanwhile, in a large skillet set over medium heat, warm the oil. When it begins to shimmer, add the bacon and cook for 3 minutes. Then add the onion and cook for 2 minutes. Add the garlic, dry mustard, molasses, orange zest, thyme and remaining 2 cups broth. Cook for 10 minutes. Add the bacon mixture to the beans, cover with the lid, and cook on the low setting for 6 to 8 hours, until the beans are cooked to your liking. Season with salt to taste.

Note: Stories published on Gear Patrol may contain links to buy products sold in our curated store as well as by third party retail destinations. Items purchased through the GP store help directly support editorial initiatives. In some cases, we may also receive a small commission for the online customers we refer to external retailers. Learn more about our editorial policies related to commerce and affiliate sales here.

How to Read a Bag of Coffee Beans

When staring down a wall of jargon-strewn bags filled with small-batch coffee, it’s difficult to know where to start. There’s no harm in grabbing whatever seems most interesting, but isolating certain details — such as roast date and country of origin — can give you a better sense of what you’re buying, and the kind of coffee you’ll ultimately brew from it. Thomas Costello of Counter Culture Coffee, a North Carolina–based roastery that heralded coffee’s third wave in 1995, outlined three pieces of information to look for on a bag of coffee beans that are most often reflective of quality.

1Keep it fresh. “Look for something that’s [been roasted] at least within the month, if not within the week,” Costello said. Coffee takes 48–72 hours to de-gas, or settle, after roasting. Consume coffee too close to the roast date, and you’ll end up with an uneven extraction; wait more than a few weeks, and the beans will have released too much carbon dioxide, setting them past peak freshness.

Packaging contributes to freshness, as well. Counter Culture’s beans are packaged in non-porous Biotré bags with a one-way valve, preventing air from passing through but allowing carbon dioxide to escape during de-gassing. Look for a resealable container, whether a zip closure, twist-tie or tin.

2Look to the source. “Just like when you’re looking for a bottle of wine. You’re going to look for tasting notes, especially if you have an idea of whether you like fruity coffees or really chocolate-y coffees, sweet coffees or something with a little more acid to it. Usually, [tasting notes are] something that an expert coffee taster has analyzed and tested and decided that that’s how the coffee [in the bag] is best described,” Costello said.

More often than not, flavor and country of origin go hand in hand. As a general rule, Kenyan coffees skew savory, Colombian coffees have chocolate-like notes, and Ethiopian coffees tend to be fruity. Sampling single-origin coffees is the best way to understand and appreciate regional differences among beans.

3Check that “fair trade” is really fair. “Everybody has a direct-trade story. Very often, it’s written on the bag, but it’s good to not take that at face value,” Costello said. “There’s a lot of greenwashing, like claiming some amount of sustainable purchasing practices without following it up. It’s like saying ‘free-range eggs’ — that can mean a lot of different things.” He recommends taking to the roaster’s website, searching for evidence that the company is supporting its producers — that there’s an effort being made to pay farmers more money for their crops or to improve farming practices in one way or another.

Now Learn How to Make a Better Pour-Over

Pour-over coffee is praised by coffee experts as the preferred method for brewing. Here’s how to nail it at home. Read the Story